

Crispy Fennel Breaded Pork Tenderloin: Your New Go-To Easy Dinner
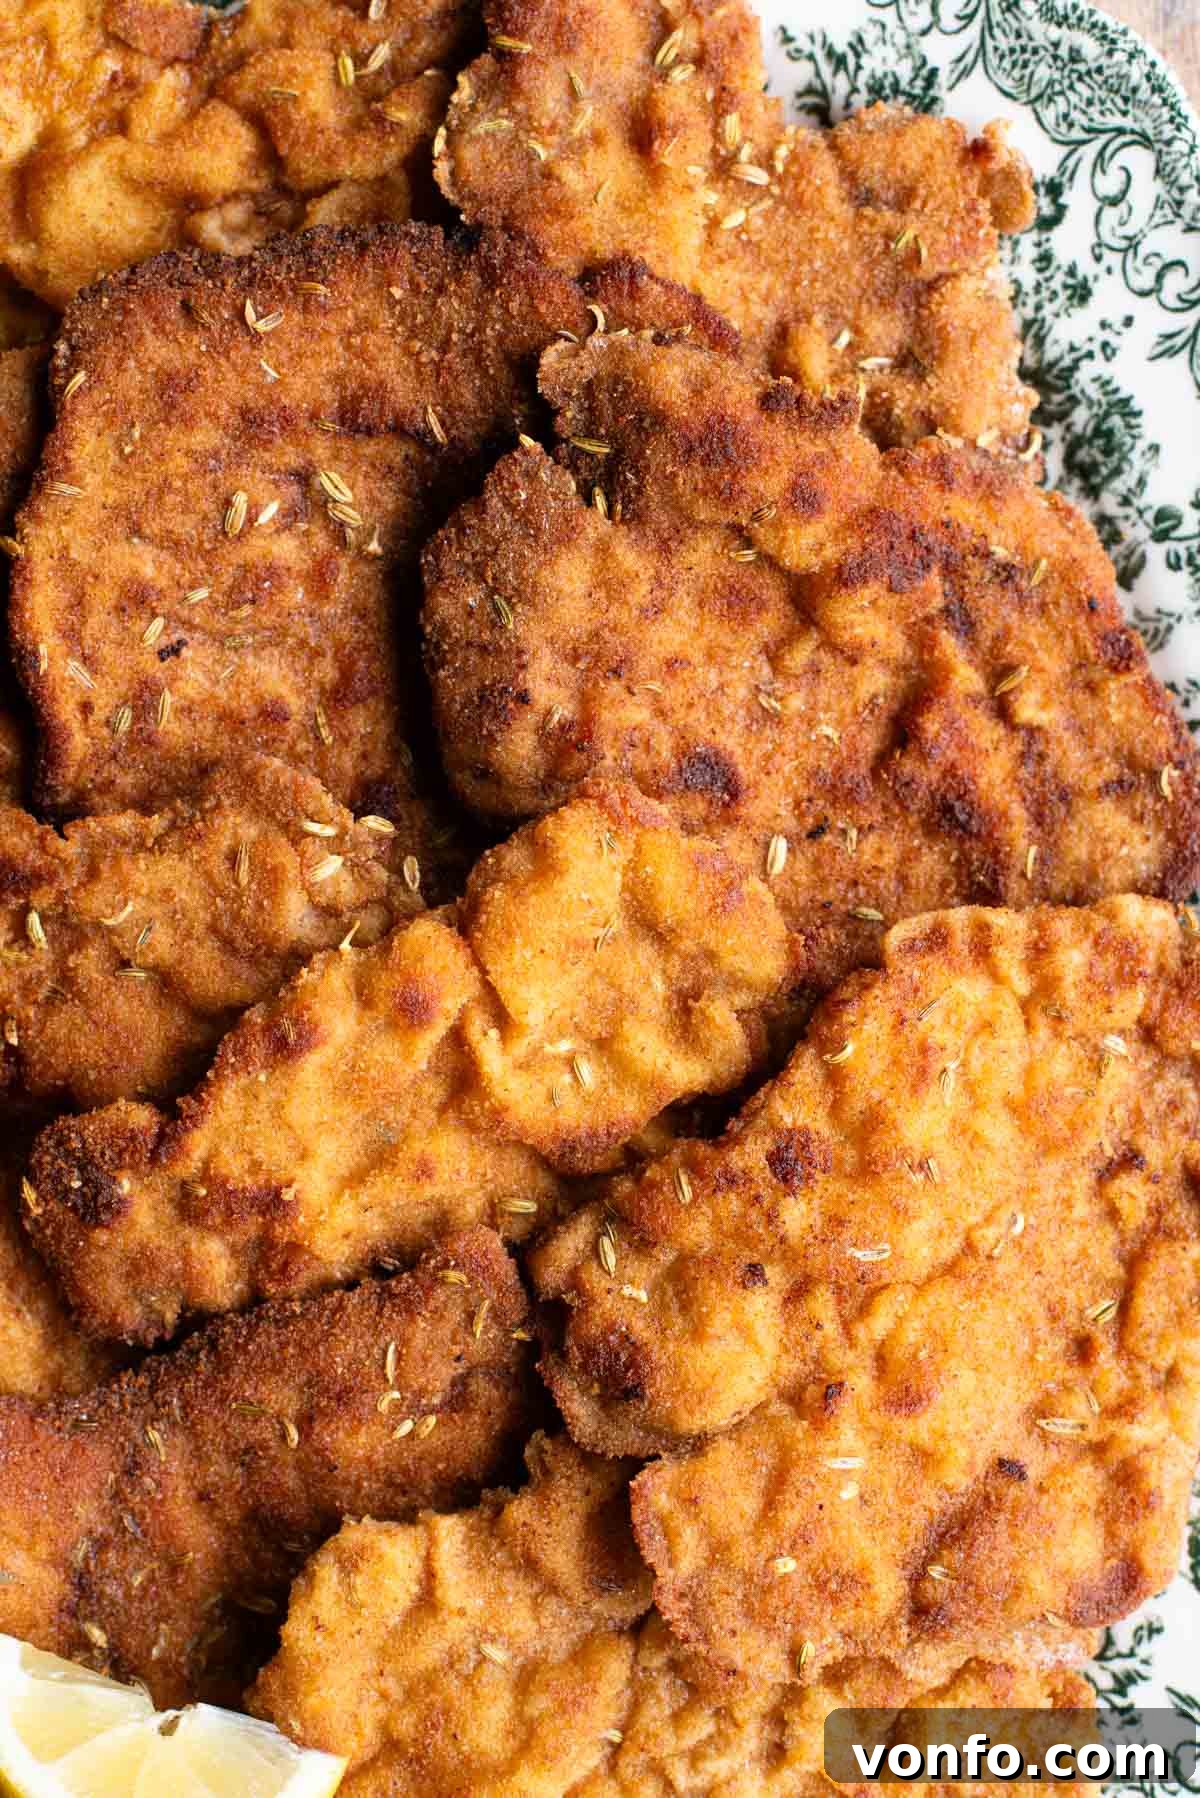
Prepare to fall in love with this incredibly simple yet extraordinarily flavorful crispy fennel breaded pork tenderloin recipe. Tender slices of lean pork are expertly coated in a delightful mixture of fine breadcrumbs and aromatic fennel seeds, then pan-fried to a golden crisp. A final drizzle of fresh lemon juice elevates every bite, making this dish a true culinary delight. It’s the perfect main course to serve alongside grilled vegetables, a vibrant salad, or your favorite comfort-food sides for a balanced and satisfying meal.

Why You’ll Love This Fennel Breaded Pork Tenderloin Recipe
This breaded pork tenderloin has quickly become a cherished staple in our household, and we’re confident it will become one in yours too. Its appeal lies in its effortless preparation combined with an explosion of rich flavors. It’s precisely the kind of fuss-free, yet incredibly delicious, dinner you crave for a relaxed weekend, ideally paired with an array of delectable side dishes and a glass of your preferred beverage. The secret to its success lies in a few simple techniques and the wonderful flavor contribution of fennel seeds.
The journey to this succulent dish begins with slicing the pork tenderloin, then carefully pounding each piece thin. This crucial step not only ensures even and rapid cooking but also creates a larger surface area for our star ingredient: the crispy breadcrumb coating, generously infused with fragrant fennel seeds. These little seeds truly transform the dish, adding an anise-like warmth and depth that’s both unexpected and utterly irresistible.
The Art of Pan-Frying for Perfect Tenderness
Once breaded, the pork cutlets are pan-fried in butter for just a few minutes on each side. The result? A delightfully crisp exterior that gives way to an exquisitely tender and juicy interior. One of the many advantages of using pork tenderloin, especially when it’s been pounded thin, is its remarkably fast cooking time. This means you only need a couple of minutes per side to achieve perfection, ensuring the meat remains beautifully soft and never dry. The quick cooking also makes this an ideal recipe for busy weeknights when you want a gourmet meal without the lengthy cooking process.
For an unforgettable dining experience, we adore serving this crispy pork with a refreshing arugula salad, creamy cannellini beans, and a medley of grilled vegetables. The combination of textures and flavors is simply divine, creating a well-rounded and satisfying meal that feels both comforting and sophisticated.
Key Ingredients for Flavorful Perfection
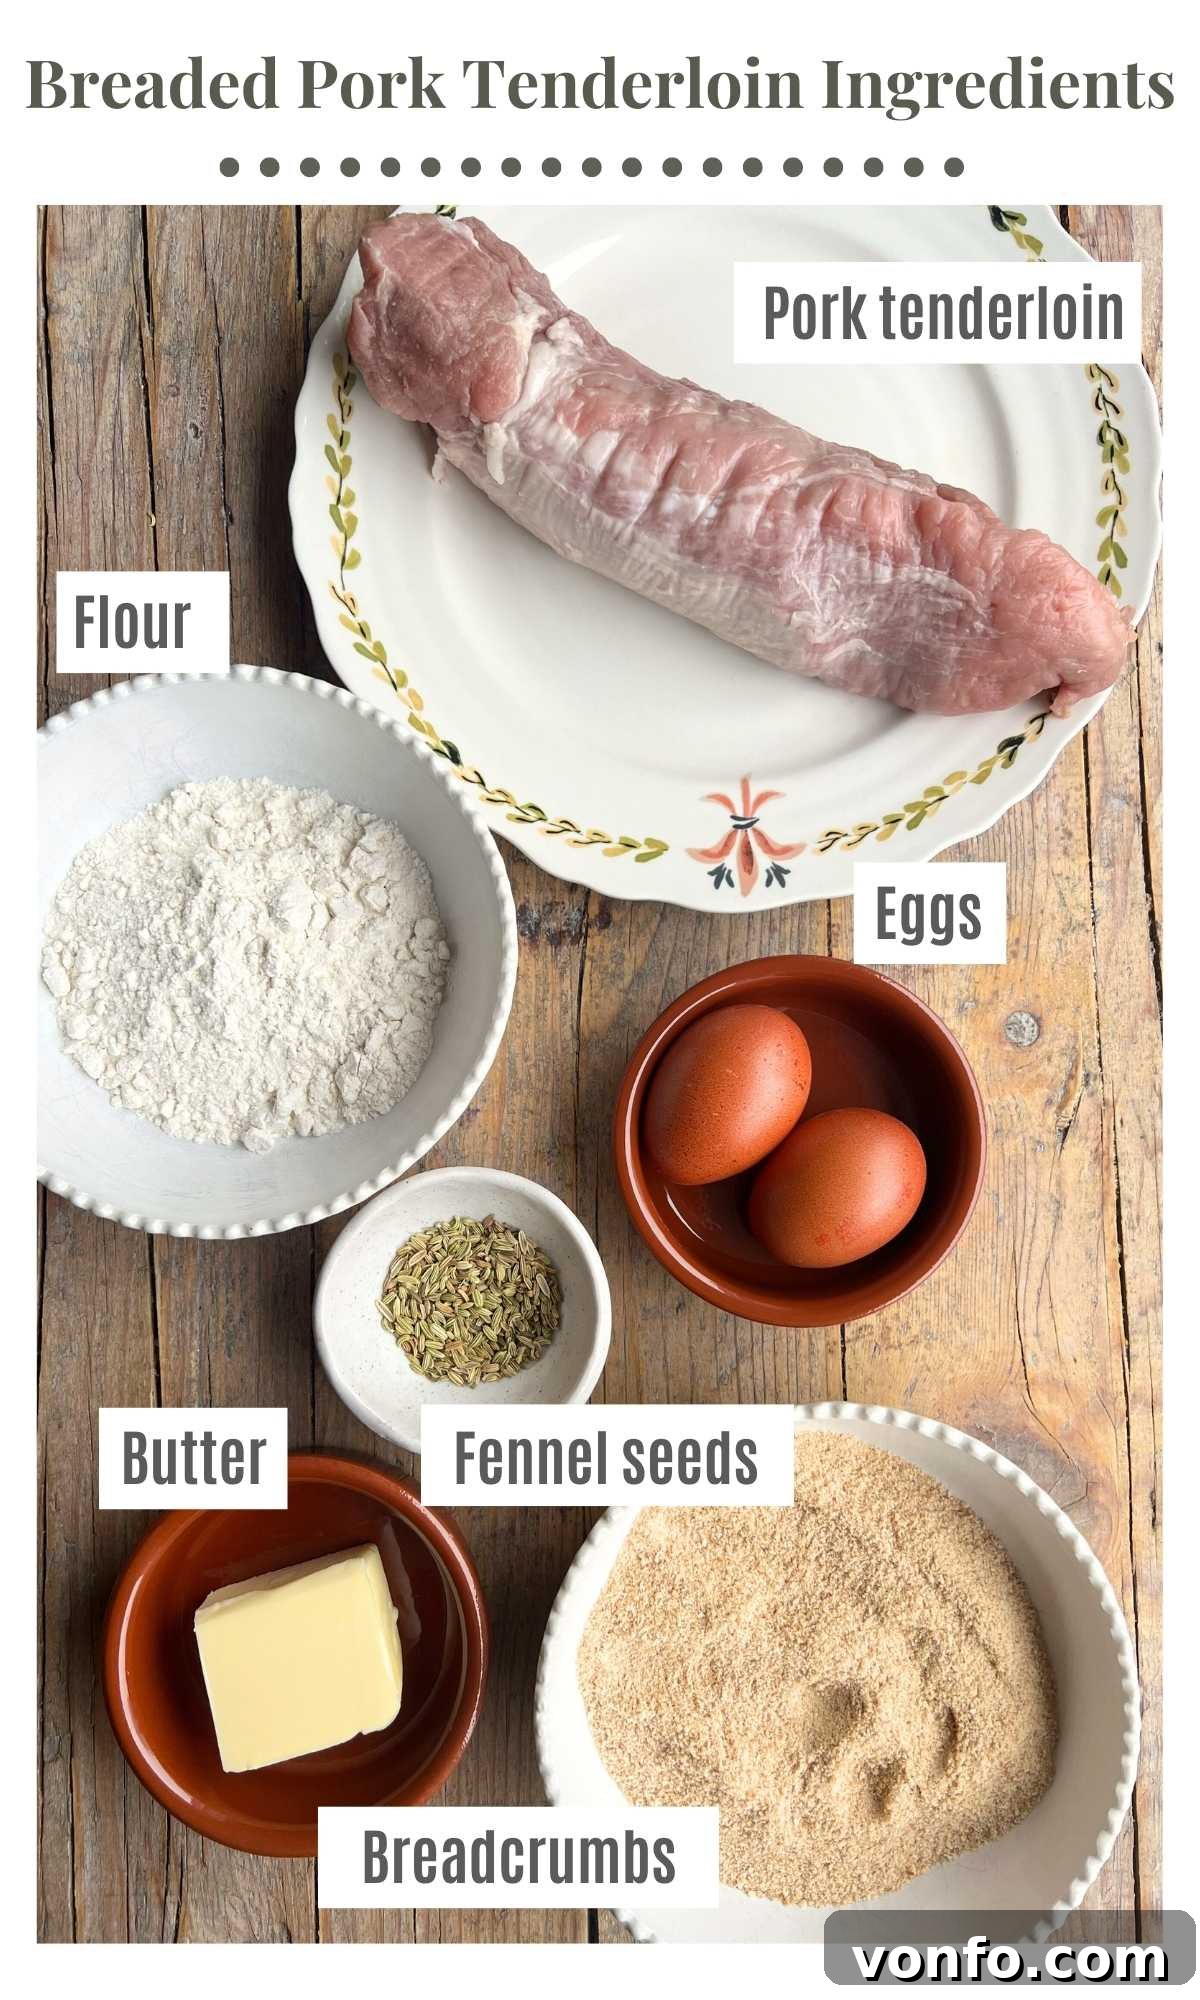
- Pork Tenderloin: Opt for a high-quality, lean cut. Tenderloin is inherently tender and cooks quickly, making it ideal for this recipe. Pounding it thin ensures maximum tenderness and an even cook.
- Breadcrumbs: The foundation of our crispy coating. We highly recommend using fine, unseasoned Italian breadcrumbs, such as those from Mulino Bianco, for their superior texture and ability to create a truly golden, delicate crust. If you can’t find Italian breadcrumbs, any fine, unseasoned variety will work beautifully.
- Fennel Seeds: These are the star flavor enhancer! Fennel seeds impart a wonderfully subtle anise-like aroma and a slightly sweet, savory taste that pairs exceptionally well with pork. For the best flavor, lightly crush them before mixing with the breadcrumbs to release their essential oils. If fennel isn’t to your taste or unavailable, dried oregano makes an excellent substitute, offering a classic Mediterranean twist.
- All-Purpose Flour: Used for dredging, it helps the egg adhere better to the pork, which in turn creates a more robust base for the breadcrumbs.
- Eggs: The binding agent in our breading station. Large eggs are whisked to create a liquid coating that ensures the breadcrumbs stick uniformly to the pork slices.
- Unsalted Butter: Essential for frying, butter provides an incomparable richness and helps achieve that beautiful golden-brown, crispy crust. Using unsalted butter allows you to control the seasoning precisely.
- Olive Oil: A drizzle of olive oil, combined with butter, helps prevent the butter from burning at higher temperatures, ensuring a perfectly cooked and flavorful crust. Extra virgin olive oil is always a good choice for its quality and flavor.
- Salt: A simple seasoning applied to the pounded pork slices before breading, it draws out the natural flavors of the meat. Don’t forget a pinch in your breadcrumb mixture too!
- Fresh Lemon Wedges: An optional but highly recommended garnish. A squeeze of fresh lemon juice over the hot pork tenderloin brightens the flavors, cuts through the richness of the butter, and adds a zesty finish that truly completes the dish.
Step-by-Step Guide to Perfect Breaded Pork Tenderloin
Follow these detailed steps to achieve a perfectly crispy and tender breaded pork tenderloin every time. Visual aids are included to guide you through each stage of the cooking process.
-
Step 1: Prepare the Pork Tenderloin for Breading
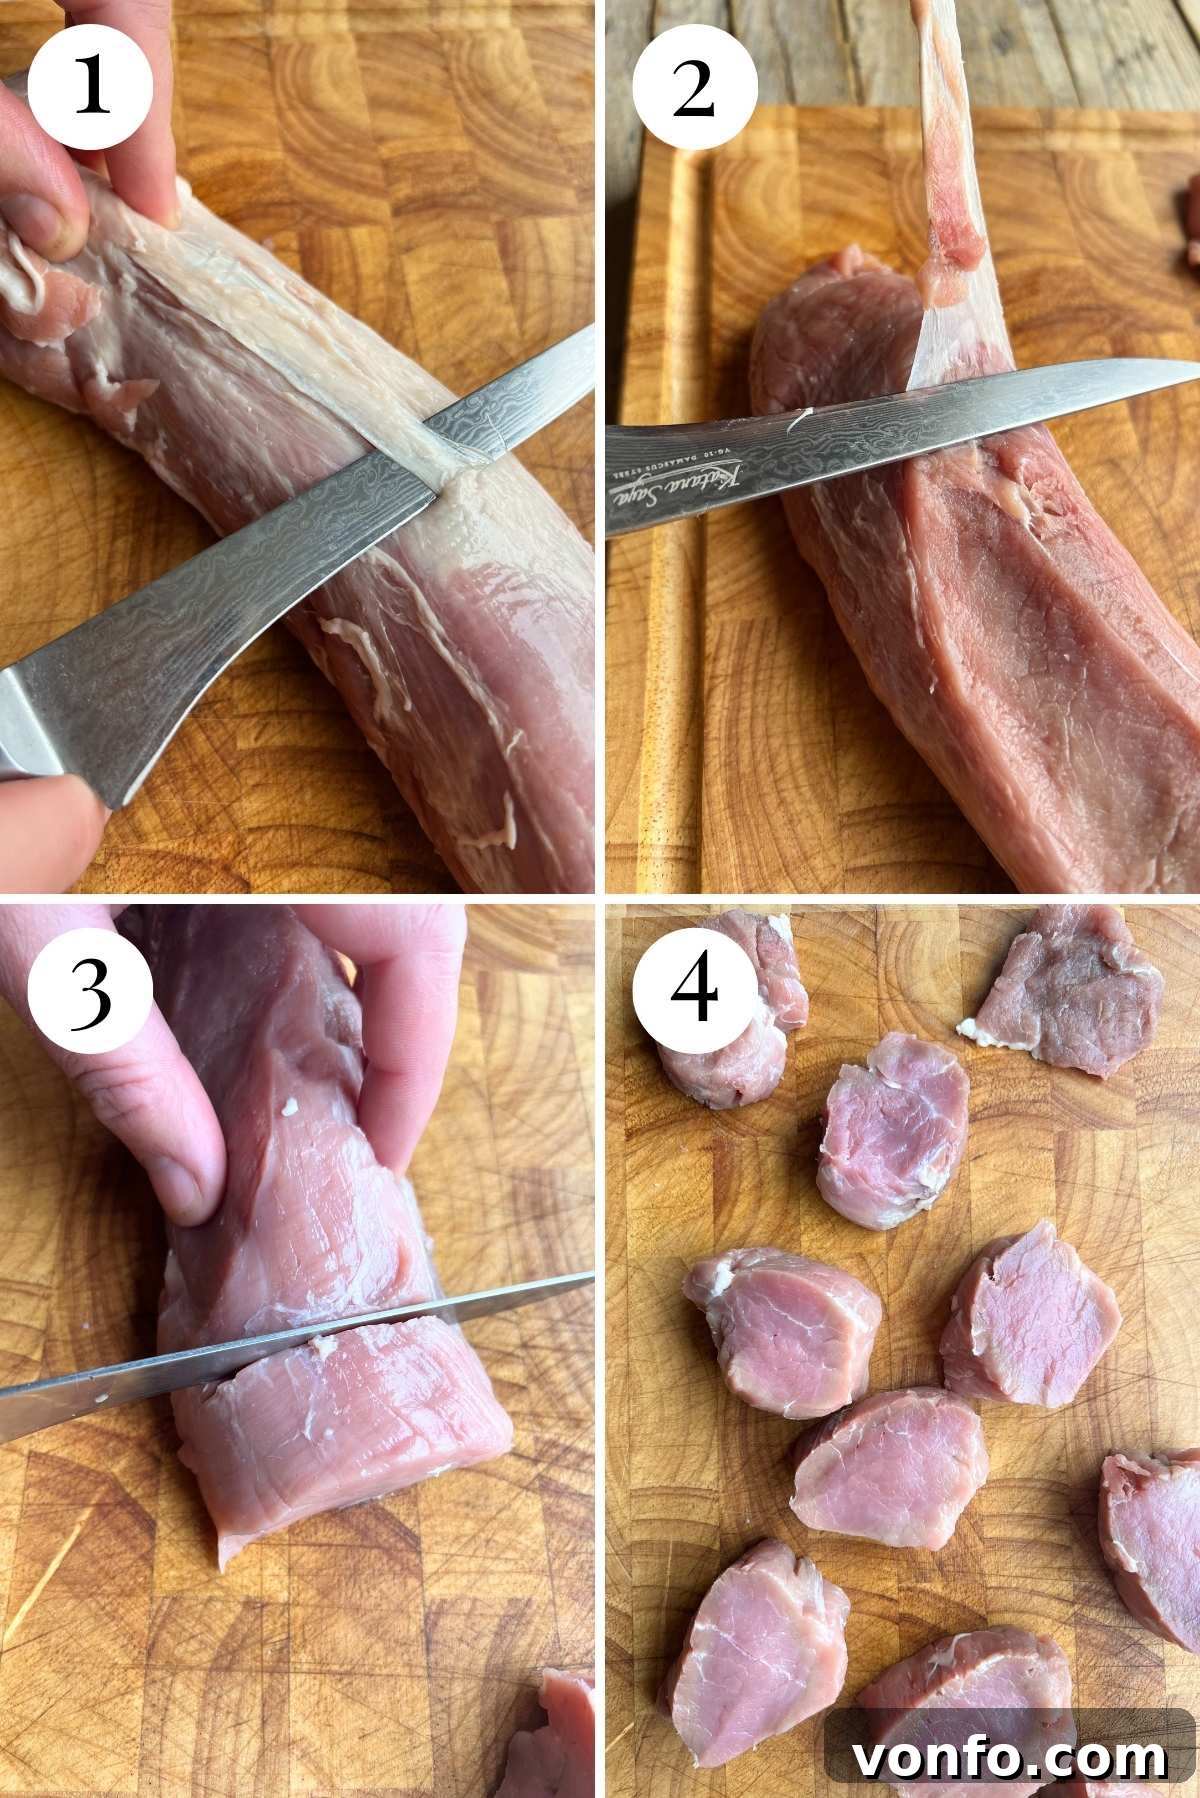
Begin by carefully trimming the pork tenderloin. Use a sharp knife to remove any silverskin or sinew from the exterior of the meat. This thin, silvery membrane can be tough if left on, so it’s important to remove it for the best texture. Be precise with your knife work to avoid cutting away too much of the lean pork itself. (Refer to visual guides in photos 1 and 2 for proper trimming technique).

Visual guide for trimming pork tenderloin. -
Step 2: Pound the Pork Slices Thin
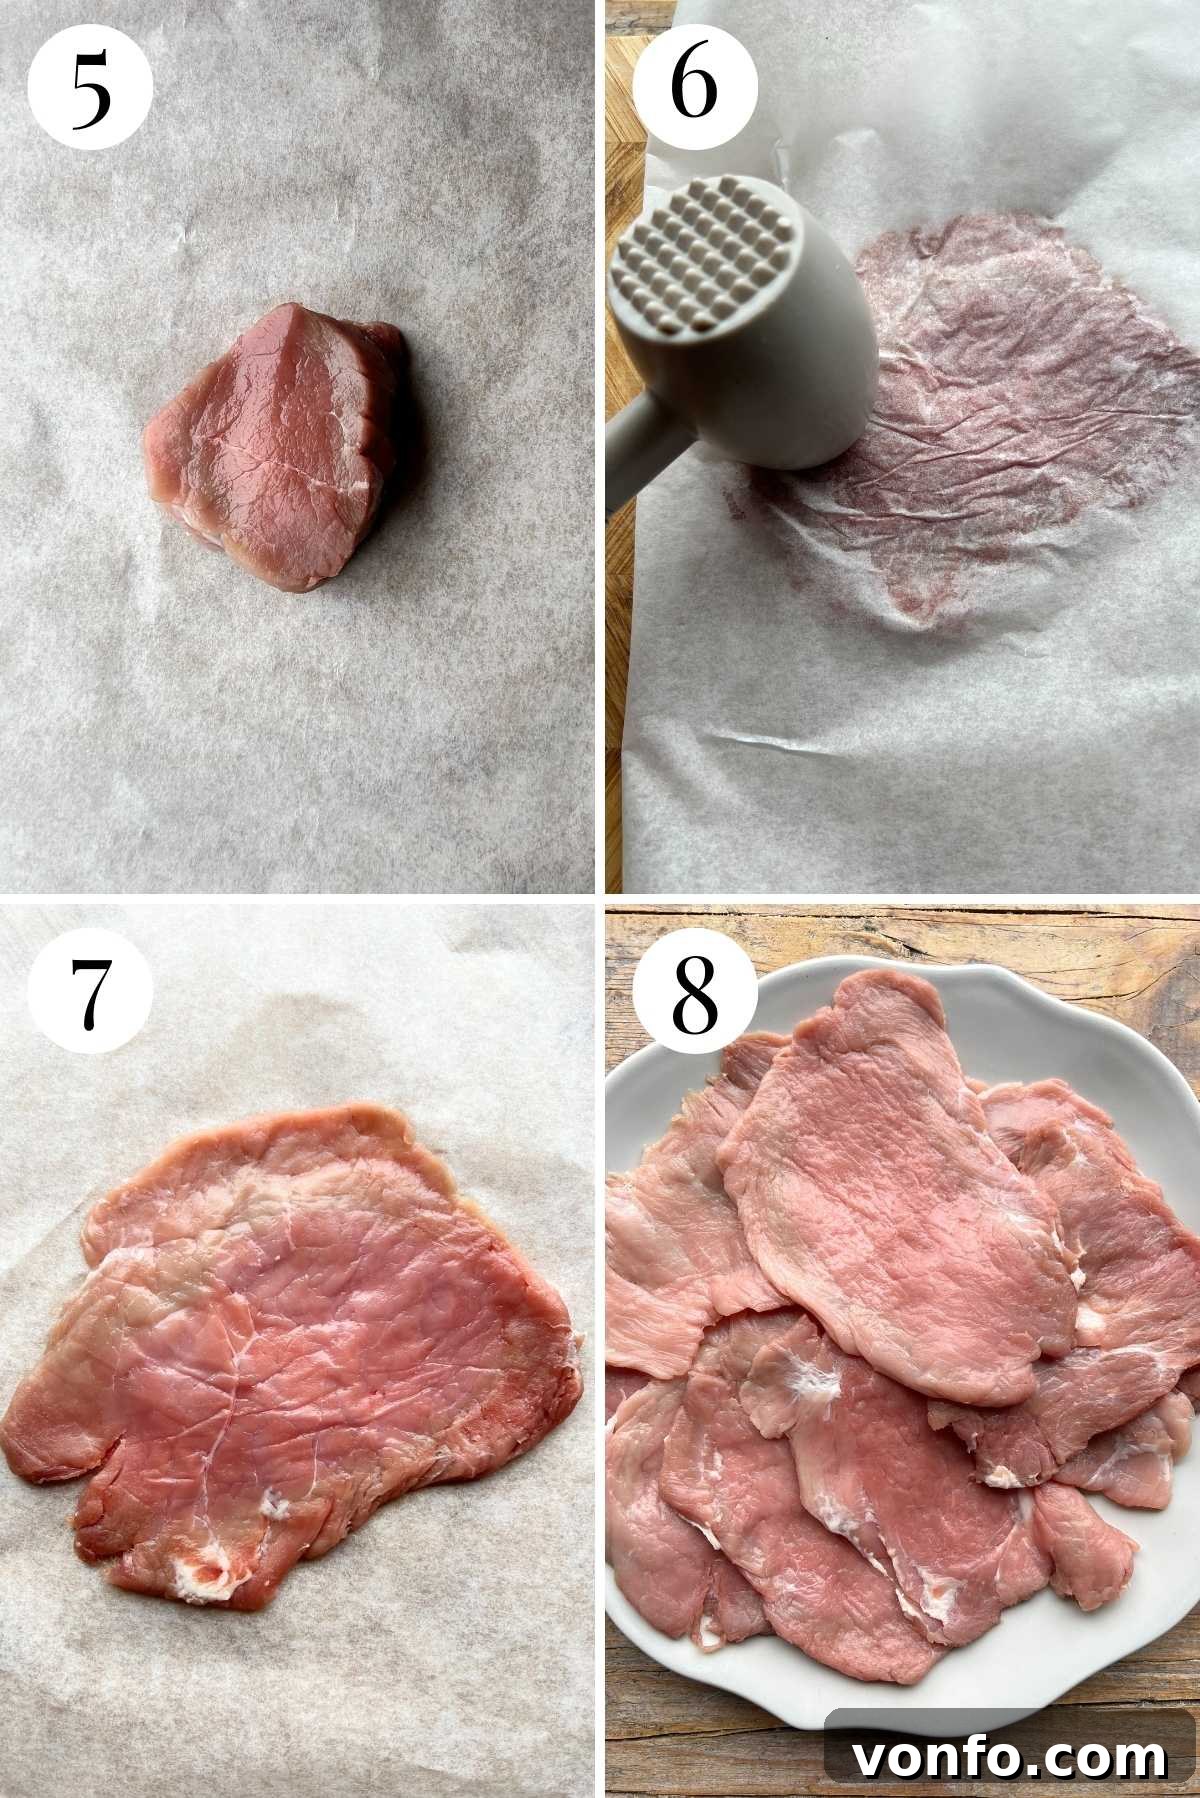
Once trimmed, cut the pork tenderloin into thick, approximately 1-inch (2.5 cm) slices. Place each slice, one at a time, between two sheets of baking parchment paper. Using a rolling pin or a meat mallet, firmly pound each slice until it is flattened to about 1 cm (¼ inch) thick. This process tenderizes the meat, ensures quicker cooking, and creates a larger surface for the breading. You should aim for about 8-10 uniform slices. Arrange the pounded slices on a plate and lightly sprinkle both sides with salt. This initial seasoning is crucial for enhancing the pork’s natural flavor. (See photos 3-8 for a detailed visual of the pounding process).
Pounding pork slices for tenderness and even cooking. -
Step 3: Set Up Your Breading Station
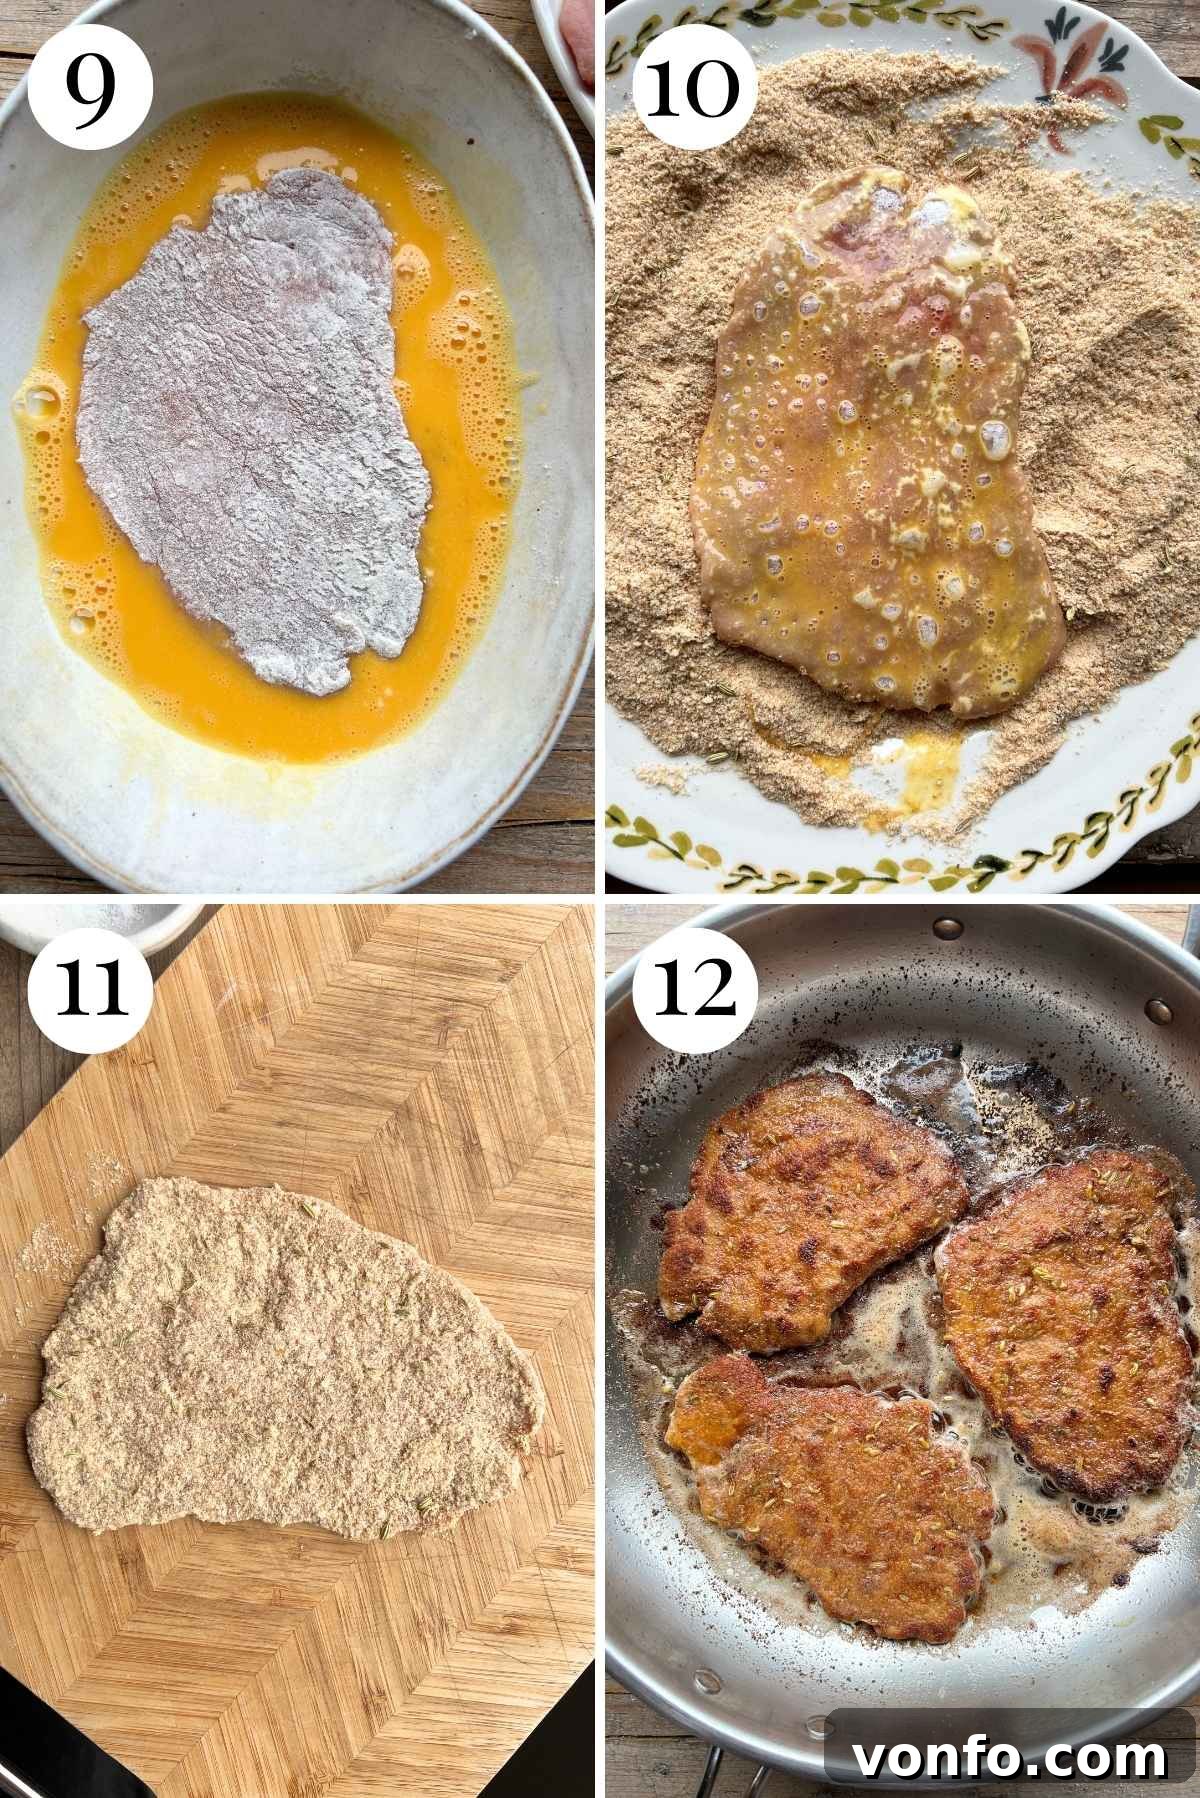
Prepare your breading station for efficiency. On one plate, place the all-purpose flour for dredging. In a shallow bowl, whisk two large eggs until well combined. On a third plate, combine the fine breadcrumbs with 1 tablespoon of fennel seeds and a pinch of salt, mixing thoroughly. This assembly line approach makes the breading process smooth and clean. Take each slice of pounded pork and first dredge it lightly in the flour, shaking off any excess. Then, dip it into the whisked egg, ensuring both sides are coated. Finally, press it firmly into the breadcrumb mixture, making sure it’s fully covered. Set each breaded slice aside on a clean plate. Continue this process until all pork slices are breaded. (Visual steps in photos 9-11 illustrate the breading technique).
The classic breading technique for a perfect crust. -
Step 4: Pan-Fry to Golden Perfection
Heat a large, heavy-bottomed pan over medium-high heat. Add approximately one-third of the unsalted butter along with a generous drizzle of olive oil. The oil helps raise the smoking point of the butter, preventing it from burning. Once the butter is melted and frothy, and the oil shimmers, carefully place a batch of breaded pork cutlets into the pan. Avoid overcrowding the pan, as this can lower the temperature and prevent the pork from browning properly. Fry the pork for about 2 minutes on each side, or until they achieve a beautiful golden-brown color and are wonderfully crispy. The internal temperature should reach 145°F (63°C).
-
Step 5: Serve Immediately and Enjoy
Once each batch is cooked, transfer the golden-brown pork cutlets to a plate lined with kitchen paper to drain any excess oil. If you notice any burnt breadcrumbs accumulating in the pan between batches, quickly wipe the pan clean with a paper towel (carefully, as the pan will be hot) before adding more butter and oil for the next batch. This step ensures clean flavors and prevents bitterness. Serve the crispy fennel breaded pork tenderloin immediately on warm plates, garnished with fresh lemon wedges for a vibrant, zesty finish.
The irresistible crispy texture of the breaded pork.
Delicious Side Dishes to Complement Your Meal
This versatile breaded pork tenderloin pairs beautifully with a variety of sides. Here are some of our top recommendations to create a complete and unforgettable meal:
Sides
Italian Roast Potatoes – Rosemary And Garlic
Salads
Arugula Salad with Lemon and Parmesan
Sides
Italian Green Beans In Tomato Sauce
Sides
Fagioli all’uccelletto – Beans in Tomato Sauce
Printable Recipe Card: Breaded Fennel Pork Tenderloin
Breaded Fennel Pork Tenderloin
By Emily

Tender slices of pork tenderloin served in crispy fennel breadcrumbs, pan-fried in butter and drizzled with fresh lemon juice. This simple yet elegant dish is perfect for any occasion.
Ingredients
- 600 g (1.3 lbs) pork tenderloin (fillet)
- All-purpose flour, for dredging
- 2 large eggs
- 150 g (1 heaped cup) fine breadcrumbs
- 1 tablespoon fennel seeds
- 80 g (2/3 stick) unsalted butter, for frying
- Olive oil
- Salt, to taste
- Lemon wedges, for serving (optional)
Instructions
Prepare the Pork Tenderloin
- Use a sharp knife to trim away any silverskin or sinew around the outside of the tenderloin. Trim it carefully so you don’t remove too much of the meat itself (a sharp knife helps significantly).
- Cut the tenderloin into 1-inch-thick slices. Then, bash each slice one at a time between two sheets of baking parchment using a rolling pin or meat mallet until they are around 1 cm (¼ inch) thick. You should have approximately 8-10 slices in total.
- Set the pounded slices aside on a plate and sprinkle them lightly with salt on both sides.
Breading
- Set up your breading station: a plate of all-purpose flour for dredging, a large bowl with 2 whisked eggs, and another plate with 150g fine breadcrumbs mixed with 1 tablespoon of fennel seeds and a pinch of salt.
- One by one, dip each slice of pork first in the flour, shaking off any excess. Then, dip it into the whisked egg, ensuring full coverage. Finally, press it firmly into the breadcrumbs, making sure the entire surface is coated. Place each breaded slice on a separate clean plate. Continue until all slices are breaded.
Frying
- Heat approximately one-third of the unsalted butter with a drizzle of olive oil in a large pan over medium-high heat. Once the butter is frothy, fry the pork cutlets in batches. Cook for about 2 minutes on each side until golden brown and deliciously crispy. Avoid overcrowding the pan to maintain consistent heat.
- Once cooked, set them aside on a plate lined with kitchen paper to absorb any excess fat. You may need to wipe the pan clean between batches if any excess breadcrumbs brown too much, preventing them from burning and affecting the flavor of subsequent batches.
- Serve the crispy breaded pork tenderloin immediately on plates with fresh lemon wedges, allowing everyone to add a zesty squeeze to their liking.
Recipe Notes & Tips for Success
Flavour Variations: To experiment with different flavor profiles, consider adding other dried herbs and spices to your breadcrumbs. Popular choices include dried oregano for an earthy Mediterranean twist, a pinch of garlic powder for added depth, or a touch of chilli flakes if you enjoy a subtle heat. Freshly grated Parmesan cheese can also be mixed into the breadcrumbs for an extra savory umami boost.
Leftovers and Storage: Should you have any delightful leftovers, they will keep well in an airtight container in the refrigerator for up to 3 days. For reheating, gently warm the pork in a preheated oven at 300°F (150°C) until it is heated through, which helps maintain some of its crispness. Alternatively, it can also be served cold, making it a great addition to salads or sandwiches the next day.
Achieving Maximum Crispiness: Ensure your pan is adequately hot before adding the pork. Using a combination of butter and oil helps achieve a rich flavor and a higher smoke point. Don’t overcrowd the pan; fry in batches to maintain the oil temperature and allow for even browning. Pressing the breadcrumbs firmly onto the pork also helps create a sturdy, crispy crust.
Pounding Technique: When pounding the pork, aim for an even thickness. This ensures that all parts cook at the same rate, preventing some areas from becoming dry while others are still cooking. The parchment paper prevents sticking and mess.
Helpful Info for All Recipes
- We consistently use extra virgin olive oil in all our recipes unless explicitly stated otherwise, for its superior flavor and health benefits.
- For canned or jarred tomatoes, we always opt for premium brands like Cirio or Mutti to guarantee the best possible results and authentic Italian flavor in our dishes.
- All vegetables specified in our recipes are assumed to be medium-sized unless an alternative size is clearly indicated.
- Every recipe provided has been thoroughly tested and developed using a fan (convection) oven to ensure reliable and consistent cooking outcomes.
- Find out more about how nutrition information is calculated for our recipes.
- Discover our essential guide to Italian Pantry Staples to stock your kitchen with key ingredients.
- Explore all our recommended Essential Kitchen Tools for Italian Cooking to enhance your culinary experience.
Nutrition Facts (Per Serving)
Carbohydrates: 29g |
Protein: 42g |
Fat: 15g |
Saturated Fat: 5g |
Polyunsaturated Fat: 3g |
Monounsaturated Fat: 6g |
Trans Fat: 0.1g |
Cholesterol: 395mg |
Sodium: 395mg |
Potassium: 741mg |
Fiber: 2g |
Sugar: 3g |
Vitamin A: 412IU |
Vitamin C: 0.3mg |
Calcium: 134mg |
Iron: 4mg
Nutrition information is automatically calculated and should be used as an approximation. Individual results may vary based on exact ingredients and preparation methods.
Did You Try This Recipe?
We’d love to hear from you! Share your experience by leaving a comment and rating the recipe below.
You can also follow us on Facebook, Instagram, and Pinterest for more delicious recipes and cooking inspiration. Don’t forget to sign up for our Newsletter to get new recipes delivered straight to your inbox every week!