
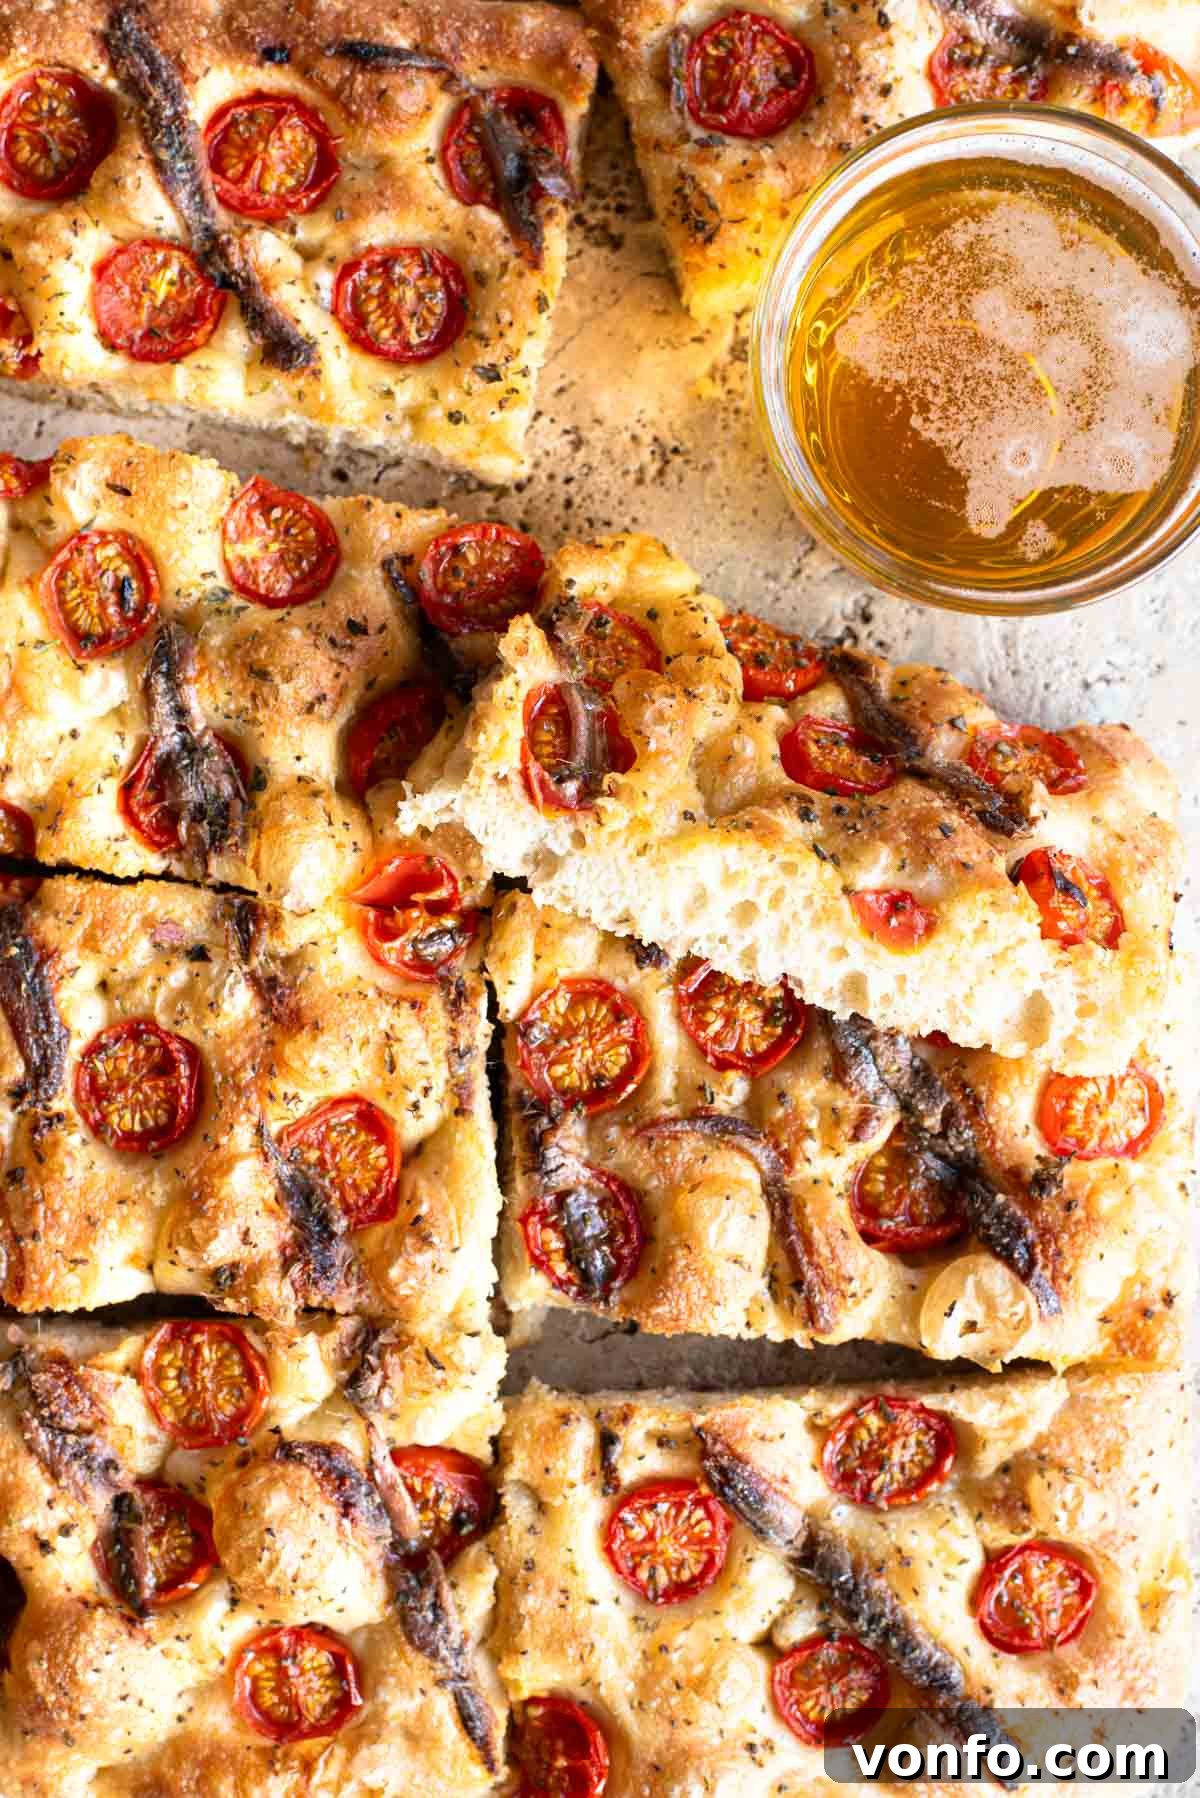
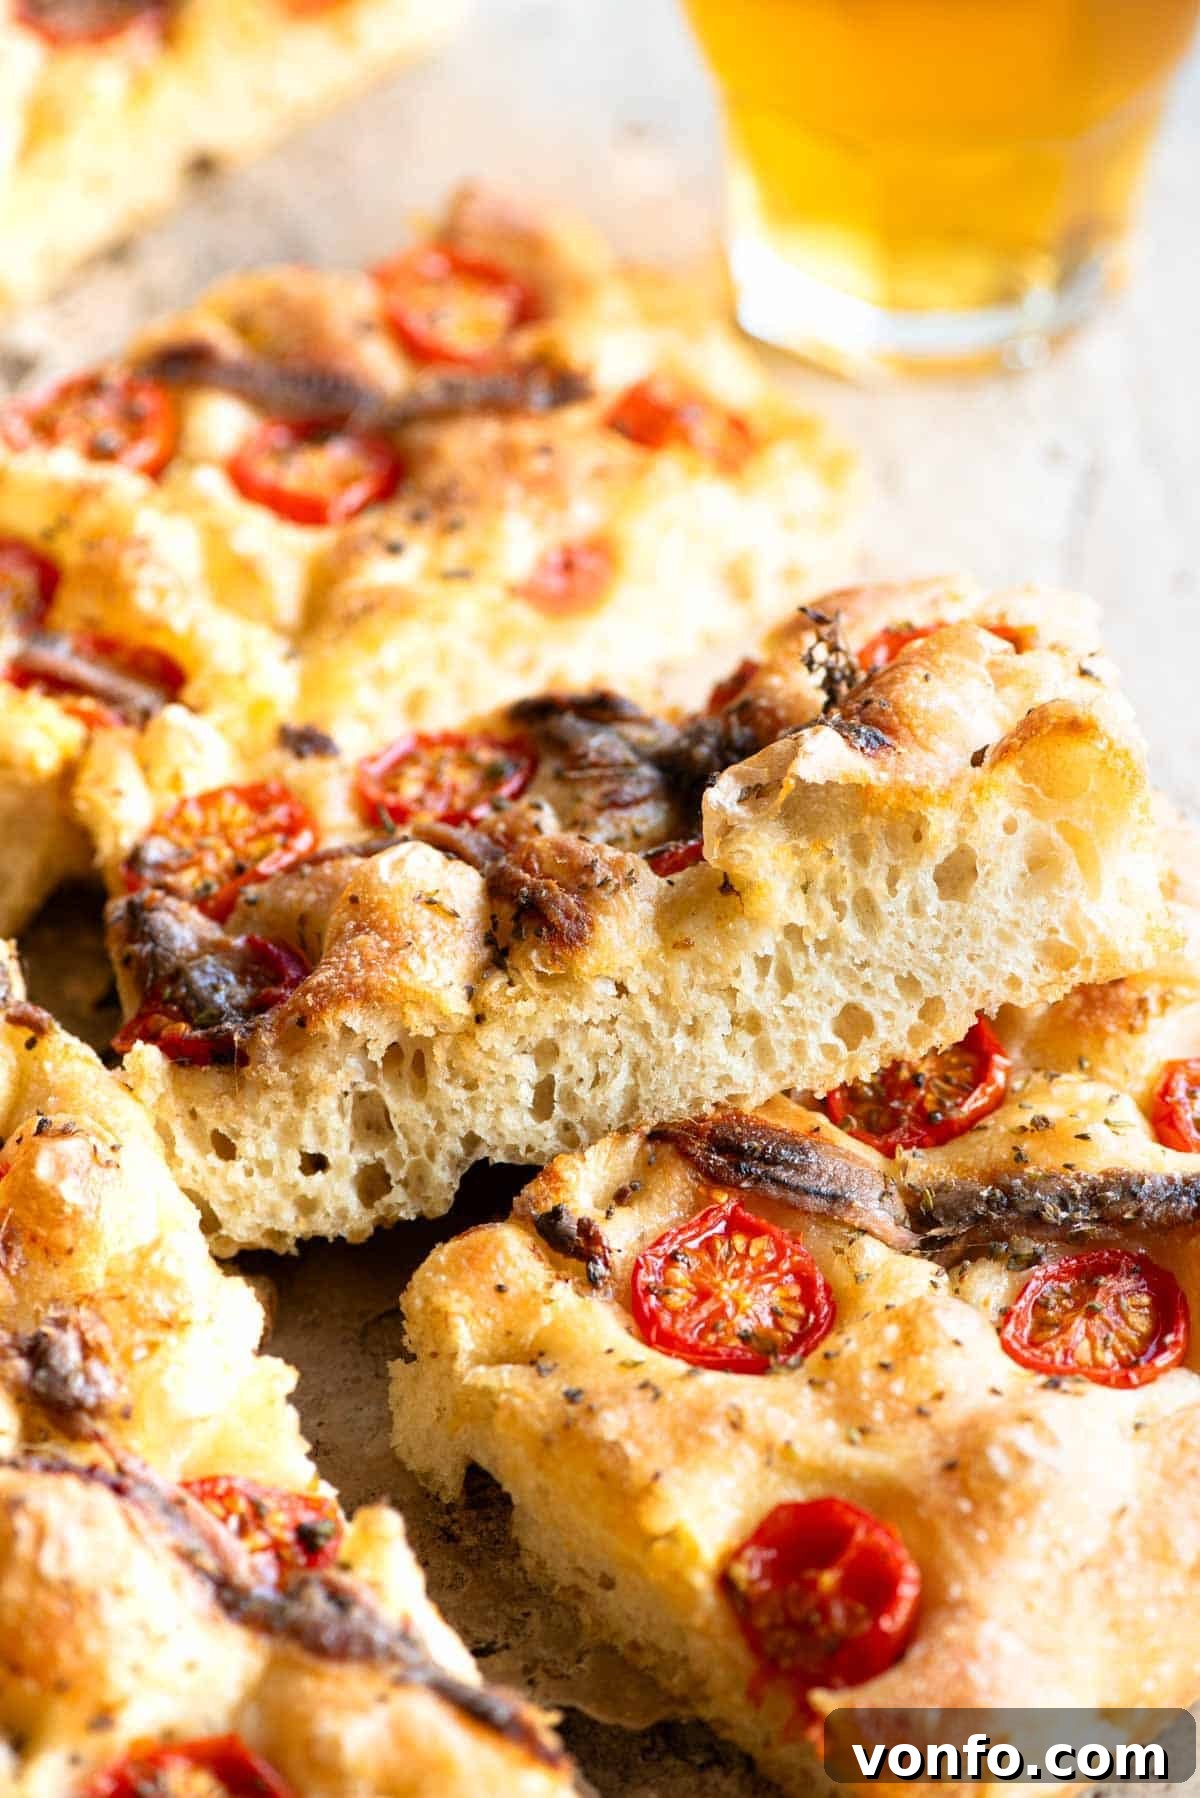
Experience the sheer delight of a truly remarkable bread with our recipe for Cherry Tomato Focaccia with Anchovies and Oregano. This isn’t just any bread; it’s a testament to simple ingredients coming together to create something extraordinary. Imagine a soft, incredibly light, and irresistibly fluffy focaccia, generously dotted with bursting sweet cherry tomatoes, rich, salty anchovies, and fragrant oregano. Every bite is an explosion of umami, delivering a depth of flavor that is both comforting and sophisticated.
This gourmet focaccia transcends its humble origins, making it an ideal choice for a variety of occasions. Serve it as an elegant appetizer at your next gathering, a satisfying snack to accompany your favorite drink, or a vibrant and flavorful side dish that complements any summer meal. What truly sets this recipe apart is its ingenious use of our simple no-knead focaccia dough. This method simplifies the baking process significantly, allowing even novice bakers to achieve bakery-quality results with an easy, step-by-step guide.
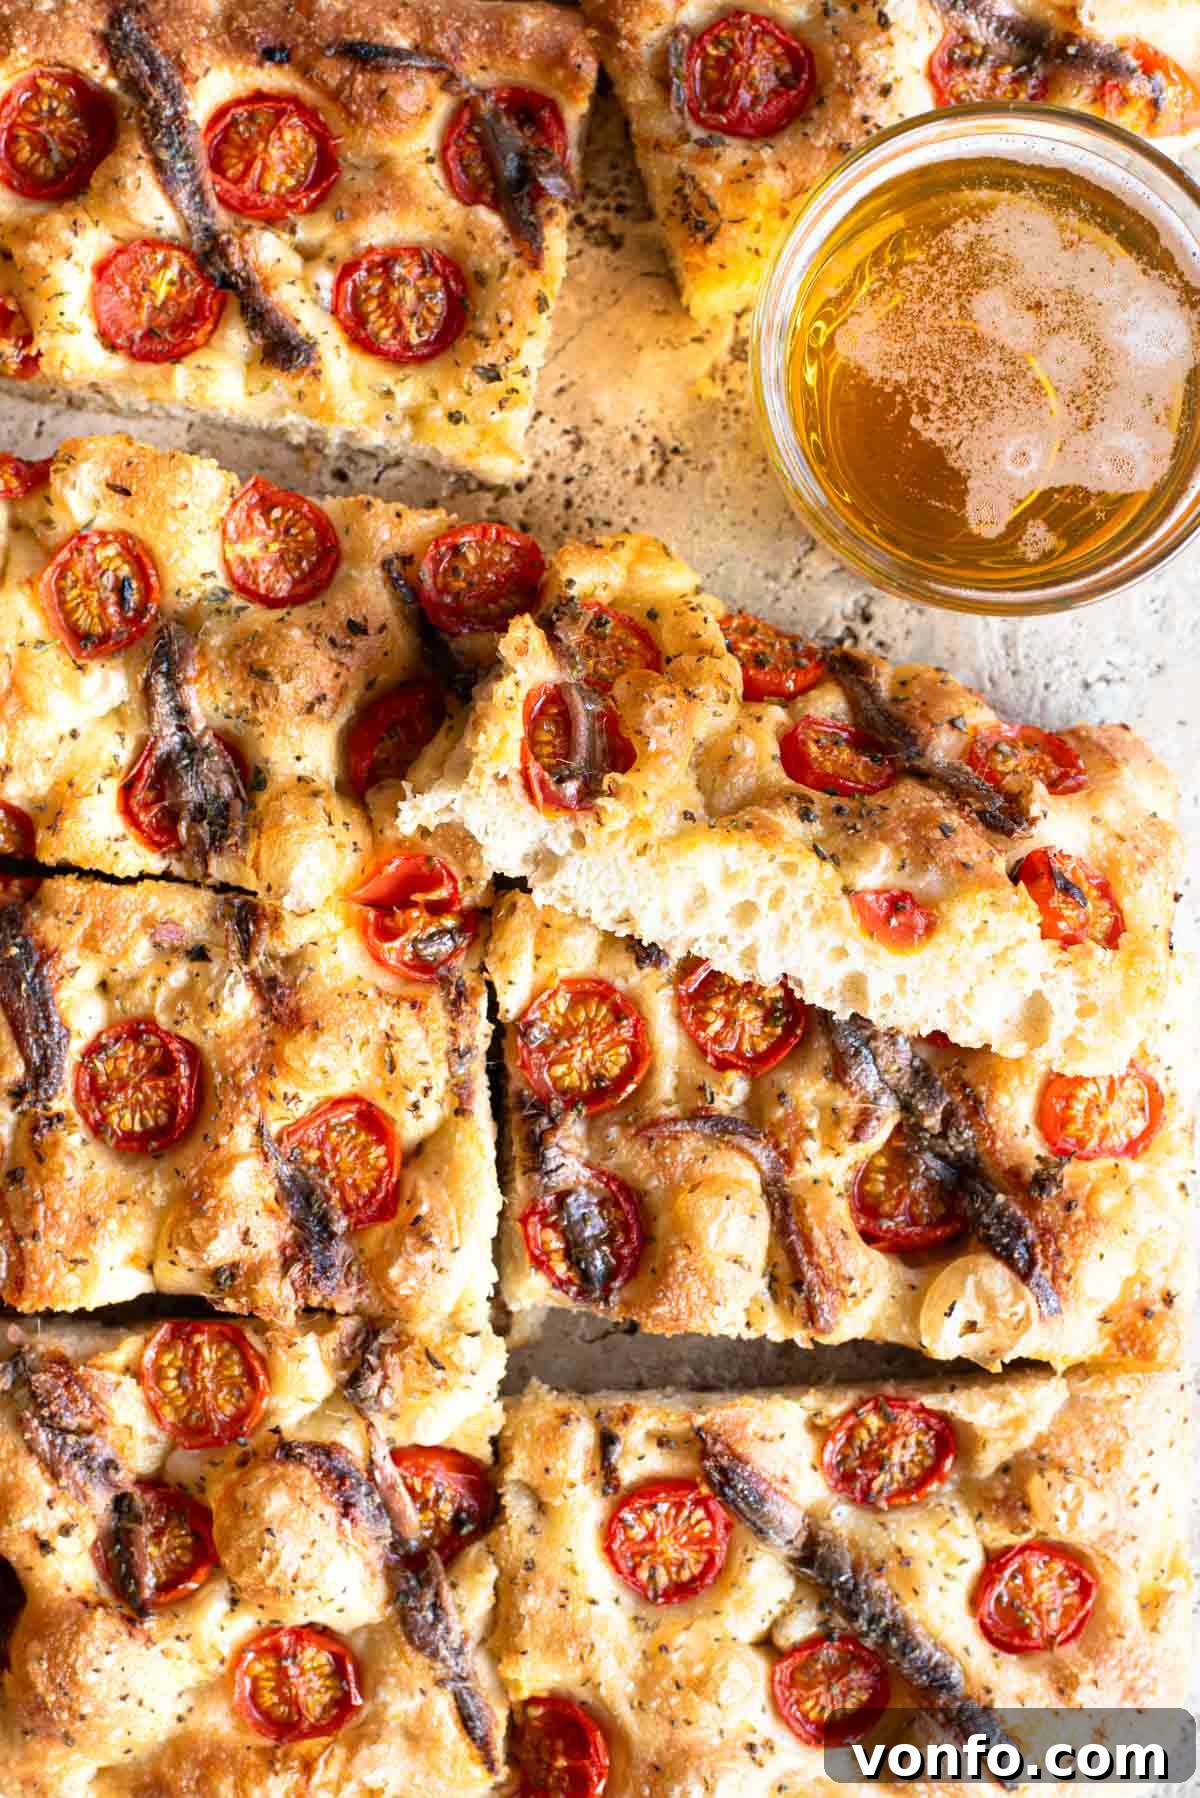
The beauty of this focaccia lies in its topping, which, despite its incredible simplicity, delivers a powerhouse of flavor. The magic happens when the rich, intensely savory notes of salted anchovies meet the bright, juicy sweetness of ripe cherry tomatoes. A final generous sprinkle of dried oregano weaves in an earthy, aromatic layer, creating a harmonious balance that will tantalize your taste buds. This combination isn’t just delicious; it’s a celebration of classic Mediterranean flavors.
Beyond its incredible taste, this focaccia is incredibly versatile. It serves as a perfect companion to a chilled glass of wine or a refreshing beer, especially when paired with other delectable nibbles. Consider presenting it alongside our easy marinated olives for an additional burst of briny goodness, or with delicate bocconcini mozzarella to offer a creamy contrast. Its light texture and robust flavor make it a crowd-pleaser for any casual gathering or sophisticated soirée.
At the heart of this recipe is our user-friendly overnight no-knead focaccia dough. This method is a game-changer for anyone intimidated by traditional bread making. Instead of laborious kneading, we employ a very simple folding technique that masterfully develops the gluten structure, resulting in an exceptionally light, bubbly, and airy texture that is characteristic of premium focaccia.
The overnight fermentation, carried out patiently in the refrigerator, is not merely a convenience; it’s a crucial step that dramatically enhances both the flavor and the texture of the dough. This slow, cold proofing allows the yeast to work its magic over a longer period, developing complex flavors that simply cannot be achieved with a quick rise. It means you’ll need to prepare the dough the day before you plan to serve this magnificent bread, but the minimal effort for maximum flavor and an unparalleled light texture is absolutely worth it.
Table of Contents
- What You Need for Your Focaccia
- The No-Knead Focaccia Method Explained: Visual Walk-Through
- Expert Tips and Frequently Asked Questions
- More Irresistible Pizza and Focaccia Recipes to Try
- Full Recipe Card
What You Need for Your Focaccia
Crafting this incredible focaccia requires a few essential ingredients. Opting for quality ingredients will always elevate your final product, ensuring the best flavor and texture:
- One batch of our Overnight No-Knead Focaccia Dough: This is the foundation of our focaccia. Its simple preparation method yields a dough with superb flavor and an incredibly airy structure, thanks to its extended fermentation. You’ll find the detailed recipe for the dough included below in the full recipe card.
- High-Quality Olive Oil: Extra virgin olive oil is non-negotiable for authentic focaccia. It’s used generously to grease the pan, enrich the dough, and provide a luscious drizzle over the top, contributing significantly to the bread’s golden crust and aromatic flavor.
- Ripe and Juicy Cherry Tomatoes: These small wonders burst with sweet, tangy flavor when baked. Their vibrant color and natural sweetness are perfect for contrasting the savory anchovies. Baby plum tomatoes can also be used as a delicious alternative if cherry tomatoes are unavailable.
- Salted Anchovies: The star of the umami show! These small, cured fish fillets provide a deep, savory, and wonderfully salty punch that is quintessential to this focaccia’s unique character. If you’re hesitant about anchovies, you can certainly leave them out. For a similar savory depth without the fish, consider doubling the tomatoes and adding sun-dried tomatoes, which offer a concentrated sweet-salty umami profile.
- Dried Oregano: This classic Italian herb is the perfect aromatic complement to the tomatoes and anchovies. Its earthy, slightly peppery notes tie all the flavors together beautifully, creating an irresistible aroma as the focaccia bakes.
The No-Knead Focaccia Method Explained: Visual Walk-Through
Creating this light and airy focaccia might seem complex, but our no-knead method simplifies it into a series of easy, manageable steps. The key is patience and gentle handling, allowing the dough to develop its structure and flavor naturally. While the full written recipe and a comprehensive video demonstrating the essential folding techniques are provided in the recipe card below, here’s a narrative walk-through to give you a clear understanding of the process:
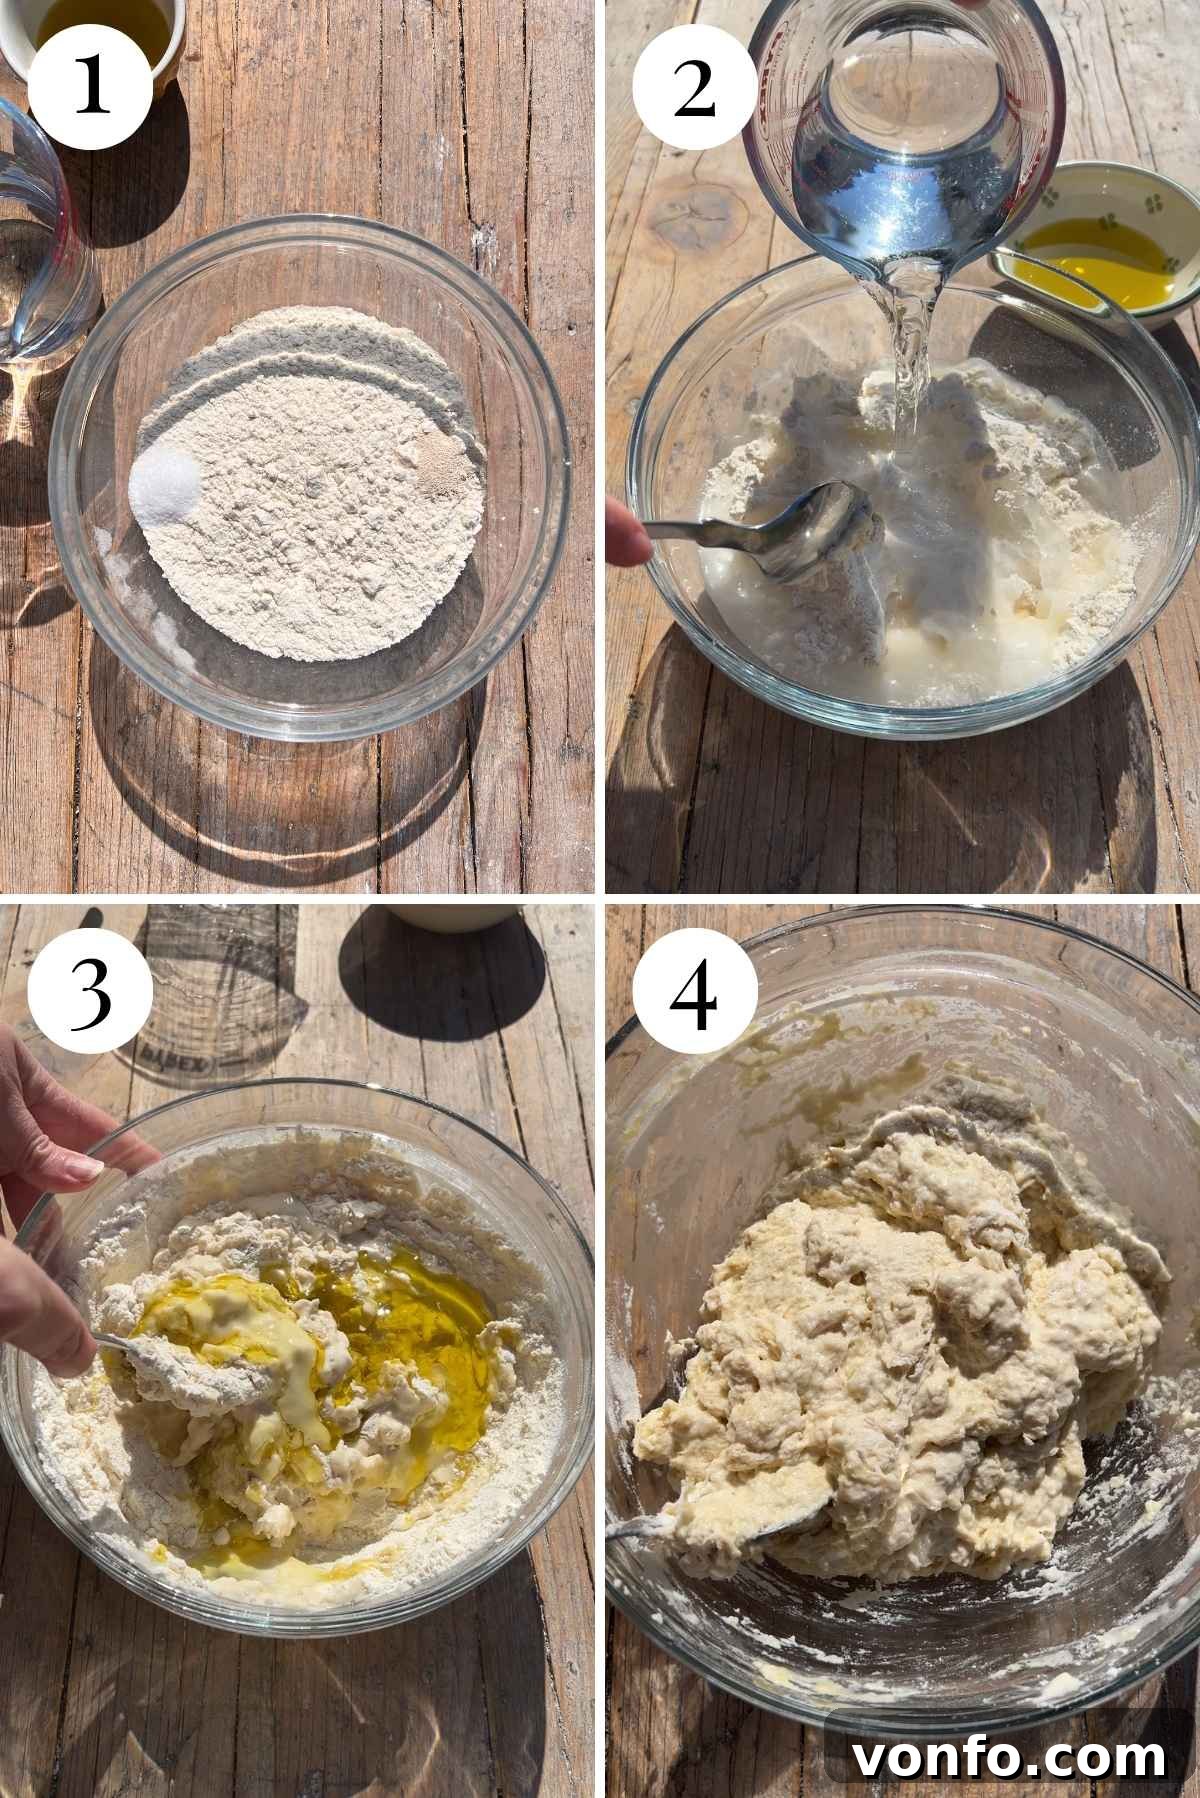
Step 1 – Initial Mix: Begin by combining all the dough ingredients in a large mixing bowl. Stir them together until there are no visible dry pockets of flour remaining. At this stage, the dough will appear quite shaggy and have a rough, sticky texture. This initial mix is about hydration, ensuring all the flour is incorporated and the yeast has a moist environment to begin its work. (Refer to photos 1-4 in the detailed visual guide for this initial mixing stage.)
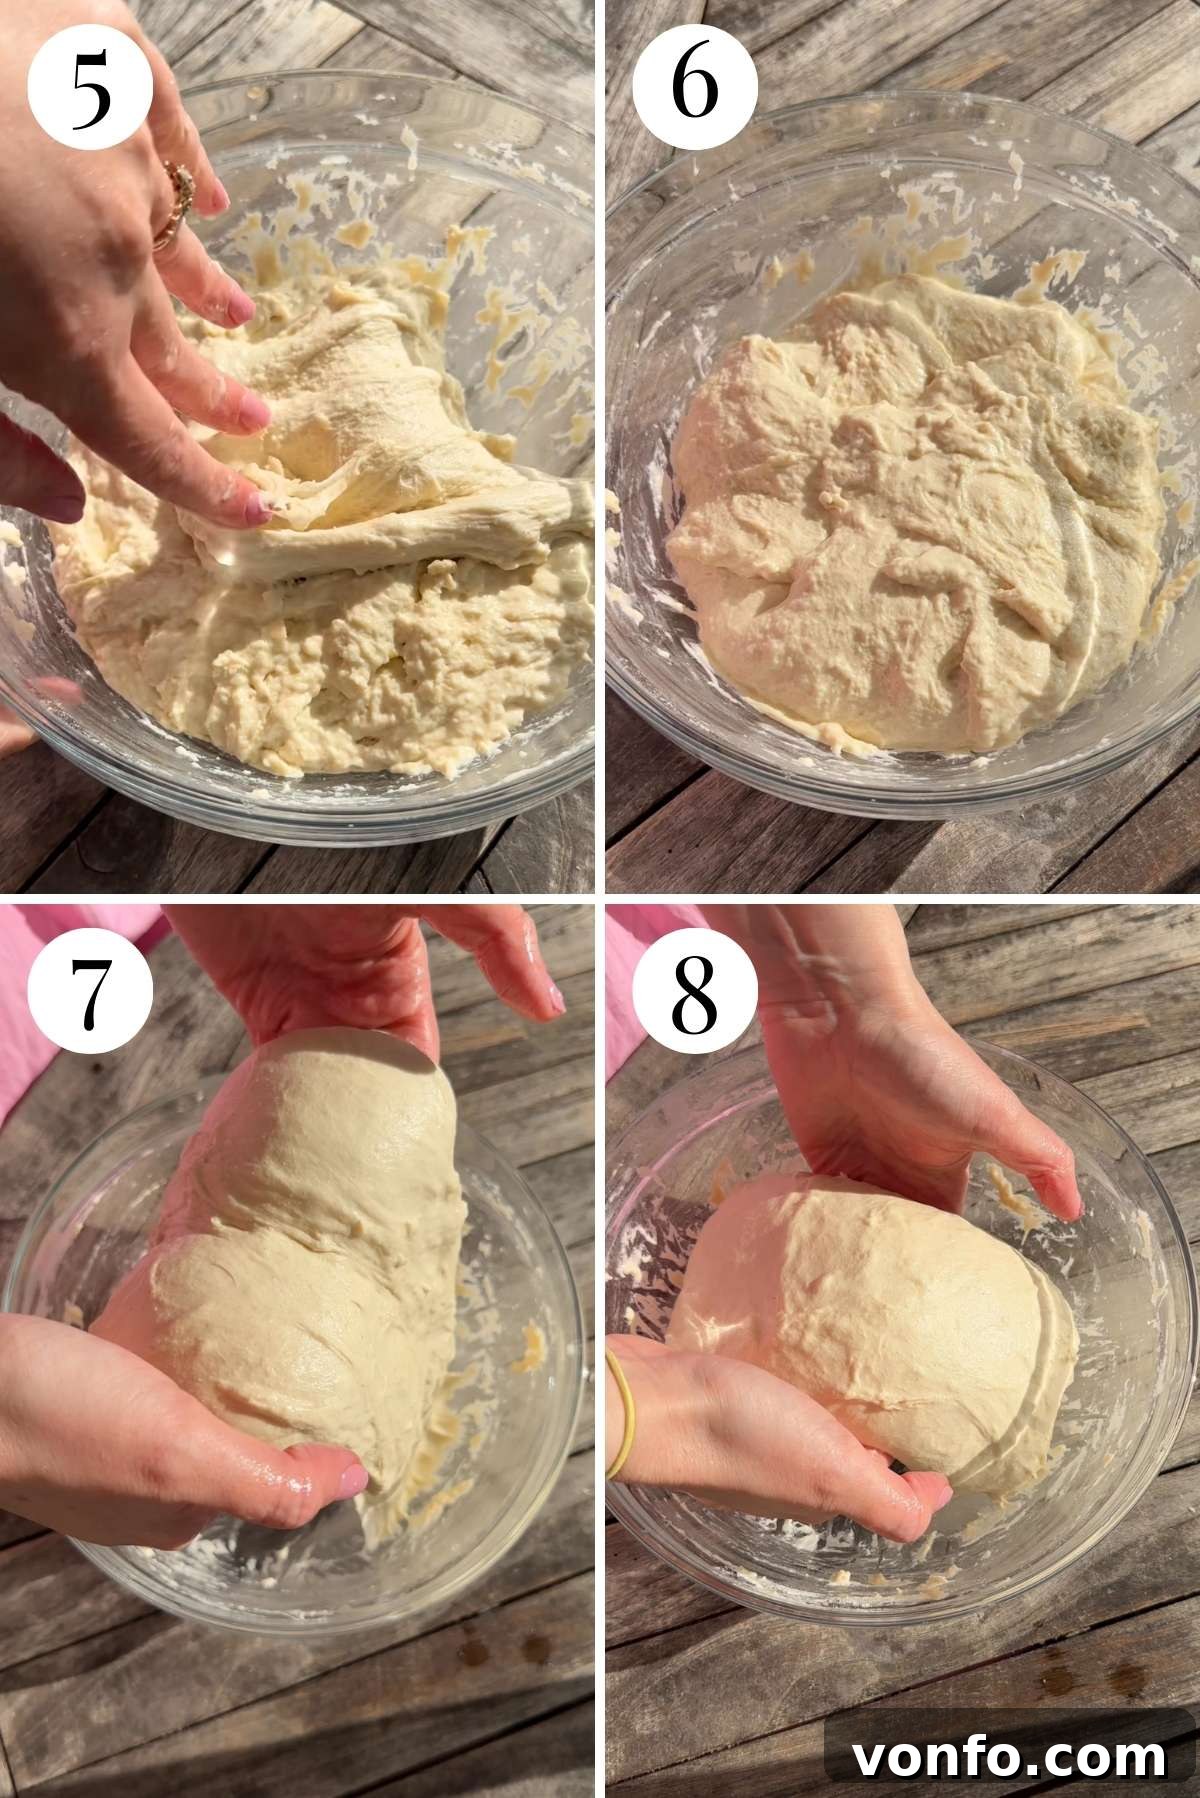
Step 2 – The Corner Folds: After the dough has rested for its initial period, it’s time for the first set of folds. Lightly wet your hand – this prevents the sticky dough from adhering to your skin. Gently grab one edge of the dough, stretching it upwards without tearing, and then fold it over into the middle of the dough ball. Rotate your bowl and repeat this action with the remaining edges, effectively folding the dough onto itself from all sides. Cover the dough once more and allow it to rest for another 30 minutes. This resting period is crucial for relaxing the gluten, making the dough more extensible for the next fold. Repeat this corner folding step one more time to continue building strength in the dough. (See photos 5 and 6 for a visual aid on performing these gentle stretch and folds.)
Step 3 – The Coil Folds & Overnight Proof: Now, we move on to the coil folds, an incredibly effective technique for building dough strength and structure without extensive kneading. Again, wet both hands thoroughly. Gently slide your hands under the middle of the dough and lift it, allowing the ends to stretch and then fold back down onto themselves. This “coil” action helps create layers and traps air. Repeat this motion 3-4 times, turning the bowl each time, until you feel the dough gaining tension and resilience. It should be strong enough to lift out of the bowl without tearing significantly. Once complete, cover the dough and let it rest for another 30 minutes. Perform this coil folding step one more time after another rest. These folds are vital for developing the airy pockets characteristic of focaccia.
After the final coil fold and rest, the dough is ready for its crucial overnight fermentation. Place the covered bowl in the refrigerator for at least 12 hours, and ideally up to 48 hours. This slow, cold proofing is where the magic happens, developing a profound depth of flavor and creating the signature light, open crumb structure. (Refer to photos 7 and 8 to visualize the coil folding technique and the dough’s appearance before refrigeration.)
Step 4 – Final Proofing and Pan Prep: On the day of baking, remove the dough from the fridge. Liberally grease your chosen baking tray with olive oil, ensuring every corner is coated – this contributes to that wonderfully crisp bottom crust. Also, lightly grease your hands. Gently transfer the dough from the bowl into the prepared tray. Carefully stretch and coax the dough to fit the contours of the tray. It doesn’t need to be perfect; focaccia embraces a rustic charm. Once in place, cover the tray with plastic wrap and allow the dough to proof at room temperature until it has almost doubled in size. This can take anywhere from 2-4 hours, depending on your ambient temperature. It’s essential to let it proof sufficiently for that ultimate airy texture. (See photos 9-11, which visually track the focaccia dough’s progress before and after this crucial proofing stage.)
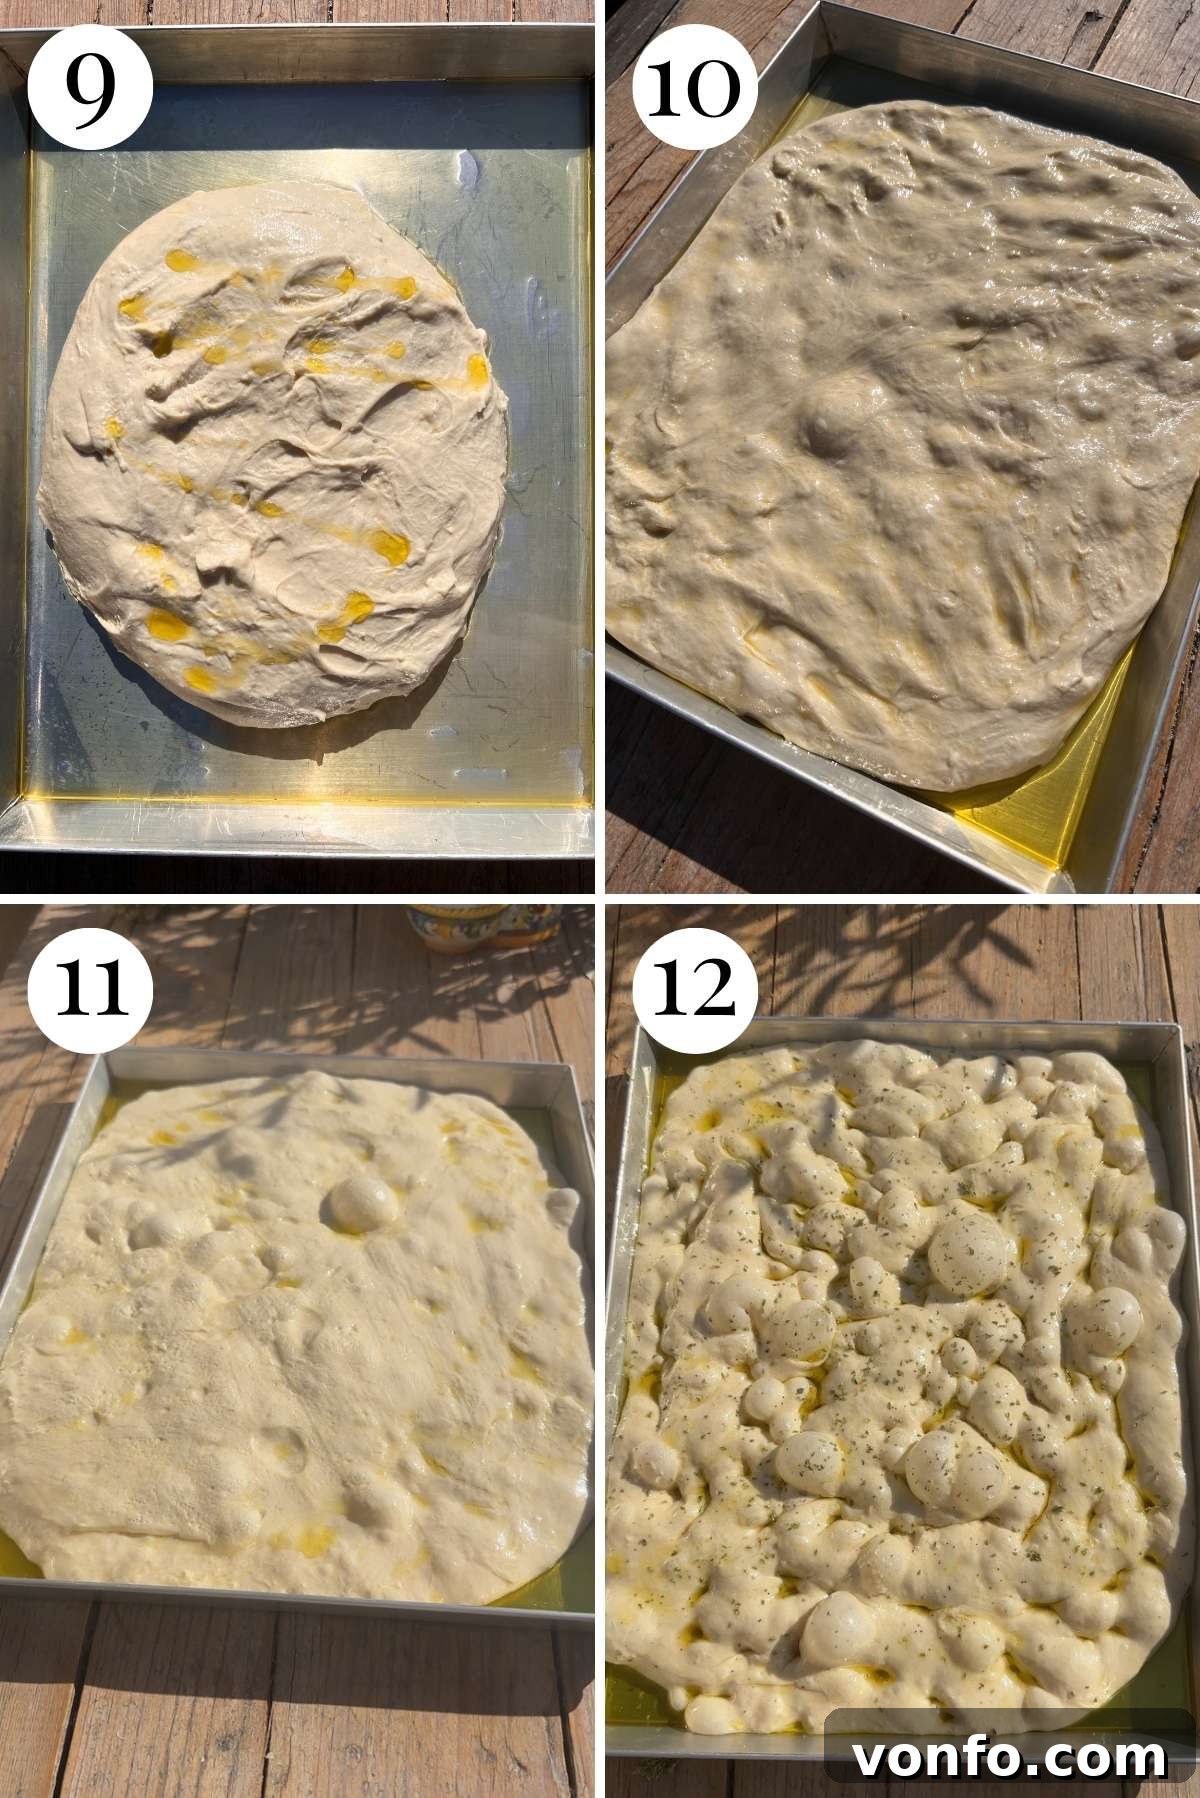
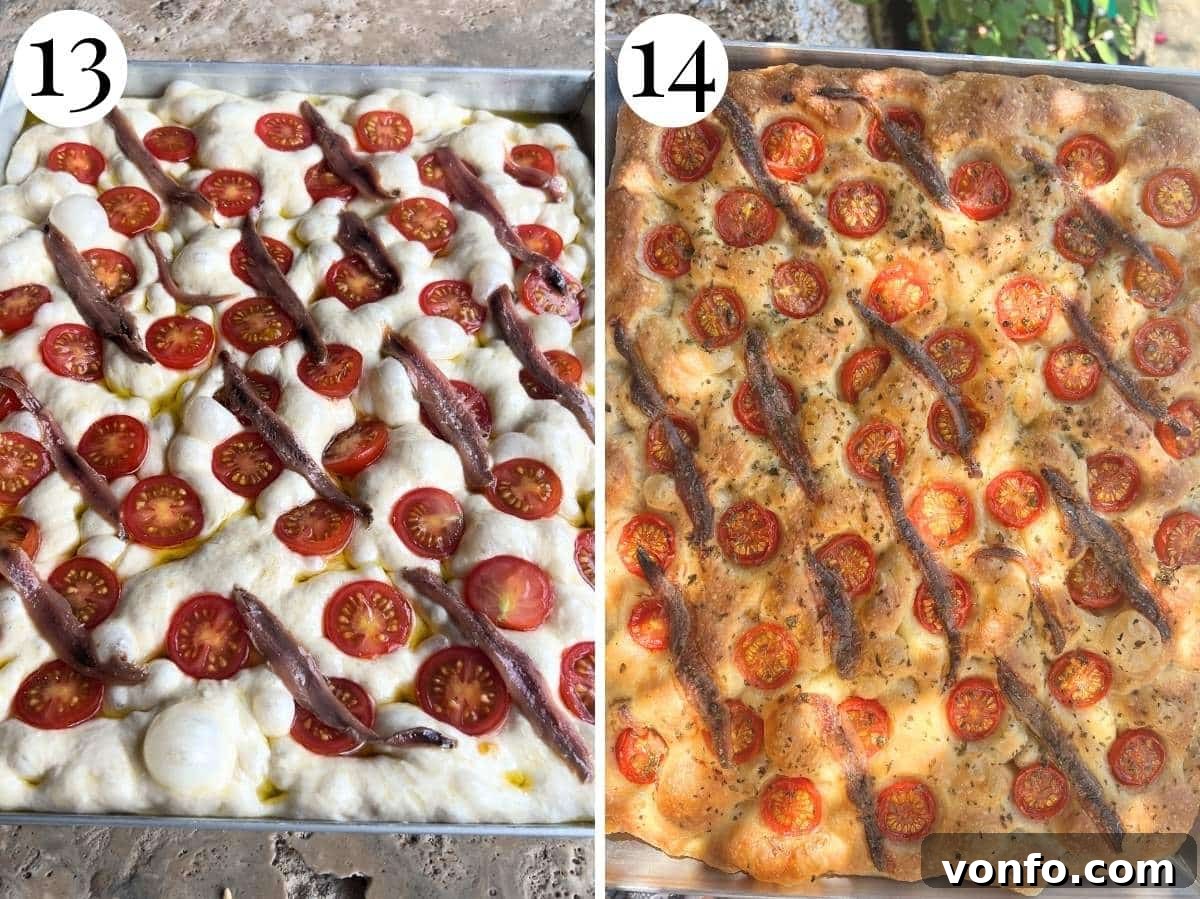
Step 5 – Dimpling and Topping: Once the dough has beautifully risen, it’s time for the signature focaccia dimpling. Re-grease your hands with olive oil. Using your fingertips, gently press down all over the surface of the dough, creating those distinctive dimples. Be careful not to deflate the precious air bubbles too much! This creates pockets for the olive oil and toppings to gather, adding to the flavor and texture. Next, arrange your halved cherry tomatoes and anchovy fillets evenly across the surface. Finish with a generous sprinkle of dried oregano and a final drizzle of high-quality olive oil. This last drizzle helps achieve a beautifully golden crust and infuses the focaccia with even more flavor. (Photos 12 and 13 clearly show the dimpling and topping process.)
Step 6 – Baking to Golden Perfection: Finally, transfer your masterpiece to a preheated oven and bake until it achieves a glorious golden-brown hue. This typically takes around 20-25 minutes, depending on your oven. The crust will be crisp, the interior light, and the aromas will fill your kitchen. (Photo 14 captures the focaccia’s transformation, showcasing its appearance both before and after baking.)
Expert Tips and Frequently Asked Questions
Achieving focaccia perfection is easier with a few key insights. Here are some valuable tips and answers to common questions:
- Precision with a Kitchen Scale: When working with flour, accuracy is paramount. I highly recommend using a digital kitchen scale for measuring ingredients, especially flour. It’s incredibly easy to over or under-measure flour using volumetric cups, which can drastically alter the dough’s hydration and, consequently, the final texture of your focaccia.
- Understanding Proofing Time: The time it takes for your dough to proof (rise) is highly dependent on your ambient room temperature. In a warmer environment, the dough will proof much quicker. In cooler conditions, it will take longer. Learn to read the dough – it’s ready when it’s visibly expanded and appears bubbly, not strictly by the clock.
- Quality of Ingredients: Investing in good quality ingredients, especially olive oil, flour, and ripe tomatoes, will significantly impact the flavor profile of your focaccia. Freshness matters!
- Oven Calibration: Ovens can vary. It’s a good idea to know your oven’s quirks. If your focaccia is browning too quickly or slowly, adjust the temperature or baking time slightly.
For this particular recipe, yes, an overnight fermentation is absolutely essential. We use a minimal amount of yeast in this no-knead method, which necessitates a longer, slower rise. This extended cold fermentation not only contributes significantly to the development of complex, nuanced flavors but also plays a crucial role in creating the desired light, airy, and bubbly texture that truly distinguishes this focaccia. Skipping this step would compromise both the taste and structure.
Absolutely! If anchovies aren’t to your taste, you can easily omit them. The focaccia will still be wonderfully flavorful with just the cherry tomatoes and oregano. For an added layer of umami without the fish, consider incorporating sun-dried tomatoes (packed in oil, drained and chopped) or a sprinkle of finely grated Parmesan cheese before baking.
When proofed correctly, the dough should look visibly expanded, light, and very bubbly. A good test is the “poke test”: gently poke the dough with a floured finger. If the indentation springs back slowly, leaving a slight dimple, it’s ready. If it springs back immediately, it needs more time. If it collapses, it’s overproofed (though still usually salvageable!).
More Irresistible Pizza and Focaccia Recipes to Try
If you’ve fallen in love with the simple elegance and rustic charm of this focaccia, you’ll be thrilled to explore more of our beloved recipes. Dive into a world of Italian bread and pizza perfection with these fantastic dishes:
Pizza
Focaccia Pizza: The Best of Both Worlds
Combine the best of airy focaccia with your favorite pizza toppings for a truly satisfying meal.
Bread & Savory Bakes
Rustic Walnut Focaccia
A delightful twist on traditional focaccia, infused with the earthy goodness of walnuts.
Bread & Savory Bakes
Our Signature Easy Overnight No-Knead Focaccia
The foundational recipe for a perfectly airy focaccia with minimal effort, allowing the flavors to develop overnight.
Pizza
Authentic Sicilian Pizza (Lo Sfincione)
Indulge in a hearty, flavorful Sicilian pan pizza, rich with traditional toppings and a unique soft crust.
If you’ve tried this delightful Cherry Tomato Focaccia Recipe or any other recipe from our blog, we would be absolutely thrilled to hear from you! Don’t forget to rate the recipe and share your experience in the comments section below. Your feedback and stories truly motivate us. You can also follow us on Facebook, Instagram, and Pinterest for daily inspiration, or simply sign up for our Newsletter to receive our latest delicious creations directly in your inbox.
Step By Step Photos Above
Most of our recipes come with step by step photos, helpful tips and tricks to make it perfectly first time and even video!
Cherry Tomato Focaccia with Anchovies and Oregano
By Emily
2 hours
25 minutes
14 hours
8
servings
Pin
Ingredients
For the dough
-
▢
500
g
Italian 00 flour,
(approx 3 and 3/4 cups spooned and levelled) -
▢
400
ml
water,
(1 and 2/3 cups) -
▢
1
g (¼ teaspoon)
instant yeast,
(please see notes) -
▢
4
tablespoons
olive oil plus more for greasing and topping -
▢
7
g
fine salt,
(1 level teaspoon)
For the topping
-
▢
200
g (7 oz)
Cherry tomatoes ,
(about 20 tomatoes), cut in half -
▢
50
g (2 oz)
salted anchovies ,
(about 14 anchovy fillets) -
▢
Dried oregano -
▢
Olive oil,
for topping
Instructions
The day before
-
Put the flour in a large mixing bowl and place the yeast and salt at opposite ends of the bowl. Please check your packet instructions to see if your yeast needs activated in water first (see notes).
-
Add the water and stir in to form a rough dough. Add the olive oil, then continue to stir the dough with a spoon until there are no dry bits left. It should look very wet and sticky.
-
Cover the bowl with plastic wrap and leave it to rest for 30 minutes.
-
Next, uncover the bowl and wet your hands well with water. Using one hand, fold each edge of the dough into the middle (see photos or video for reference). This takes just a few seconds. Re-cover the bowl and let it rest for another 30 minutes.
-
Repeat the step above once more, then leave it again for 30 minutes.
-
Next, wet your hands again and do a coil fold. To do this, pick the dough up from the middle and stretch it right up until to feel the edges start to come away from the bowl. Release the dough then do this again up to 3-4 times until you can lift the dough right out of the bowl without tearing it. Place the dough back in the bowl letting the ends fold in on themselves. Repeat it from the opposite edge you started with (I recommend watching the quick video below as this is a very simple technique but can sound so complicated written out).
-
Let the dough rest for another 30 minutes then repeat this another twice with 30 minutes rest in between.
-
Cover the bowl and refrigerate it overnight or up to 48 hours.
Same day of baking
-
Remove the dough from the fridge and put it in a well-oiled baking tray. Drizzle more olive oil over the top then place more plastic wrap over the tray. Let the dough proof at room temperature until almost doubled in size (don’t put it near any direct sun or high heat).
-
Pre-heat the oven to 230C (450F). Oil your hands well and drizzle a small amount over the surface of the dough. Use your fingers to create dimples all over the dough (try not to burst any air bubbles).
-
Top the focaccia with the cherry tomatoes, anchovies and a sprinkling of dried oregano. Give it another light drizzle of olive oil then bake in the oven for 20-25 minutes until golden brown.
-
Remove from the oven and let it rest for at least 10-15 minutes before cutting. You can serve the focaccia warm or at room temperature.
-
It’s best served the same day (see notes for storing leftovers)
Video
A demonstration video showcasing the no-knead focaccia folding techniques is available to guide you through the process, ensuring perfect results every time.
Notes
Instant yeast – Always check your specific yeast packet instructions before using, as some types of yeast may require activation in warm water prior to mixing with other ingredients. If activation is needed, simply use a small portion of the water measured for the recipe.
Storage – Any leftover focaccia can be stored effectively in an airtight container at room temperature for up to 2 days. For longer storage, it can be refrigerated, but for the best flavor and texture, it’s always recommended to consume it warm or at room temperature on the same day it’s baked.
Helpful Info for All Our Recipes
- We consistently use extra virgin olive oil in all our recipes unless explicitly stated otherwise, due to its superior flavor and quality.
- For canned or jarred tomatoes of any variety, we exclusively recommend using Cirio or Mutti brands to ensure the best results and authentic Italian flavor profile.
- All vegetables specified in our recipes are assumed to be medium-sized unless their size is specifically noted otherwise.
- All recipes published on our blog are meticulously tested and developed using a fan (convection) oven to ensure consistent and reliable results.
- Find out more about how nutrition information is calculated for our recipes.
- Check out our list of must-have Italian Pantry Staples to stock your kitchen.
- You can also discover all our recommended Essential Kitchen Tools for Italian Cooking.
Nutrition
Carbohydrates: 49g |
Protein: 8g |
Fat: 13g |
Saturated Fat: 2g |
Polyunsaturated Fat: 2g |
Monounsaturated Fat: 9g |
Sodium: 815mg |
Potassium: 123mg |
Fiber: 2g |
Sugar: 1g |
Vitamin A: 122IU |
Vitamin C: 6mg |
Calcium: 14mg |
Iron: 3mg
Nutrition information is automatically calculated, so should only be used as an approximation.
Did you try this recipe?
Leave a comment below!