
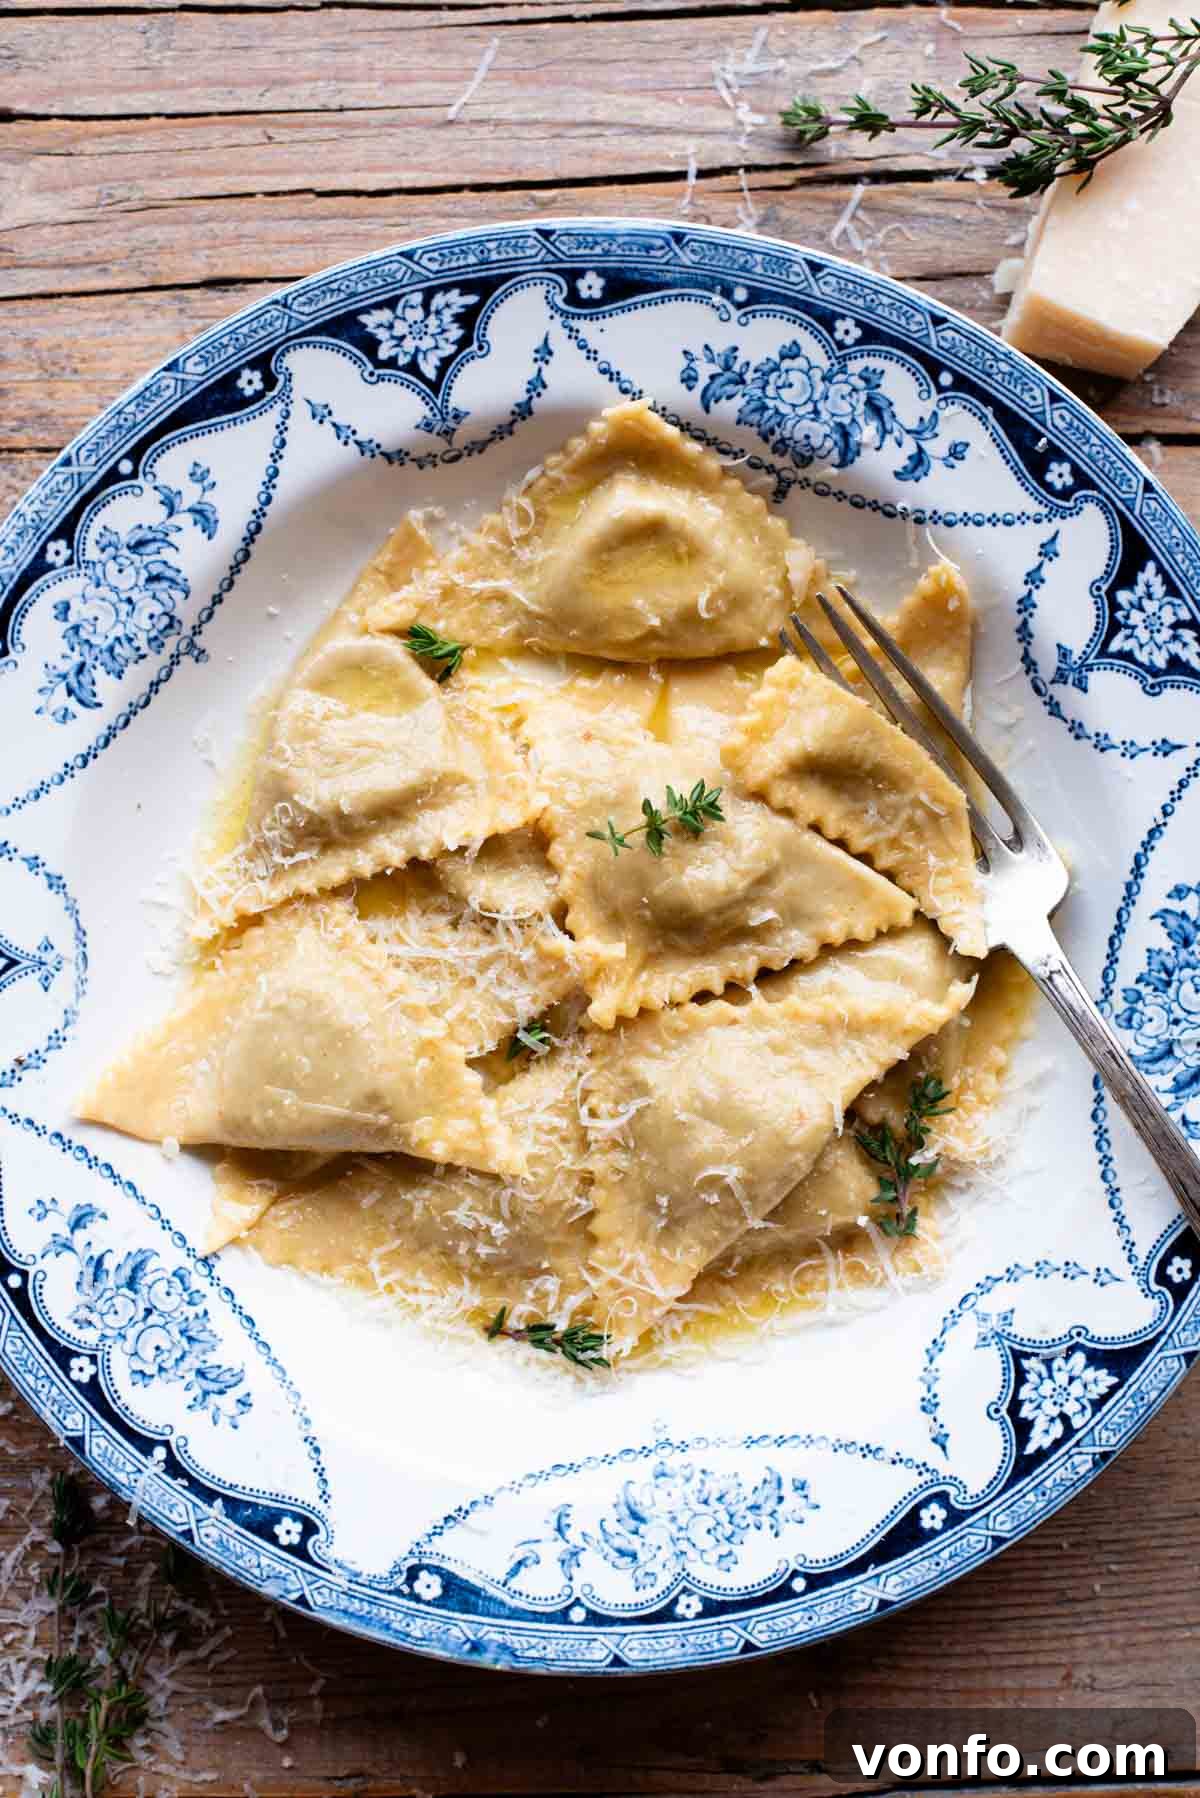
Embark on a delightful culinary journey with our comprehensive, step-by-step guide to crafting exquisite homemade Triangoli Pasta. These beautiful triangular pasta parcels are generously filled with a rich, savory mushroom and Taleggio cheese filling, offering a perfect blend of earthy and creamy flavors. Served simply in a luscious butter sauce and finished with a generous dusting of Parmigiano Reggiano cheese, this dish promises an unforgettable taste of authentic Italy. Get ready to impress yourself and your loved ones with this truly delicious and elegant creation!
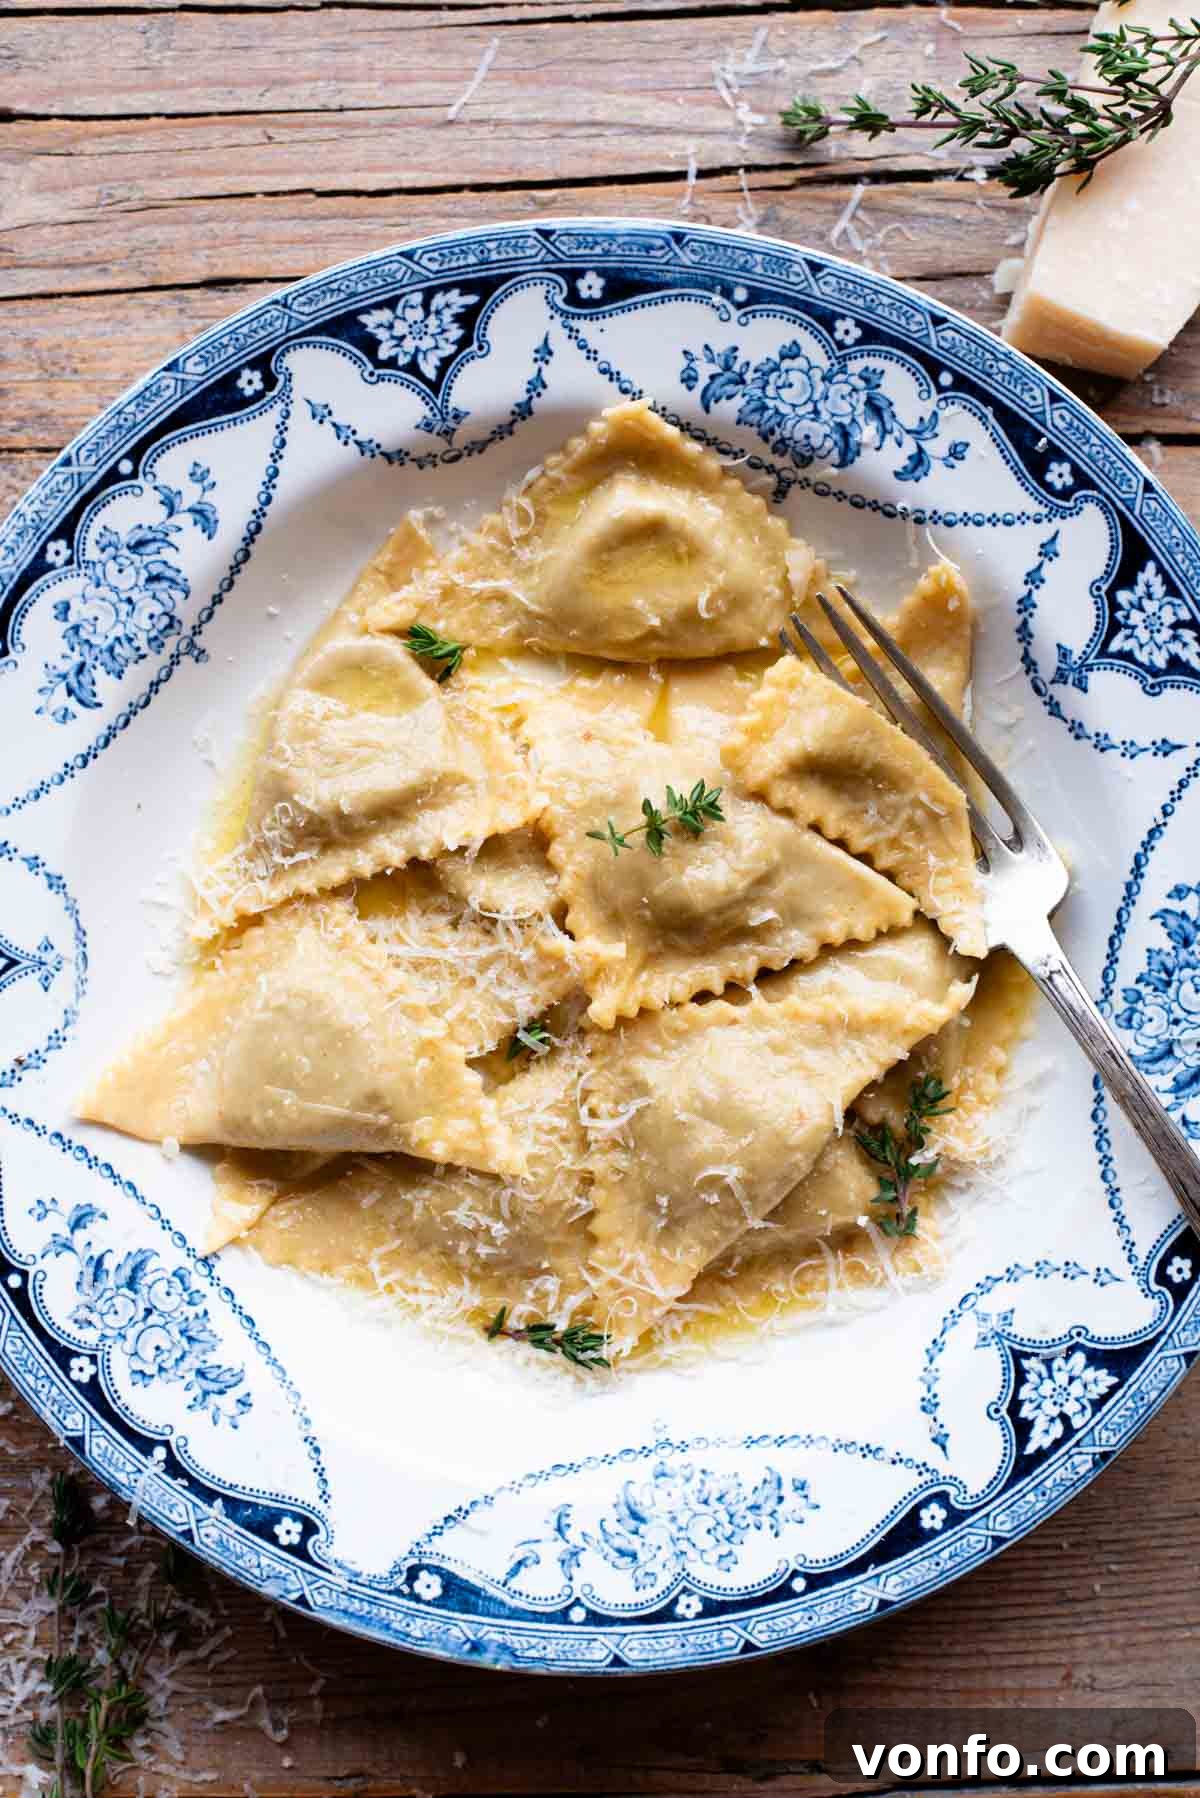
Triangoli, a charming and elegant filled pasta shape, offers an approachable entry point for aspiring pasta makers. Often compared to traditional ravioli, their distinct triangular form simplifies the sealing process, requiring attention to just two edges instead of four. This makes them wonderfully straightforward to prepare, even for those new to the art of fresh pasta making. We’ll guide you through using a perfectly balanced batch of our signature homemade pasta dough, renowned for its silky texture and effortless workability. The result is a tender, pliable pasta that practically melts in your mouth.
The star of this dish, the filling, draws deep inspiration from one of our most beloved recipes – our classic mushroom ravioli. For this Triangoli recipe, we elevate the experience by incorporating the wonderfully pungent and creamy Taleggio cheese, transforming the filling into an absolutely incredible blend of earthy and tangy notes. This luxurious fresh pasta is then lovingly coated in a simple yet decadent butter and Parmigiano Reggiano sauce. This minimalist sauce allows the delicate pasta and its rich, complex filling to truly shine, highlighting the quality of each ingredient. The entire process, from preparing the dough to plating the final dish, promises an authentic and deeply satisfying Italian culinary adventure.
The Essence of Italian Pasta: Key Ingredients for Perfect Triangoli
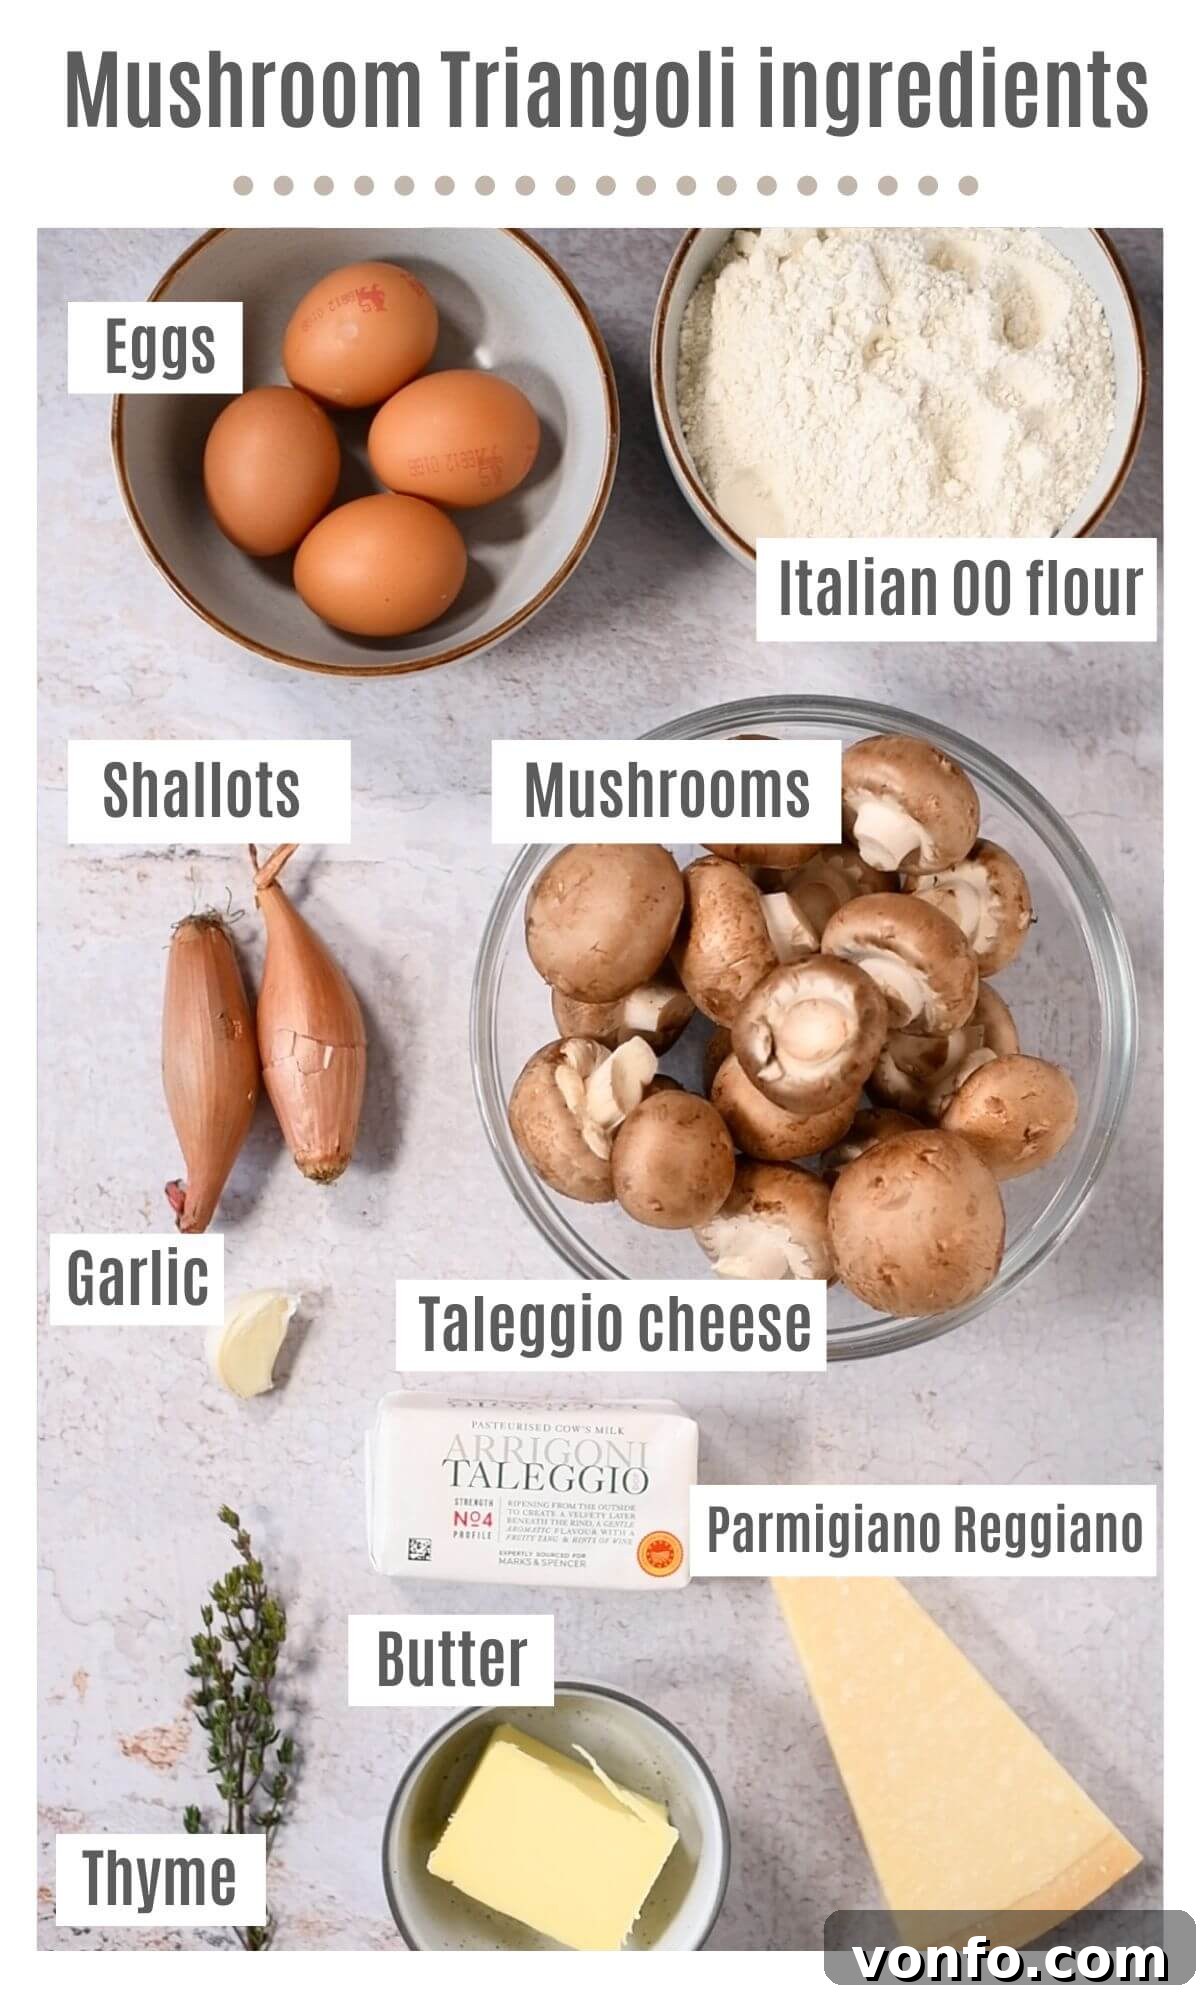
Crafting exceptional homemade pasta begins with selecting the right, high-quality ingredients. Here’s a closer look at what you’ll need and how thoughtful choices or substitutions can significantly impact your final dish, ensuring the best flavor and texture for your mushroom and Taleggio Triangoli.
Ingredient Notes and Expert Substitutions
- Italian 00 Flour: This finely milled soft wheat flour is the gold standard for authentic homemade Italian pasta dough. Its low protein content results in a beautifully silky, tender dough that is exceptionally easy to roll thin without tearing, which is crucial for delicate filled pastas like Triangoli. While all-purpose flour can be used as a last resort, it typically yields a chewier texture that isn’t quite as refined. For the best, most traditional results, we highly recommend investing in good quality 00 flour.
- Eggs: Eggs are far more than just a binder; they contribute significantly to the vibrant color, richness, and elasticity of your pasta dough. For that desired vibrant, deep yellow hue characteristic of homemade Italian egg pasta, seek out eggs with intensely golden yolks. In Italy, these are often specifically labeled ‘Pasta Gialla’ (yellow dough) eggs. Our recipe calls for medium-sized eggs; if you happen to use larger eggs, you might need to adjust the flour slightly, adding a touch more if your dough feels overly sticky or wet. Achieving the right consistency in your dough is paramount, and the precise egg-to-flour ratio makes all the difference.
- Mushrooms: We’ve chosen earthy chestnut mushrooms (also known as Crimini mushrooms) for their robust, savory flavor and firm texture, which holds up beautifully when cooked down into a rich filling. However, feel free to experiment with other varieties like white button mushrooms for a milder taste, shiitake for more umami depth, or even a blend of wild mushrooms for a truly gourmet touch. Remember, mushrooms are incredibly porous; never wash them under running water as they will absorb too much moisture and dilute their flavor. Instead, gently wipe away any dirt with a damp kitchen towel or a soft mushroom brush before roughly chopping. This ensures a concentrated, flavorful mushroom base for your filling.
- Taleggio Cheese: This is a true star in our filling, prized for its uniquely pungent, slightly fruity aroma and wonderfully creamy, melt-in-your-mouth texture. Taleggio, an Italian semi-soft, washed-rind cheese, offers a complexity and depth of flavor that elevates the entire dish. Its tangy, rich notes pair perfectly with the earthy mushrooms. If authentic Taleggio is unavailable or if you prefer a different flavor profile, consider these excellent alternatives:
- Stracchino: Another Italian soft cheese, similar in texture to Taleggio but generally milder in flavor.
- Ricotta: Will offer a much milder, sweeter, and fresher taste. If using ricotta, opt for whole milk ricotta for maximum creaminess and ensure it is very well-drained to avoid a watery filling.
- Gorgonzola: For those who appreciate a stronger blue cheese flavor, a small amount of Gorgonzola can add an exciting, intense tang and spice to the filling, creating a bolder taste experience.
- Fresh Thyme: The aromatic, slightly peppery notes of fresh thyme are crucial here, providing a subtle yet distinct herbaceous counterpoint to the rich mushrooms and cheese. Fresh herbs always offer a brighter, more nuanced, and vibrant flavor profile than their dried counterparts. Therefore, we strongly recommend using fresh thyme for the best possible results in this recipe.
- Semolina (Semola): While optional, a light sprinkle of fine semolina flour on your work surface is an invaluable trick for homemade pasta making. It acts as a non-stick barrier, preventing your delicate, freshly formed Triangoli from adhering to surfaces while they await cooking. This is especially helpful in humid environments. If semolina isn’t available, a light dusting of Italian 00 flour or even cornmeal can also work effectively.
Mastering Triangoli: A Detailed Step-by-Step Guide
Creating homemade pasta from scratch is a deeply rewarding culinary journey that connects you with Italian tradition. Follow these detailed steps carefully to achieve perfect, delicious Triangoli every single time, from the silky dough to the flavorful filling and elegant shaping.
1. Crafting the Silky Pasta Dough
The foundation of any great fresh pasta dish is the dough. Our recipe yields a beautifully pliable and silky dough that’s an absolute joy to work with, making the rolling and shaping process much smoother.
- Combine Ingredients: On a clean, spacious work surface, mound the Italian 00 flour into a neat circle. Create a generous well in the center of the flour, resembling a volcano crater. Carefully crack the eggs and egg yolk into this well. Using a fork, gently whisk the eggs, gradually incorporating small amounts of flour from the inner edge of the well. Continue this process, drawing more flour into the liquid, until a thick, shaggy mixture forms that is difficult to work with a fork.
- Knead to Perfection: Once the mixture is too thick for a fork, use your hands to bring the rough dough together. Begin kneading vigorously and consistently for approximately 10 minutes. This essential step is where the magic happens: you’re developing the gluten in the flour, transforming the dough from sticky and rough into a wonderfully smooth, elastic, and supple ball. If you find the dough is too sticky during kneading, lightly dust your hands and the work surface with a small amount of extra flour. However, avoid adding too much flour, as this can make the finished pasta tough. You’ll know the dough is perfectly kneaded when it feels smooth, is no longer sticky, and springs back slightly when gently poked with your finger.
- Rest the Dough: This is a crucial, non-negotiable step that allows the gluten you’ve just developed to relax. Resting makes the dough significantly easier to roll thinly without tearing or snapping. Wrap the kneaded dough tightly in plastic wrap (cling film) to prevent it from drying out and forming a crust. Let it rest at room temperature for a minimum of 30 minutes, or ideally for an hour. For added convenience, you can prepare the dough the night before and store it in the refrigerator overnight. Just remember to bring it back to room temperature for about 30-60 minutes before you plan to roll it out, as cold dough will be stiff and difficult to work with.
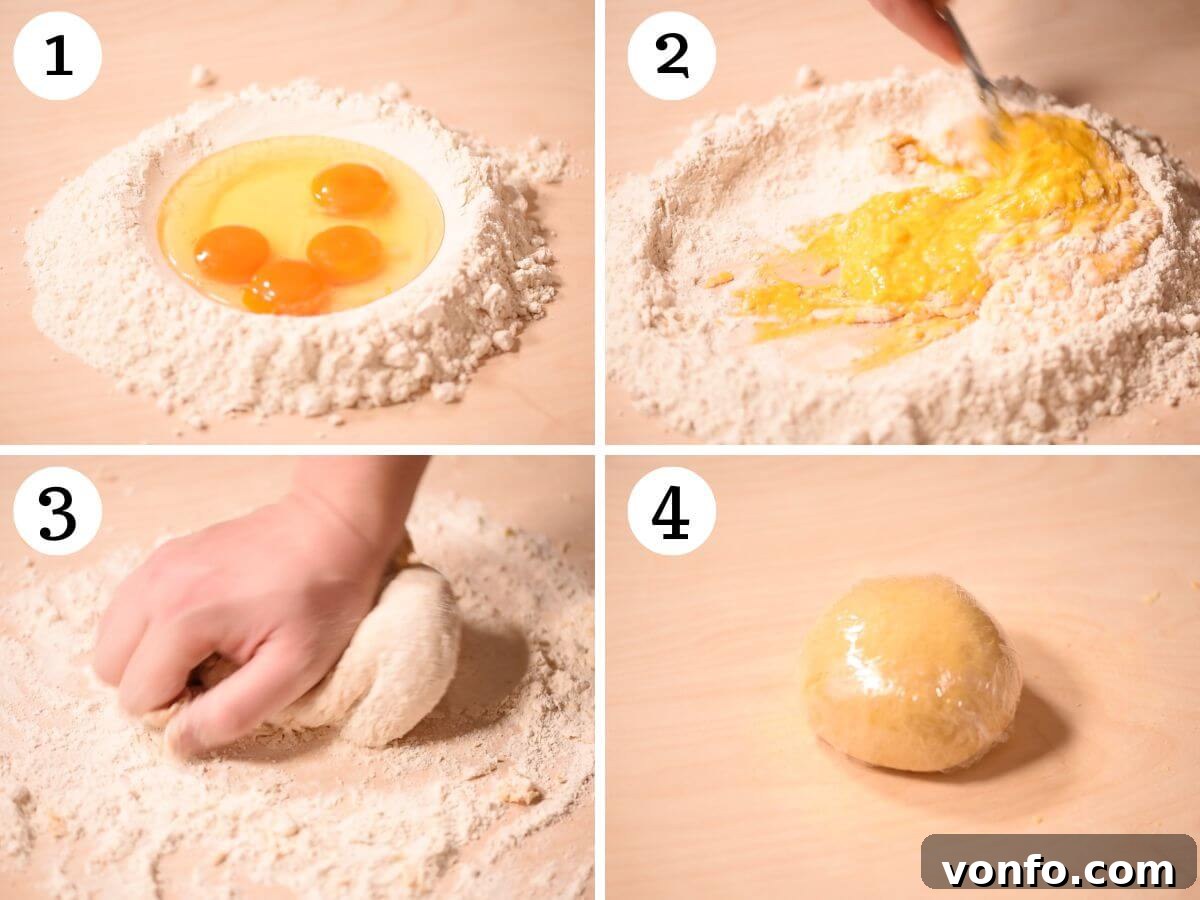
2. Preparing the Rich Mushroom and Taleggio Filling
This savory and aromatic filling is the creamy, umami-packed heart of your Triangoli, providing a luxurious counterpoint to the tender pasta.
- Sauté Aromatics and Mushrooms: Begin by finely chopping the shallots and mincing the garlic; set them aside. Roughly chop your chosen mushrooms. Heat 1-2 tablespoons of olive oil in a large frying pan over high heat. Add the chopped mushrooms to the hot pan and cook them vigorously. The high heat is essential here as it helps to quickly evaporate their natural moisture, allowing them to brown beautifully and concentrate their deep, earthy flavor. Continue cooking, stirring occasionally, until they have significantly shrunk in size and any liquid released has completely evaporated.
- Infuse with Herbs and Season: Reduce the heat to medium. Add the finely chopped shallots, minced garlic, and fresh thyme leaves to the pan with the cooked mushrooms. Sauté for another 2-3 minutes, stirring frequently, until the shallots and garlic are soft, translucent, and fragrant. Season the mixture generously with salt and freshly ground black pepper to taste. Remove the pan from the heat and allow the mushroom mixture to cool for about 5 minutes before proceeding to the next step.
- Blend the Filling: Transfer the slightly cooled mushroom mixture to a food processor. Add the Taleggio cheese, which you should roughly chop into smaller pieces, and the freshly grated Parmigiano Reggiano. Process the ingredients until they combine to form a smooth, homogenous, and thick paste. This creates a wonderfully creamy, intensely flavorful filling with a delightful texture. Scoop the finished filling into a bowl and set it aside to cool completely. A cold filling is much easier to work with when shaping the pasta and helps prevent the delicate pasta dough from tearing.
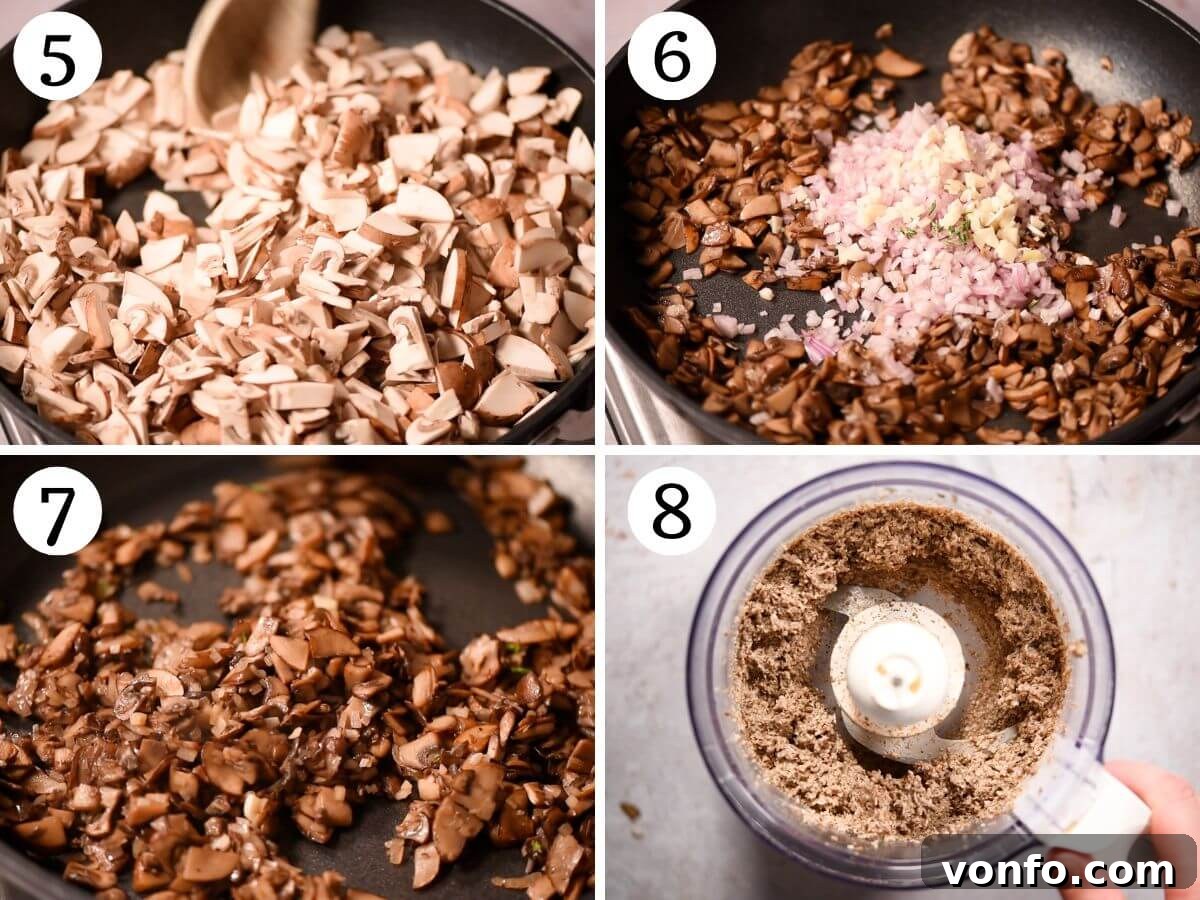
3. Shaping the Elegant Triangoli Pasta
The distinctive triangular shape of Triangoli is both visually appealing and surprisingly simple to achieve, making this filled pasta perfect for showcasing your handmade pasta skills.
- Prepare the Dough for Rolling: Divide your rested pasta dough in half. It is essential to keep one half tightly wrapped in plastic wrap to prevent it from drying out while you work with the other section. On a lightly floured surface (using either 00 flour or semolina), flatten the working dough with your hands or a rolling pin until it’s thin enough to fit comfortably into the widest setting of your pasta machine (this is typically setting 0 or 1, depending on your machine).
- Initial Passes through the Pasta Machine: Pass the flattened dough through the widest setting of your pasta machine. Then, carefully take one end of the dough sheet and fold it into the middle, then fold the other end directly over it, as if you were creating a leaflet or a tri-fold. Gently flatten the dough again and pass it through the widest setting once more. Repeat this folding and passing process two more times. This crucial step helps to strengthen the gluten structure, creates a perfectly smooth, rectangular sheet of dough, and makes it more elastic.
- Rolling to Desired Thickness: Once the dough has been conditioned by the initial passes, it’s ready for final rolling. Begin passing the dough through your pasta machine, advancing one setting at a time. It’s important not to skip settings. Pass the dough through each subsequent setting only once, until you reach setting number 6 (or your preferred thickness for filled pasta, which should be thin enough that you can almost see your hand through it). If the pasta sheet becomes too long to manage easily during this process, simply cut it in half before continuing to roll.
- Cutting and Filling the Triangles: Lay your thinly rolled pasta sheet on a clean work surface that has been lightly dusted with semolina flour (our preference) or 00 flour. First, cut the sheet in half lengthwise to create two more manageable strips. Then, using a pasta cutter (fluted or straight) or a sharp knife, cut the pasta strips into even squares, approximately 7cm (about 2.75 inches) per side. You can certainly make them slightly smaller if you prefer bite-sized Triangoli. For each individual square, place a scant teaspoon of the completely cooled mushroom and Taleggio filling precisely in the center.
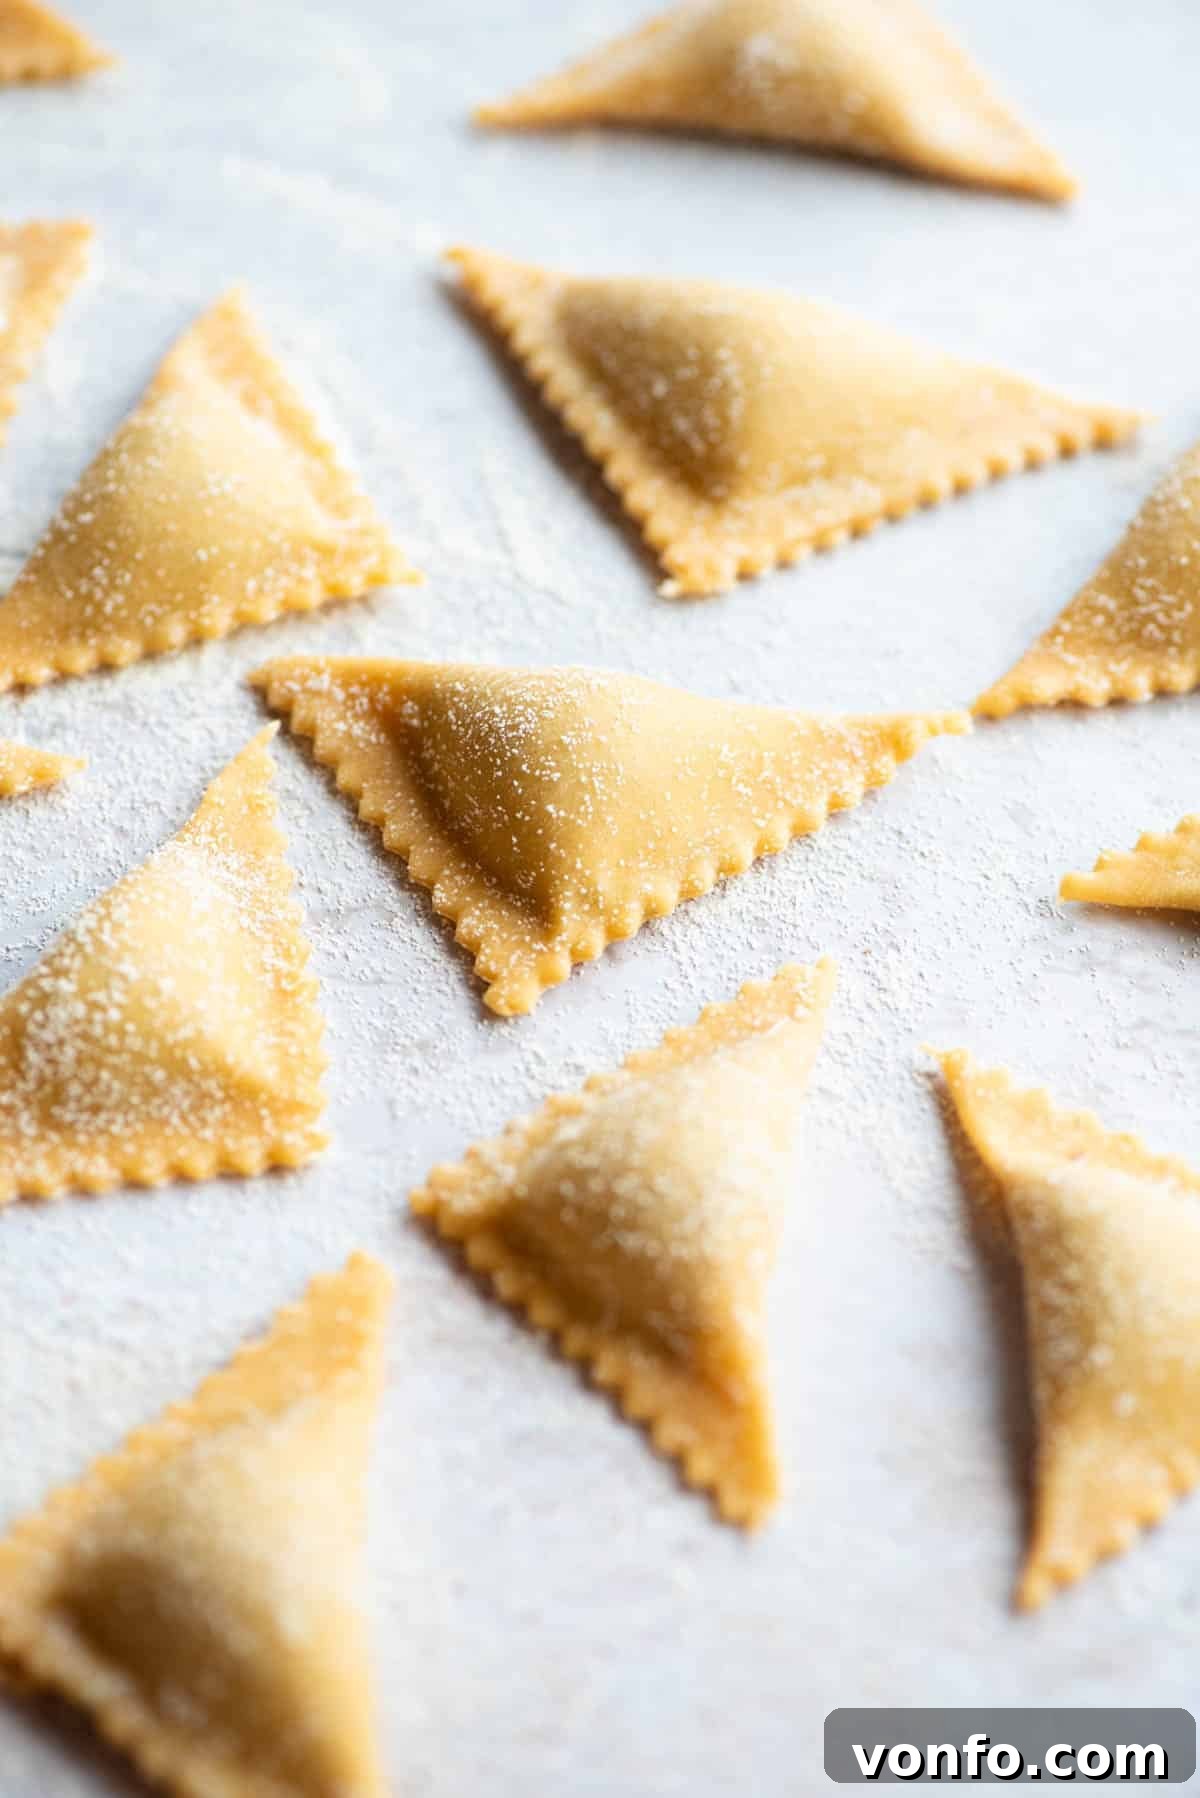
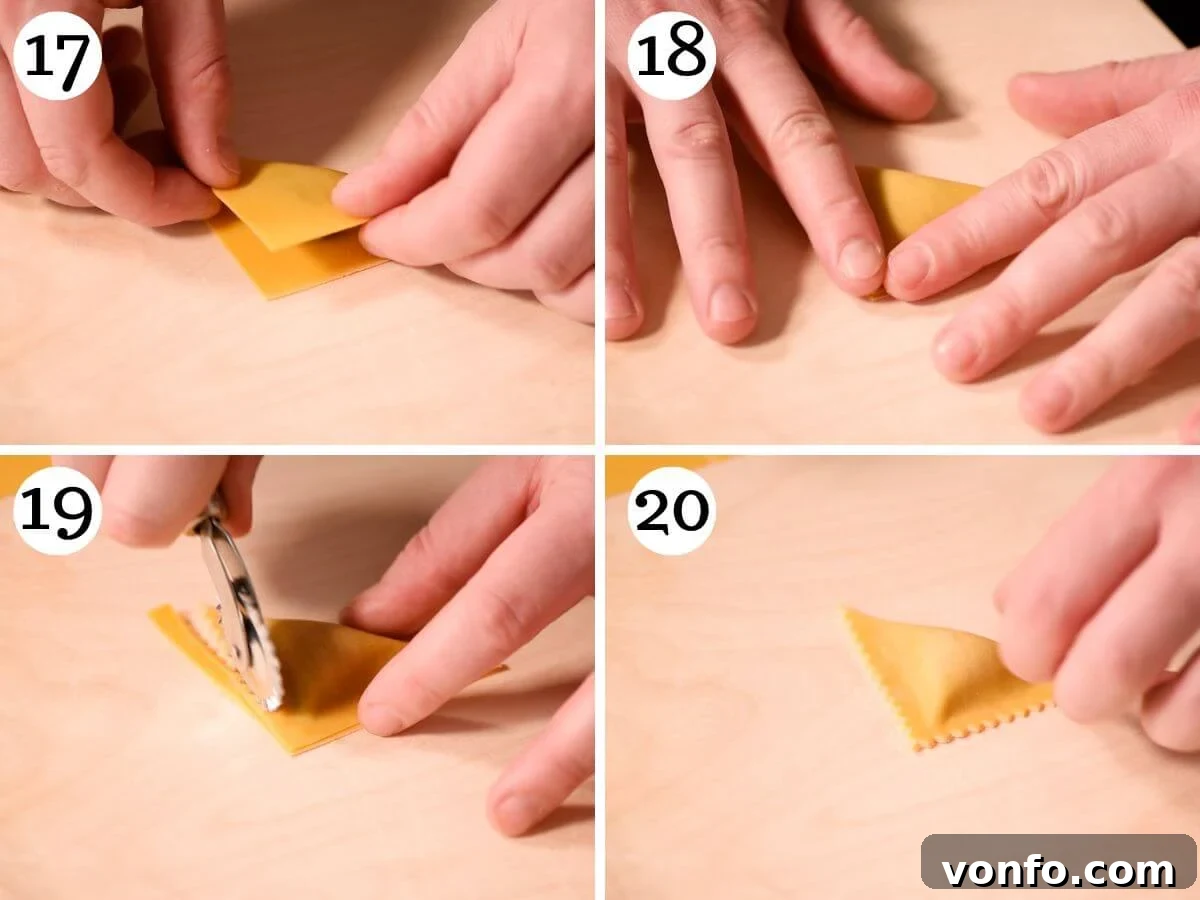
- Folding and Sealing: To form the Triangoli, carefully fold one corner of the pasta square over to meet the opposite corner, creating a perfect triangle shape. Gently but firmly press down on all the edges with your fingers, working from the center outwards, to seal the pasta completely and, crucially, to push out any trapped air. Air pockets can cause your beautiful pasta parcels to burst during cooking. For a more professional and aesthetically pleasing finish, you can trim the sealed edges with a fluted pasta cutter or a sharp knife. As you finish each Triangolo, immediately place it on your clean work surface that is well-dusted with semolina flour or 00 flour to prevent any sticking. Continue this process methodically with the remaining dough and filling until all your Triangoli are shaped.
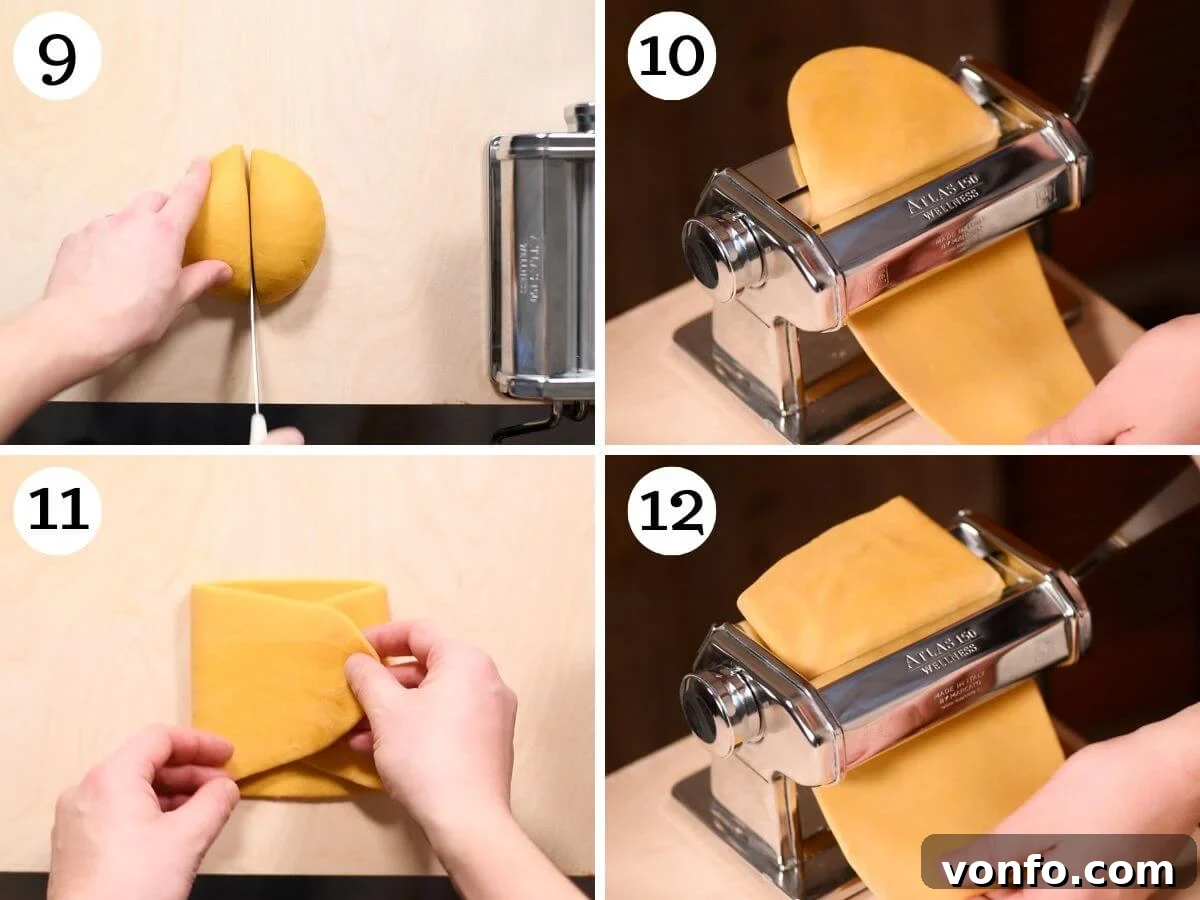
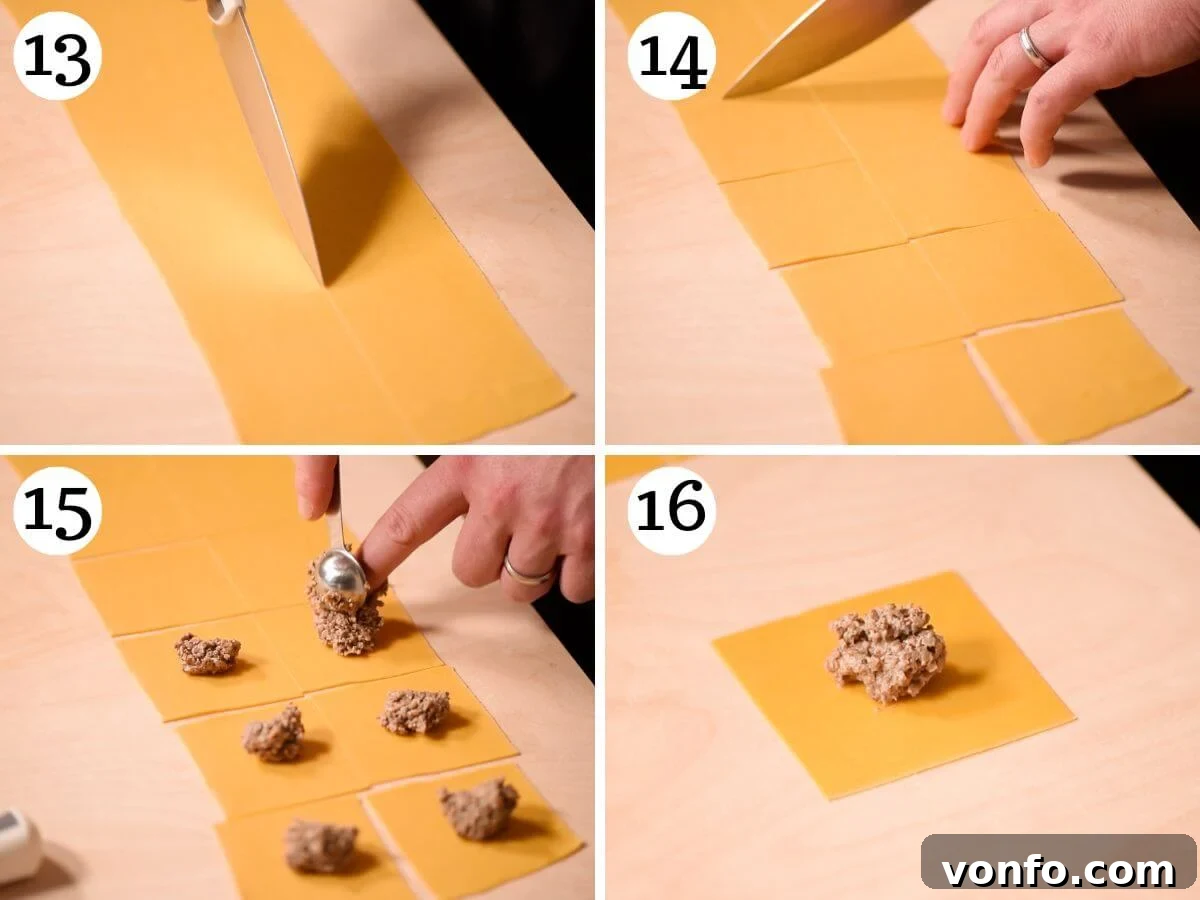
4. Cooking Your Triangoli and Creating the Butter Sauce
Bringing your freshly made pasta to life with a simple, yet incredibly elegant and flavorful butter sauce that perfectly complements the rich filling.
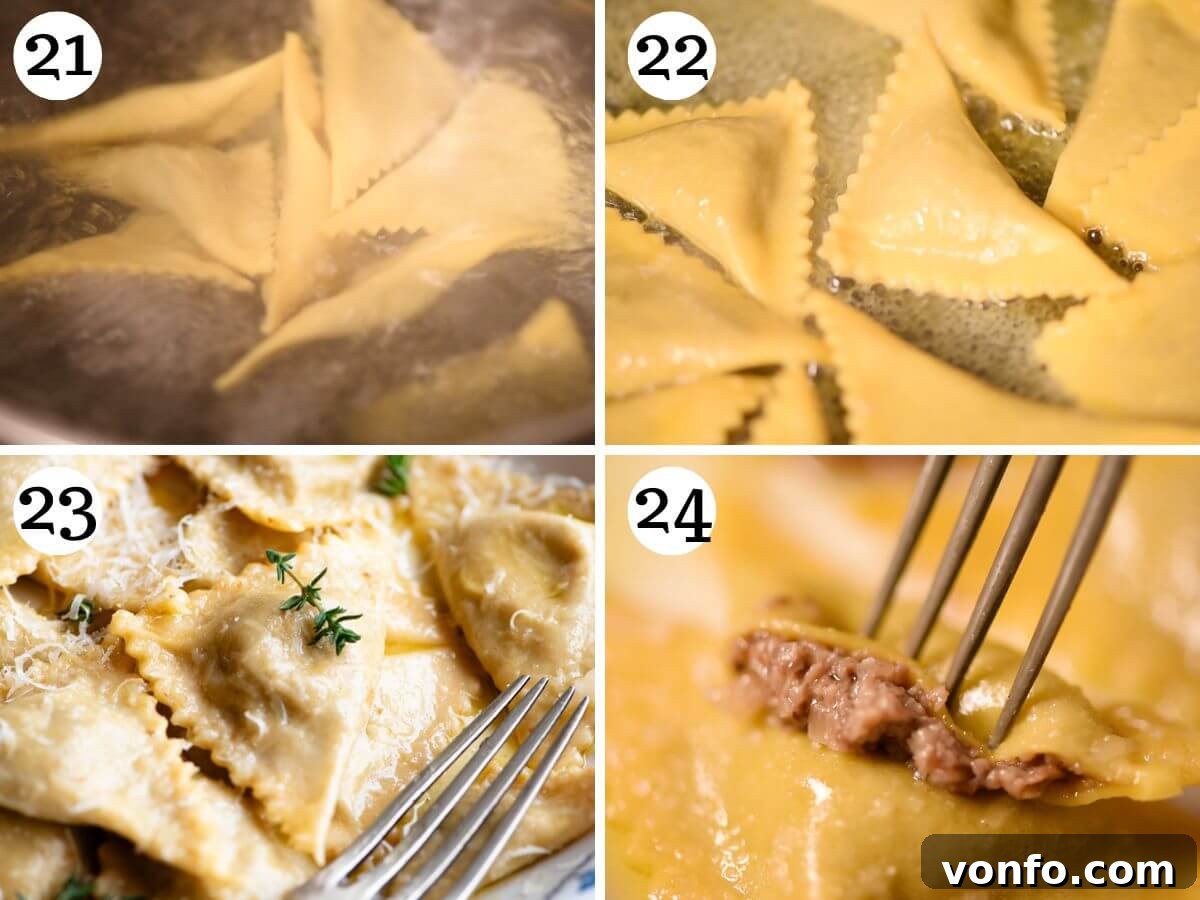
- Boil the Pasta: Bring a large pot of water to a vigorous, rolling boil. It is absolutely essential to season the water generously with salt – it should taste distinctly salty, like the sea, as this is your only opportunity to truly season the pasta itself from the inside out. Carefully add the freshly formed Triangoli to the boiling water. It’s important to avoid overcrowding the pot; if necessary, cook them in small batches to maintain the water temperature and ensure even, perfect cooking. Cook for approximately 3 minutes, or until the pasta floats to the surface and is perfectly al dente (tender with a slight, pleasant bite).
- Prepare the Butter Sauce: While the Triangoli are cooking, melt the unsalted butter in a large frying pan over medium heat. The pan should be wide enough to comfortably hold all the cooked Triangoli without them being cramped. Allow the butter to gently melt and just begin to turn a light golden color, developing a nutty aroma (be careful not to burn it).
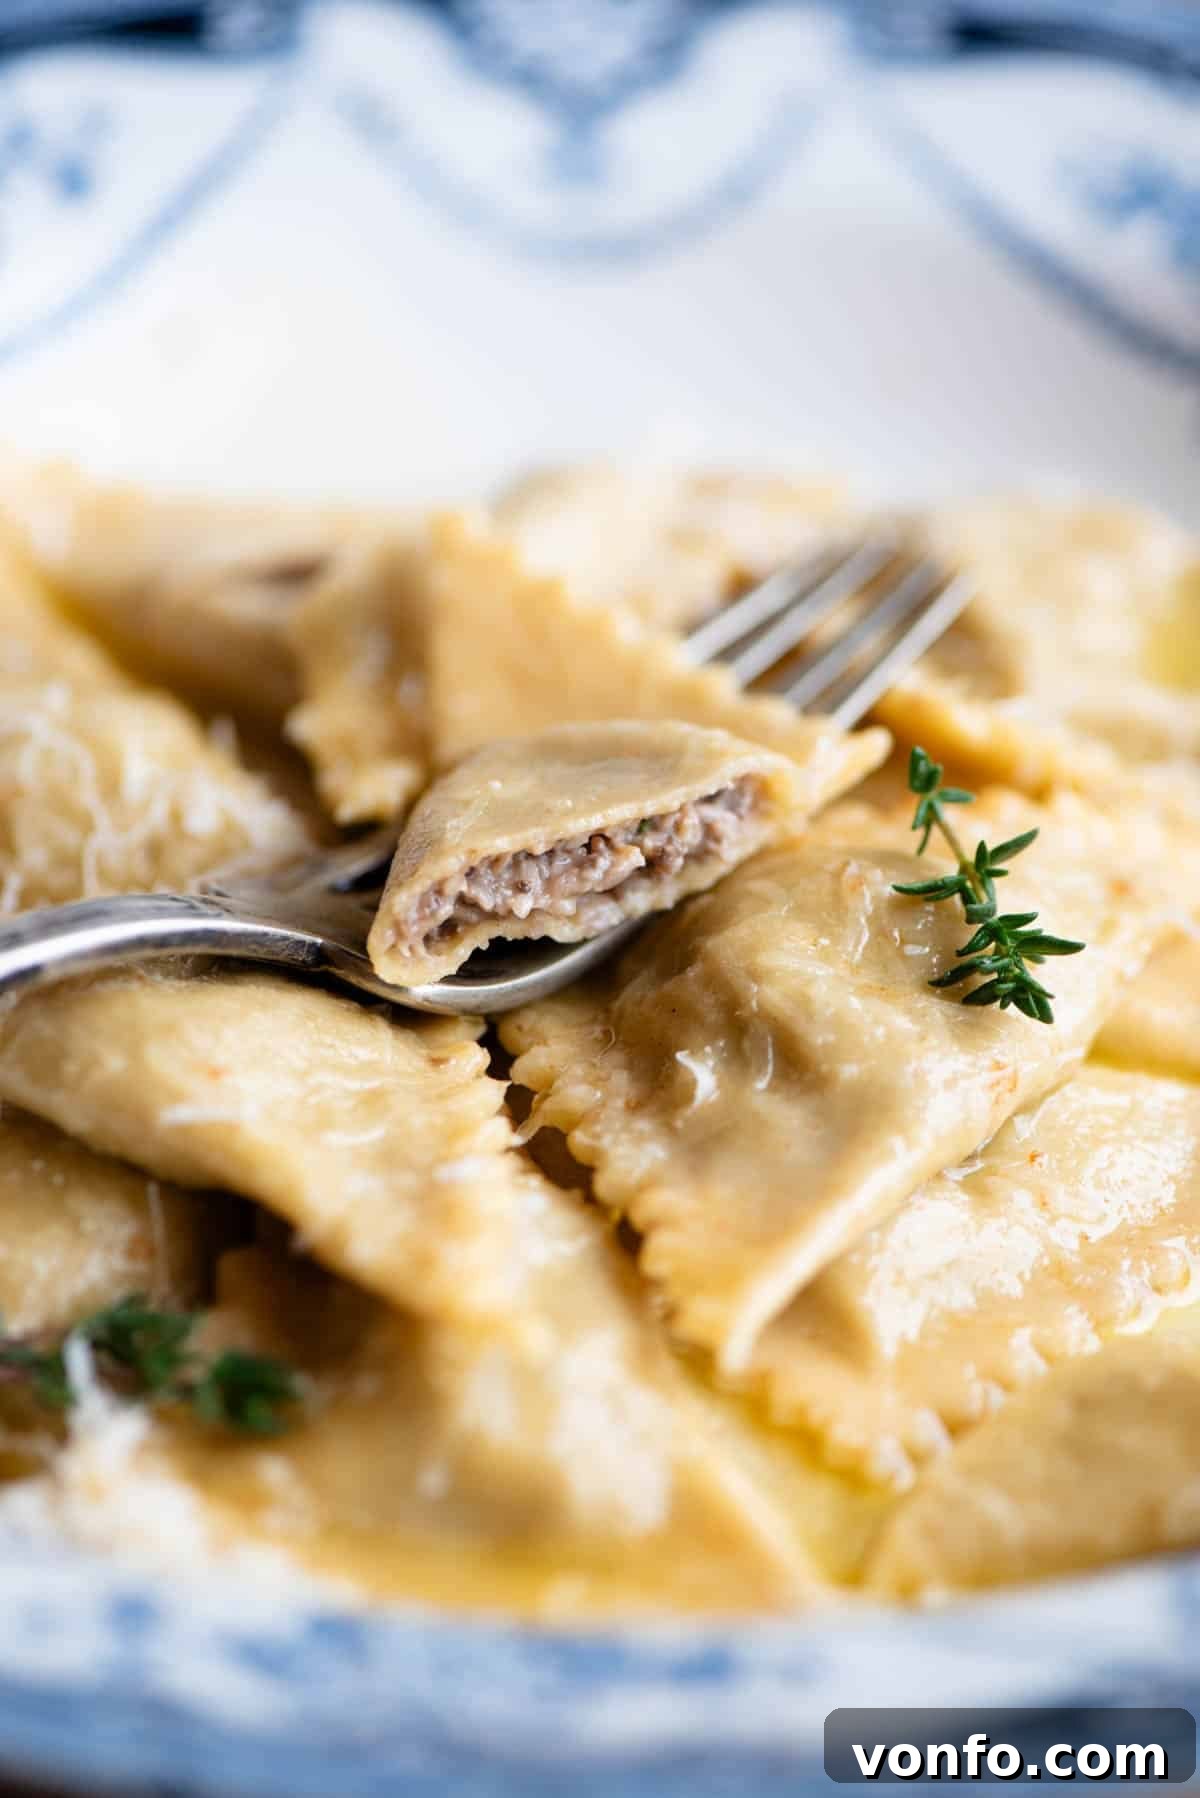
- Combine and Serve: Using a slotted spoon or a spider, carefully transfer the cooked Triangoli directly from the boiling water into the pan with the melted butter. Do not worry if a little residual pasta water transfers with them; this starchy water is often referred to as “liquid gold” by chefs, as it contains starches that help to emulsify the sauce and create a luscious, clinging, and creamy texture that beautifully coats each pasta parcel. Gently toss the Triangoli in the butter sauce for about 1 minute, ensuring each piece is thoroughly coated and warmed through. Remove the pan from the heat and immediately stir in a generous amount of freshly grated Parmigiano Reggiano. The residual heat will melt the cheese into the sauce. Serve your Homemade Triangoli immediately in warm bowls, perhaps with an extra sprinkle of Parmigiano Reggiano and a small sprig of fresh thyme for an elegant garnish.
Essential Recipe Tips and Frequently Asked Questions
- Weigh Your Flour for Precision: As always, when working with flour for any baking or pasta-making project, accuracy is paramount. We strongly recommend weighing your flour using a digital kitchen scale rather than relying on volume measurements like cups. This ensures you have the precise amount required for the recipe, as cup measurements can vary significantly and impact dough consistency.
- Cleaning Mushrooms Properly: Mushrooms are incredibly porous, much like sponges. Therefore, you should never wash them under running water, as they will quickly absorb excess moisture and become waterlogged. This dilutes their natural flavor and can lead to a soggy filling. Instead, use a slightly damp paper towel or a soft mushroom brush to gently wipe away any dirt or debris. Always remember to trim off the very end of the stalk before roughly chopping.
- Using Water for Sealing Assistance: If you find that your delicate pasta dough has started to dry out slightly during the shaping process, making it difficult to achieve a proper seal on your Triangoli, don’t despair! A tiny dab of water applied with your fingertip along the edges of the pasta before pressing can work wonders. This small amount of moisture reactivates the gluten and helps to create a strong, secure seal, preventing your filling from escaping during cooking.
- Kneading and Dough Consistency Matters: Kneading the dough is a critical step for developing gluten and achieving the perfect texture. If your dough feels particularly dry and crumbly, and the flour isn’t easily incorporating during the initial stages of kneading, it might indicate that you have too little liquid or, more commonly, too much flour. This can happen if your eggs are smaller than the average medium size. This is precisely why we provide the approximate weight of the eggs (165g for 3 medium eggs plus 1 yolk) as a guideline. Always aim for a dough that feels firm but pliable, and adjust very gradually if needed.
- Creative Variations: This delicious Triangoli recipe serves as an excellent foundation for endless culinary exploration. Once you’ve mastered the basic technique, feel free to experiment with different fillings and sauces to suit your personal taste preferences or seasonal ingredients. For even more inspiration and diverse ideas, we invite you to explore our extensive collection of fresh pasta recipes, where you’ll find a world of flavor combinations, shaping techniques, and sauce pairings waiting to be discovered.
Frequently Asked Questions About Triangoli Pasta
Absolutely! Freshly made Triangoli can be arranged on a surface generously sprinkled with semolina flour and left at room temperature for 1-2 hours. This brief period helps them dry slightly and prevents sticking. However, if you need to store them for a longer period, it’s essential to blanch them first. Once blanched and thoroughly air-dried (please see detailed instructions below on how to blanch), they can be safely stored in an airtight container in the refrigerator for up to 3 days. This preparatory step is key to preventing them from becoming soggy or sticking together in storage.
Yes, freezing is an excellent option for longer-term storage of your homemade Triangoli. To prevent the pasta from becoming brittle, cracking, or breaking in the freezer, it is crucial that you blanch the Triangoli first before freezing. After blanching, lay them out in a single layer to air dry completely. Once thoroughly dried and cool, transfer them to airtight freezer-safe bags or containers. They can be frozen for up to 3-6 months. When you’re ready to enjoy them, cook the frozen Triangoli directly in a pot of well-salted boiling water – do not defrost them beforehand, as this can cause them to become mushy and lose their delicate texture.
How to Properly Blanch Homemade Pasta for Freezing or Refrigeration
Blanching is a critical preliminary step if you intend to prepare your homemade Triangoli pasta in advance for extended storage, whether in the fridge or freezer. Skipping this simple yet vital process can lead to a less than ideal texture; unblanched fresh pasta stored in the refrigerator tends to turn soggy and stick together, while unblanched pasta placed directly into the freezer can become brittle and break easily during subsequent cooking.
To blanch your homemade pasta effectively and preserve its quality:
- Bring a large pot of generously salted water to a vigorous, rolling boil, just as you would for cooking fresh pasta for immediate consumption.
- Carefully add the freshly formed Triangoli to the boiling water. Cook them for approximately 1 to 1.5 minutes. The goal here is to cook them just enough to set their shape, prevent them from sticking, and partially cook the dough, but not to fully cook them through to al dente.
- Promptly remove the pasta from the boiling water using a slotted spoon or a fine-mesh strainer.
- Immediately transfer the blanched Triangoli to a clean, dry dish towel or a baking sheet lined with parchment paper. Arrange them in a single, even layer to ensure proper air circulation around each piece.
- Allow the pasta to air dry completely. This step is crucial; you’ll need to gently turn them periodically to ensure both sides dry thoroughly and prevent any moisture from remaining, which could lead to sticking or freezer burn.
- Once fully dried and completely cool, the blanched Triangoli are ready for storage. For refrigeration, place them in an airtight container, and they will keep well for up to 3 days. For freezing, transfer them to freezer-safe bags or rigid containers, ensuring as much air as possible is removed to prevent ice crystals. They can be frozen for up to 3-6 months. Always cook blanched and frozen pasta directly from frozen; there is no need to thaw them beforehand, as thawing can negatively impact their texture.
Explore More Homemade Pasta Recipes to Try
If you’ve enjoyed the rewarding experience of crafting these beautiful Triangoli, we invite you to delve deeper into the wonderful world of fresh, homemade Italian pasta with our other cherished recipes. Each guide provides detailed instructions and tips to help you master new shapes and flavors.
Fresh Pasta
Homemade Agnolotti (Step by Step)
Fresh Pasta
Homemade Tonnarelli Pasta (Spaghetti alla Chitarra)
Fresh Pasta
Homemade Cavatelli Pasta
Tips & Tricks
How to Make Homemade Ravioli – The Ultimate Guide
If you’ve enjoyed creating this Homemade Triangoli Pasta with Mushroom and Taleggio Filling or any other recipe on our blog, we would absolutely love to hear from you! Please consider rating the recipe and leaving a comment below to share your experience, tips, or questions. Your feedback is incredibly valuable to us and helps our community grow! You can also connect with us and discover more delicious Italian food by following us on Facebook, Instagram, and Pinterest, or by subscribing to our Newsletter for weekly updates and exclusive content directly to your inbox.
Triangoli Pasta with Mushroom and Taleggio Recipe Card
This comprehensive recipe card includes detailed steps, helpful tips, and ingredient specifics to ensure your homemade Triangoli turn out perfectly delicious every single time!
Prep Time: 1 hour 10 minutes
Cook Time: 30 minutes
Resting & Cooling Time: 1 hour
Total Time: 2 hours 40 minutes
Servings: 4 – 6 servings (yields approximately 50 Triangoli)
Pin this Recipe | Print Recipe
Master the art of fresh pasta making with these irresistible homemade Triangoli, featuring a luscious mushroom and Taleggio cheese filling. Served simply in a rich butter and Parmigiano Reggiano sauce, it’s an unforgettable and truly authentic Italian dining experience!
Recommended Equipment
- Pasta machine or rolling pin
- Pasta cutter (fluted or straight) or sharp knife
- Food processor
- Large frying pan
- Large pot (for boiling pasta)
Ingredients
For the Silky Pasta Dough:
- 3 medium eggs (approx. 165g total weight)
- 1 egg yolk
- 300 g Italian 00 flour (equivalent to about 2 and ¼ cups)
- Semolina flour for dusting (optional, but highly recommended; can use more 00 flour instead)
For the Rich Mushroom & Taleggio Filling:
- 600 g crimini (chestnut) mushrooms (approx. 1.3 lbs), cleaned and roughly chopped
- 2 shallots, finely chopped
- 1 large clove garlic, minced
- 1 sprig fresh thyme, leaves picked and finely chopped
- 1-2 tablespoons extra virgin olive oil (for cooking mushrooms)
- 50 g Taleggio cheese (approx. 2 oz), roughly chopped
- 1 tablespoon freshly grated Parmigiano Reggiano (approx. 15g)
- Salt and freshly ground black pepper, to taste
For the Simple Butter Sauce:
- 7 tablespoons unsalted butter (approx. 3.5 oz / 100g)
- Freshly grated Parmigiano Reggiano, for tossing and serving
Instructions
Part 1: Craft the Homemade Pasta Dough
- On a clean work surface, mound the 00 flour and create a large well in the center. Add the eggs and egg yolk to the well and beat them with a fork, gradually incorporating flour from the inner edges.
- Once a shaggy dough forms, use your hands to bring it together and knead vigorously for about 10 minutes until it becomes smooth, elastic, and no longer sticky. Add a tiny bit of extra flour if needed.
- Wrap the dough tightly in plastic wrap and let it rest at room temperature for at least 30 minutes (up to 1 hour). For overnight storage, refrigerate and bring to room temperature before use.
Part 2: Prepare the Mushroom & Taleggio Filling
- Finely chop shallots and mince garlic; set aside. Roughly chop mushrooms. Heat olive oil in a large frying pan over high heat. Add mushrooms and cook, stirring frequently, until their moisture has evaporated and they have significantly shrunk in size.
- Reduce heat to medium. Add the chopped shallots, garlic, and thyme to the pan. Sauté for 2-3 minutes until soft and translucent. Season well with salt and freshly ground black pepper. Remove from heat and allow to cool for 5 minutes.
- Transfer the mushroom mixture to a food processor along with the chopped Taleggio and grated Parmigiano Reggiano. Blitz until a smooth, thick paste forms. Scoop the filling into a bowl and ensure it cools completely before using (a cold filling is easier to work with).
Part 3: Shape the Elegant Triangoli Pasta
- Note: It is crucial that the filling is completely cold before you begin shaping. Cut the rested pasta dough in half, keeping one half wrapped in plastic. Flatten the working dough to fit into the widest setting of your pasta machine (usually setting 0).
- Pass the dough through the widest setting. Fold one end into the middle, then the other end directly over it (like a letter). Flatten gently and pass through the widest setting twice more. This creates a stronger, smoother sheet.
- Roll the dough through each subsequent setting of your pasta machine, advancing one setting at a time, until you reach setting number 6. If the sheet becomes too long, cut it in half.
- Lay the thin pasta sheet on a lightly semolina-dusted surface. Cut the sheet in half lengthwise, then cut into squares of approximately 7cm (2.75 inches) per side.
- Place 1 scant teaspoon of the cold filling in the center of each pasta square. Fold one corner of the square over to meet the opposite corner, forming a triangle. Press down firmly on all edges to seal the pasta, ensuring no air is trapped inside. Trim the edges with a pasta cutter or knife for a neat finish. Place finished Triangoli on a clean, semolina-dusted surface to prevent sticking. Repeat for all dough and filling.
Part 4: Cook the Pasta and Make the Simple Butter Sauce
- Bring a large pot of generously salted water to a rolling boil. Carefully add the Triangoli and cook for about 3 minutes, or until they float and are al dente. Cook in batches if necessary to avoid overcrowding the pot.
- Meanwhile, melt the butter in a large frying pan over medium heat.
- Using a slotted spoon, transfer the cooked Triangoli directly from the boiling water to the pan with the melted butter. Allow a little pasta water to transfer, as its starch will help emulsify the sauce. Toss gently for about 1 minute to coat the pasta. Turn off the heat and stir in a generous amount of freshly grated Parmigiano Reggiano. Serve immediately in warm bowls.
Recipe Video
For a complete visual walkthrough of each step, from dough preparation to shaping and serving, please refer to our accompanying video tutorial available on our blog post. It’s an invaluable resource for first-time pasta makers!
Notes for Success & Storage
- Weigh Your Flour: Always weigh flour with a kitchen scale for precise results in pasta making.
- Kneading Considerations: If dough seems dry, verify egg weight (165g for 3 medium + 1 yolk) or adjust liquid sparingly.
- Mushroom Cleaning: Wipe mushrooms clean with a damp cloth; never wash them to avoid waterlogging.
- Sealing the Pasta: If dough edges dry, dab a tiny amount of water to aid sealing Triangoli firmly.
- Freezing and Storage: Always blanch fresh pasta before refrigerating (up to 3 days) or freezing (3-6 months). After blanching, air dry completely. Cook frozen pasta directly from frozen; do not thaw.
Helpful Information for All Our Recipes
- We consistently use extra virgin olive oil in all our recipes unless explicitly stated otherwise, for superior flavor.
- For the best flavor and results in tomato-based dishes, we always recommend using premium brands like Cirio or Mutti when choosing canned or jarred tomatoes.
- Unless otherwise specified within a recipe, all vegetables used are assumed to be of medium size.
- All our recipes are meticulously tested and developed using a fan (convection) oven to ensure consistent results.
- Find out more about how nutrition information is calculated on our site, providing transparency for your dietary planning.
- Discover our must-have Italian Pantry Staples to stock your kitchen for authentic Italian cooking.
- Explore all our recommended Essential Kitchen Tools for Italian Cooking, designed to make your culinary adventures easier and more enjoyable.
Nutrition Information (Approximate Per Serving)
Please note: Nutrition information is automatically calculated and should be used as an approximation. Values can vary based on specific ingredients and preparation methods.
- Calories: 470 kcal
- Carbohydrates: 44 g
- Protein: 13 g
- Fat: 27 g
- Saturated Fat: 16 g
- Polyunsaturated Fat: 2 g
- Monounsaturated Fat: 7 g
- Trans Fat: 1 g
- Cholesterol: 179 mg
- Sodium: 324 mg
- Potassium: 573 mg
- Fiber: 2 g
- Sugar: 3 g
- Vitamin A: 1006 IU
- Vitamin C: 1 mg
- Calcium: 108 mg
- Iron: 3 mg