
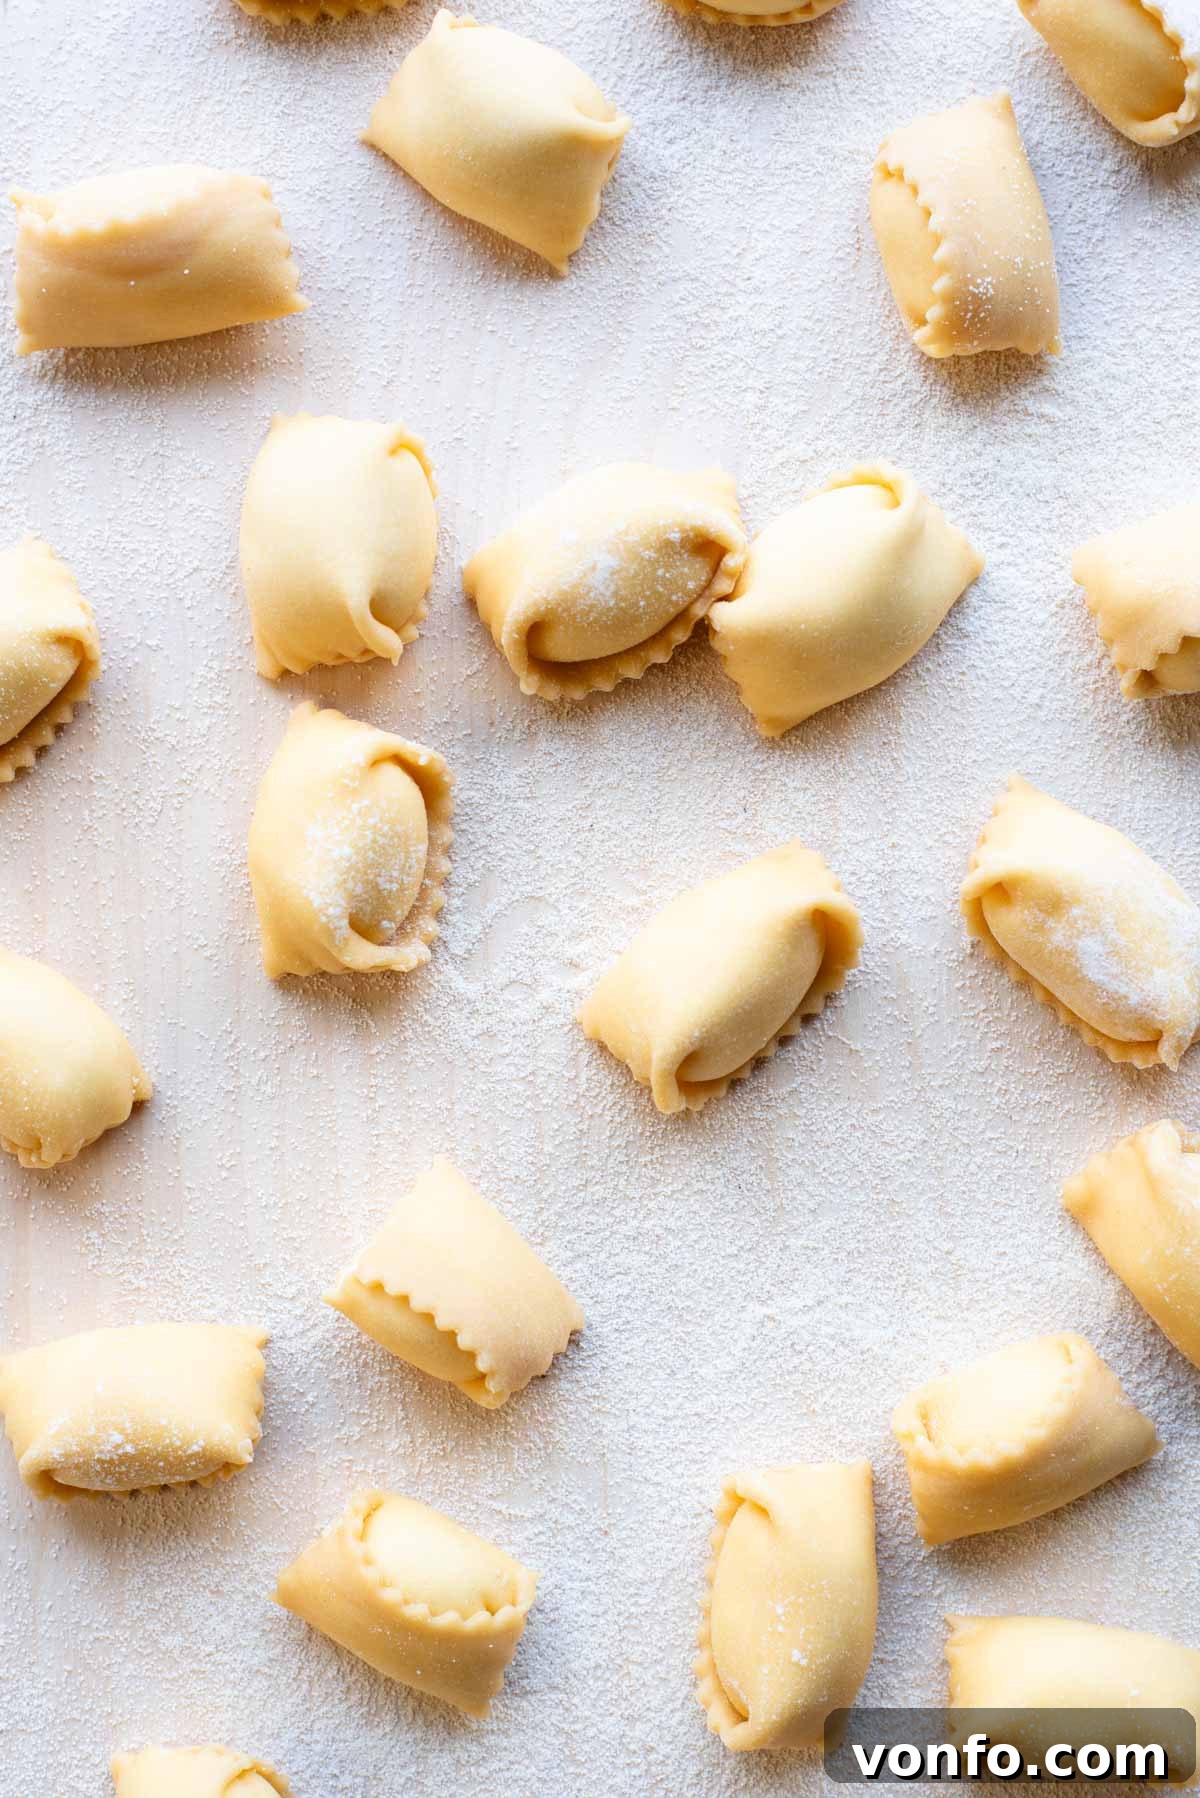
Embark on a delightful culinary journey to create Homemade Agnolotti from scratch. This exquisite filled pasta, a true gem of Italian cuisine, may appear intricate, but with our detailed step-by-step tutorial, you’ll discover just how achievable and rewarding it is to make at home. We’ll guide you through every stage, from preparing the silken pasta dough to expertly filling and shaping these delectable parcels, ensuring your success with helpful tips and visuals.
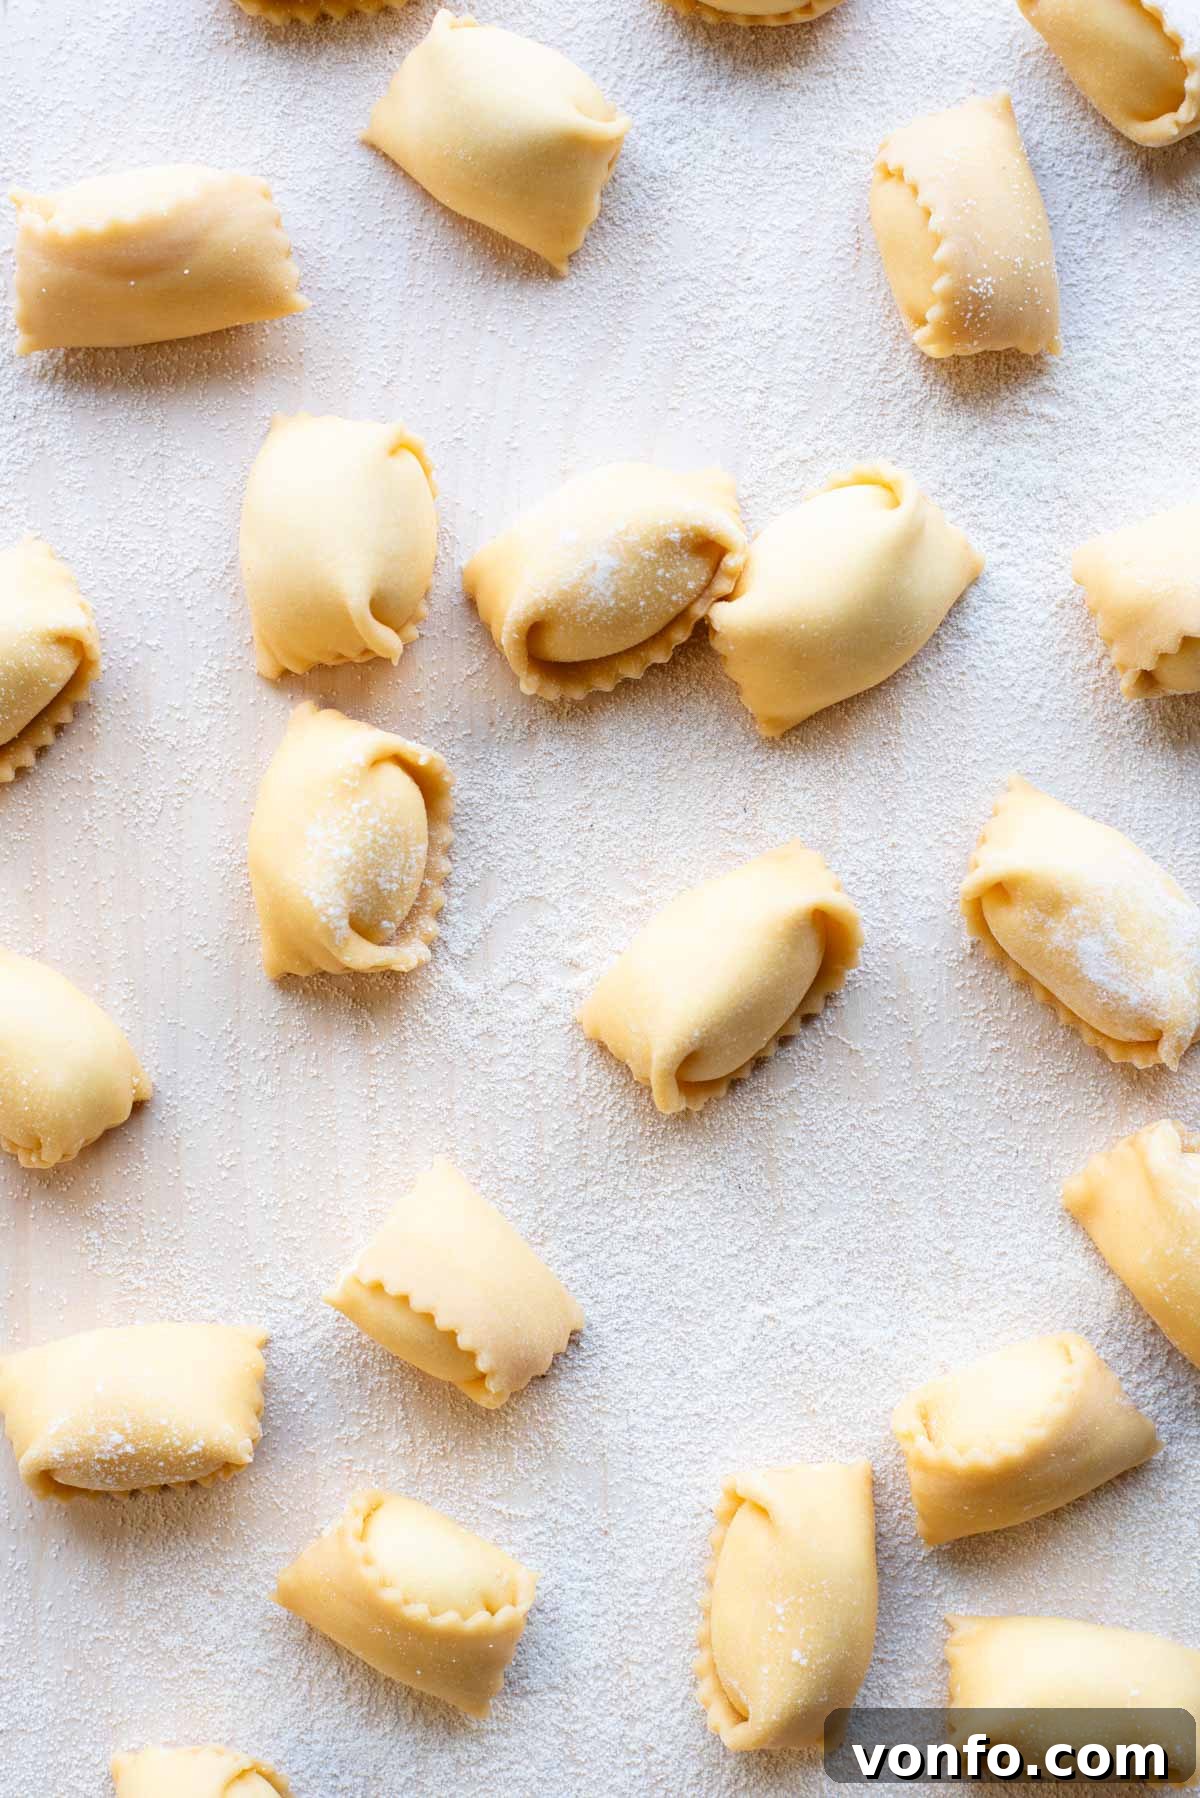
The Art of Agnolotti: A Culinary Journey from Piedmont
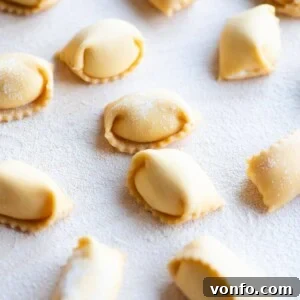
Agnolotti del Plin is a revered traditional filled pasta originating from the picturesque region of Piedmont in northern Italy. Its name, “del Plin,” fittingly translates to “of the pinch” in the local Piedmontese dialect, referring to the characteristic pinch used to seal each small pasta parcel. Traditionally, these delightful pockets are filled with slow-cooked, tender stewed meats and vegetables, often served in a simple butter sauce or the rich braising liquid from the meat filling itself. This creates an incredibly comforting and profoundly delicious dish that has been cherished for generations.
While similar in concept to ravioli, Agnolotti distinguishes itself through its unique folding technique, resulting in a slightly different, more compact shape. Many home cooks, myself included, find Agnolotti a little easier to master than ravioli, primarily because the method of folding inherently reduces the chance of trapping air bubbles within the pasta, leading to a more consistent and robust finished product.
Just like any truly exceptional homemade pasta, Agnolotti is a labor of love. It requires dedication and a bit of time, but the end result is unbelievably delicious and profoundly satisfying. It transforms an ordinary meal into something extraordinary, making it absolutely perfect for special occasions such as festive Christmas dinners, memorable birthday celebrations, or intimate family gatherings where culinary excellence is appreciated.
This comprehensive recipe focuses on a luscious cheesy ricotta filling, offering a taste of Italian comfort. However, the beauty of Agnolotti lies in its versatility; you are free to fill your Agnolotti with virtually any ingredient your heart desires. We’ll explore various filling ideas later in this guide, alongside an array of delicious sauce options. Dive into the full tutorial below, packed with all our essential tips for happy and successful pasta making!
Discover the complete recipe details below, including insightful notes on ingredients, visual step-by-step photos, expert tips, exciting variations, and even a video tutorial. For the full printable recipe, scroll to the bottom or click the convenient recipe link.
Essential Ingredients for Perfect Agnolotti
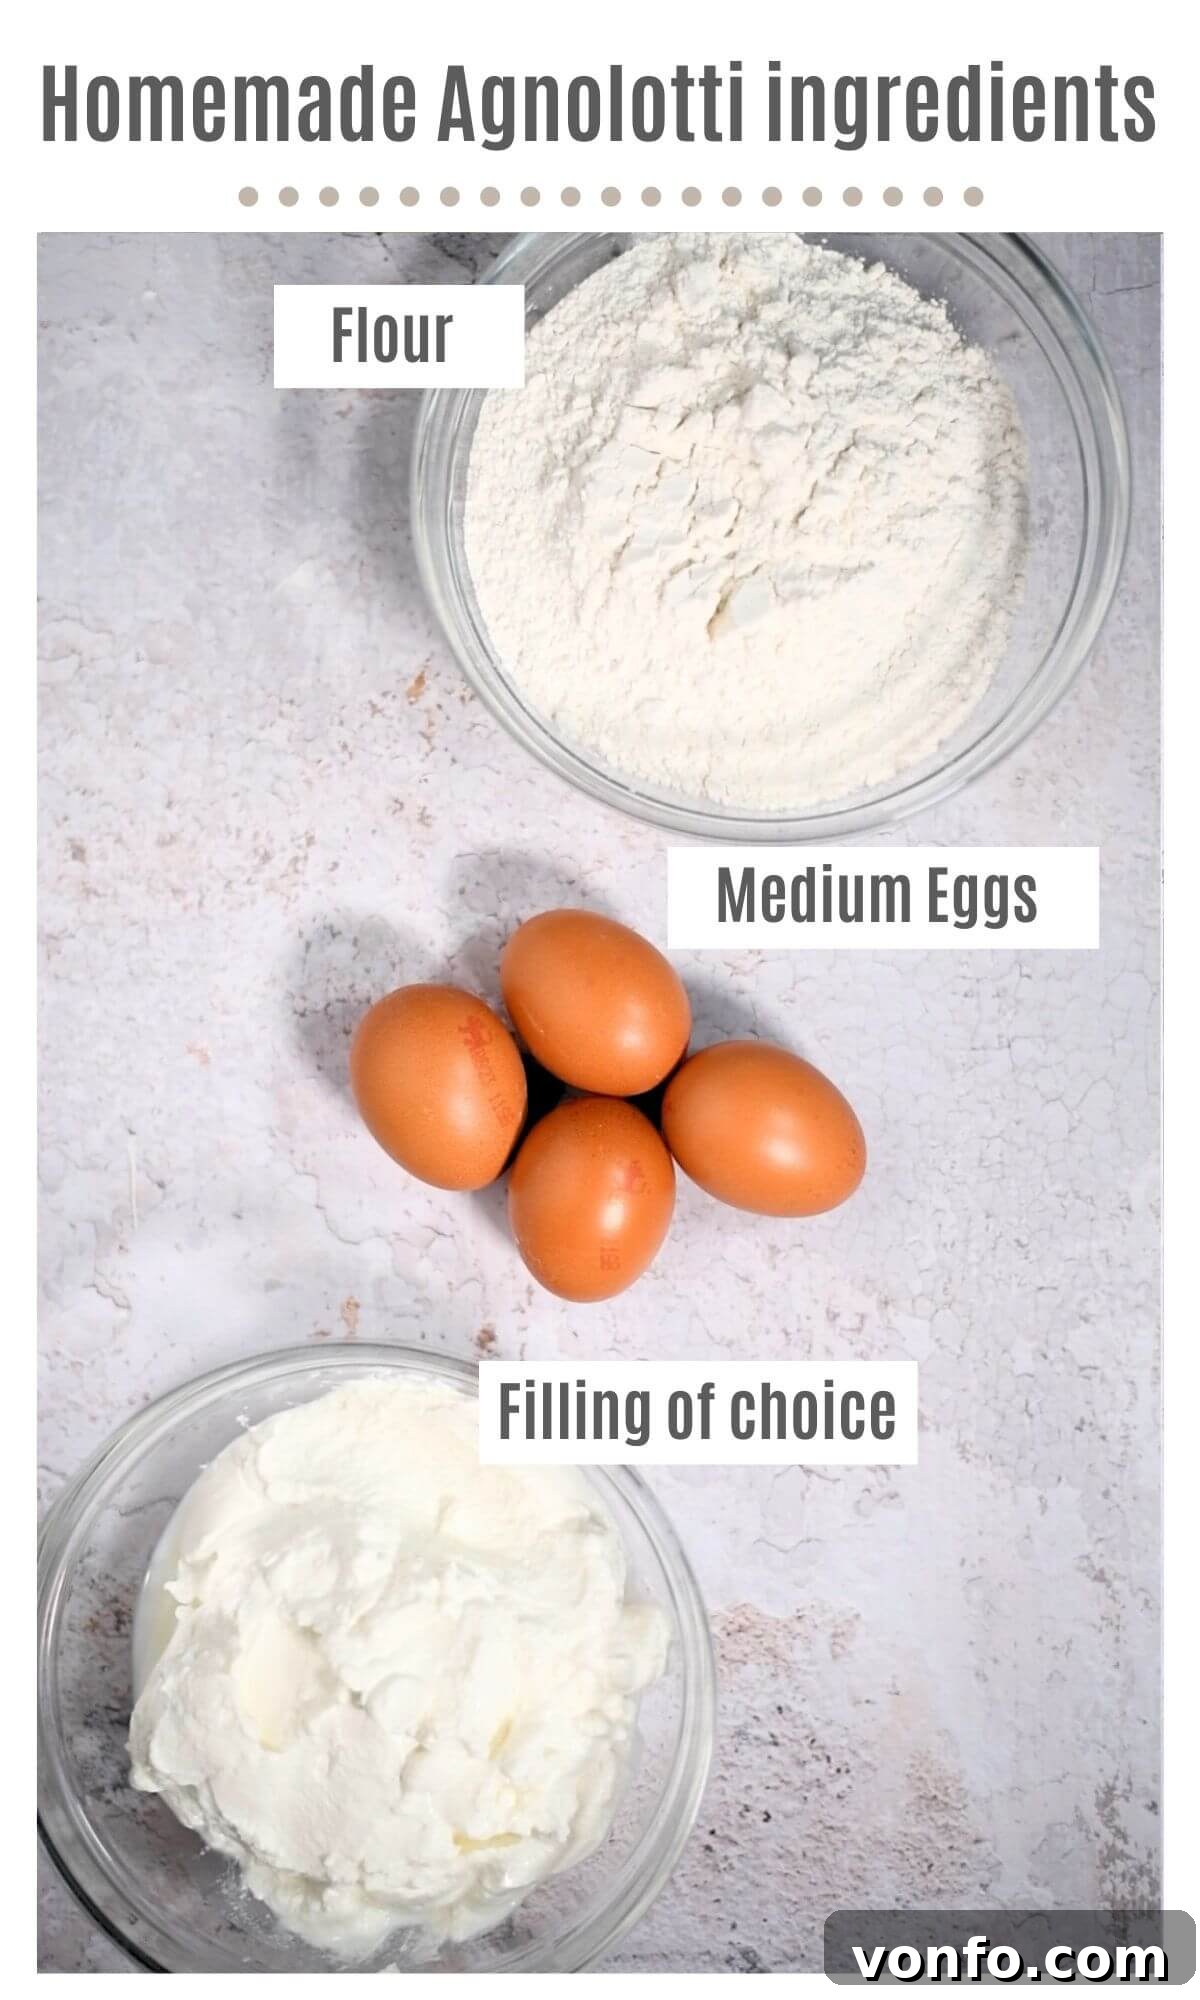
Crafting sublime homemade Agnolotti begins with selecting the finest ingredients. Here’s a breakdown of what you’ll need, along with crucial notes and potential substitutions to ensure your pasta is nothing short of perfect.
Ingredient Notes and Expert Tips
- Flour: For truly authentic and tender pasta, Italian 00 flour is the gold standard. Its exceptionally fine consistency and lower protein content create a silky-smooth dough that’s a joy to work with and yields a delicate texture. If 00 flour is unavailable, high-quality all-purpose flour can be used, though the final texture may be slightly different. For dusting, fine semolina flour is excellent as it prevents sticking without over-drying the dough.
- Eggs: This recipe calls for medium-sized eggs plus an extra yolk. The yolks are crucial for adding richness, flavor, and a beautiful golden hue to your pasta dough. If you’re using large eggs, you might consider omitting the extra yolk, or adjusting the flour slightly if the dough feels too soft. Always use fresh, high-quality eggs for the best results.
- Filling: Our featured filling utilizes creamy ricotta, which is incredibly adaptable. For an authentic and structurally sound filling, it’s vital to strain your ricotta for at least one hour (or even overnight) to remove excess moisture. This prevents a watery filling that could compromise the pasta’s integrity. For enhanced flavor, we combine ricotta with grated provolone cheese and a touch of black pepper. Other fantastic options include smoked scamorza for a deeper flavor, Fontina for creaminess, or Parmigiano Reggiano for a salty, umami kick. For a brighter, fresher taste, a hint of lemon zest can be wonderfully refreshing. Traditionally, meat fillings (like braised beef or pork) mixed with vegetables are common. You’ll need approximately 2 cups (500g) of strained ricotta for this recipe.
- Sauce: The right sauce perfectly complements your homemade Agnolotti. You have a world of choices! For simplicity, a light and easy tomato sauce allows the pasta and filling to shine. A classic butter and sage sauce is wonderfully aromatic and quick to prepare. For a richer experience, consider a creamy sauce. The choice is yours, tailored to your taste and the filling you select!
Agnolotti Crafting: Step-by-Step Photos and Detailed Instructions
Mastering Your Mise en Place
Success in pasta making, especially with filled varieties like Agnolotti, often lies in thoughtful preparation. This recipe empowers you to create delicious homemade Agnolotti with any filling or sauce you prefer. Here are a couple of key preparation tips to get you started:
- Strain Your Ricotta: If you’re opting for a ricotta-based filling, it is absolutely essential to strain it. Place the ricotta in a fine-mesh sieve lined with cheesecloth and let it drain for at least 1 hour, or preferably overnight in the refrigerator. This crucial step removes excess moisture, preventing your filling from becoming watery and making it easier to work with.
- Prepare Your Sauce in Advance: To minimize last-minute stress, I highly recommend preparing your chosen sauce ahead of time. This way, all you’ll need to do is gently heat it up when your fresh Agnolotti are ready to cook. If you’re planning a delicate butter sauce, this can be quickly made just before serving.
Crafting the Perfect Pasta Dough
The foundation of exceptional Agnolotti is a perfectly pliable and smooth pasta dough. Follow these steps carefully:
1. On a clean, spacious work surface (a large wooden board or clean countertop is ideal), mound the 00 flour. Create a generous well in the center, much like a volcano crater. This well will hold your eggs.
2. Carefully crack the three medium eggs and add the extra egg yolk directly into the center of the well. Using a fork, gently beat the eggs, gradually incorporating small amounts of flour from the inner rim of the well into the liquid. Work slowly to prevent the egg from spilling out (photos 1 and 2).
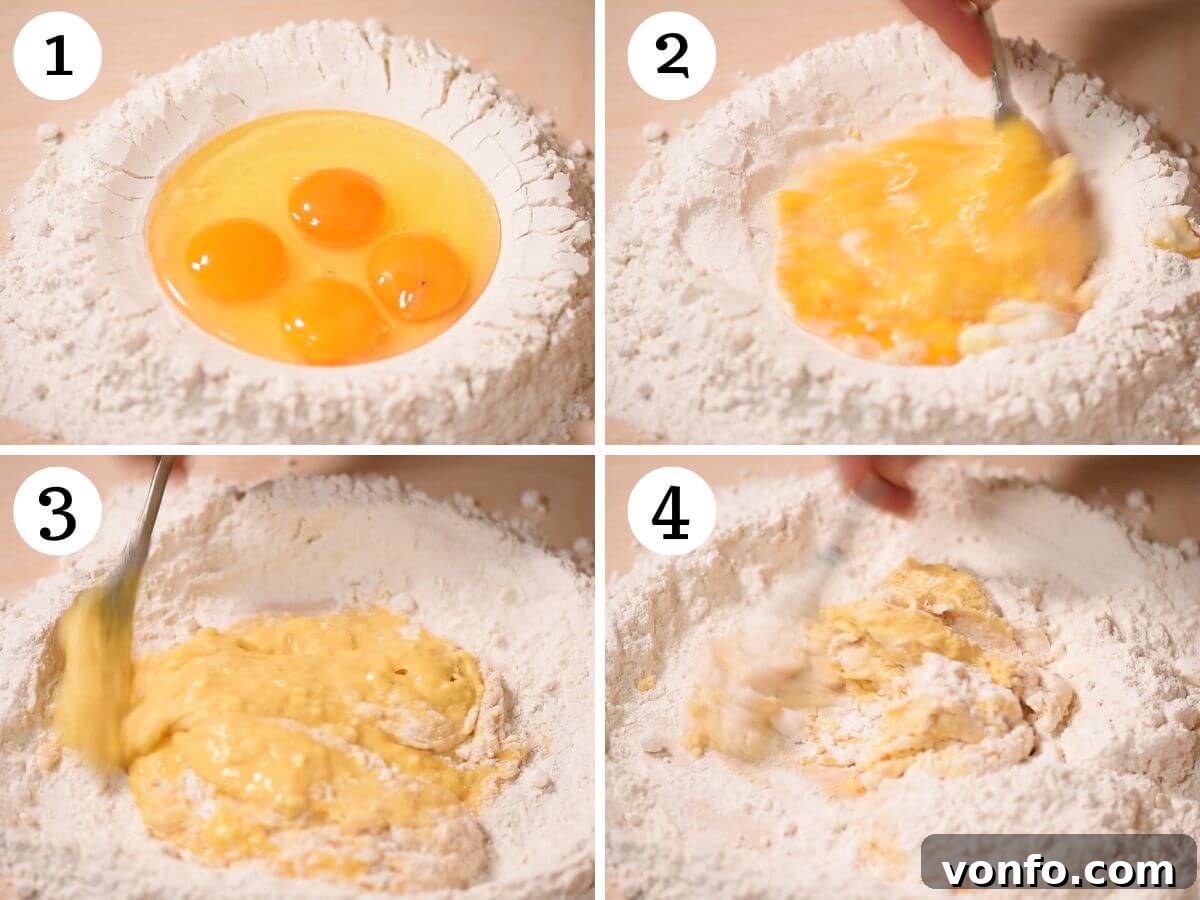
3. Continue to incorporate the flour into the beaten egg mixture, a little at a time, until a shaggy, rough dough forms. At this point, set aside your fork and use your hands to bring the dough together. Knead the dough vigorously for approximately 10 minutes. The goal is to develop the gluten, transforming the dough into a smooth, elastic, and homogenous mass. If the dough feels too sticky, add a tiny pinch of extra flour; if it’s too dry, moisten your hands slightly. Resist the urge to add too much flour too quickly (photos 3-7).
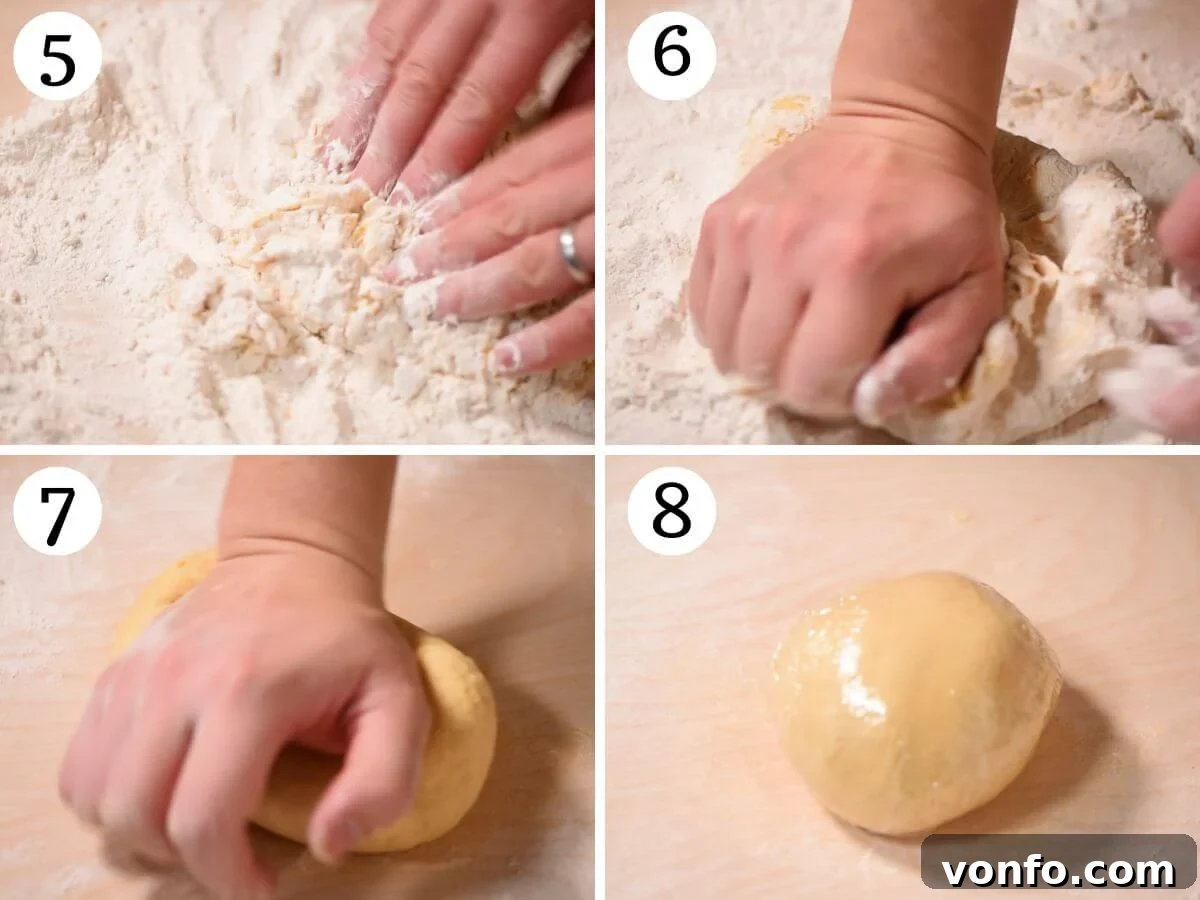
4. Once your dough is beautifully smooth and elastic, wrap it tightly in plastic wrap (cling film) to prevent it from drying out. Allow it to rest at room temperature for a minimum of 30 minutes. This resting period is crucial; it allows the gluten to relax, making the dough much more pliable and easier to roll. For convenience, you can prepare the dough the night before and store it in the refrigerator overnight. Just remember to bring it back to room temperature before you begin rolling (photo 8).
Achieving Silken Pasta Sheets: Rolling the Dough
Rolling pasta dough evenly and thinly is key to delicate Agnolotti. A pasta machine is highly recommended for consistent results, but a good old rolling pin can also do the trick with patience.
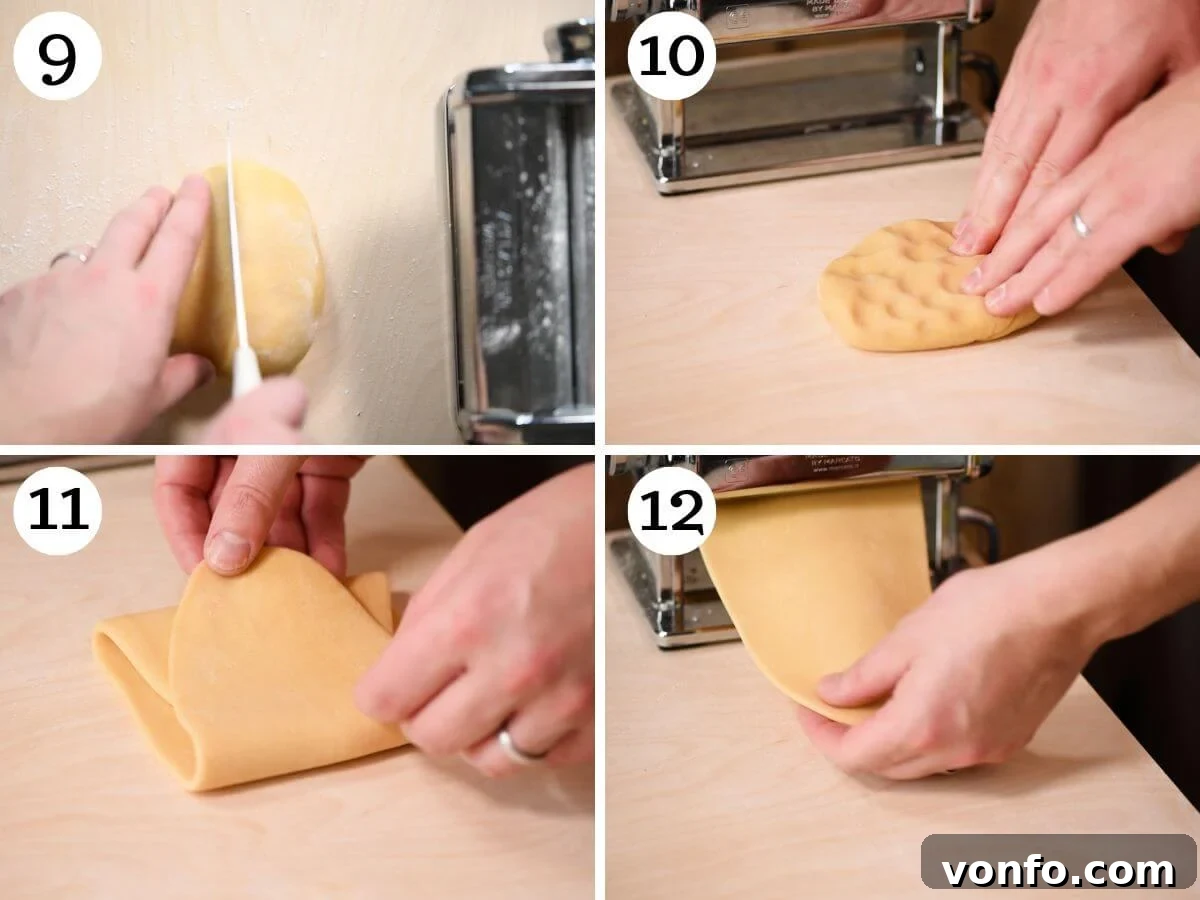
1. Divide your rested pasta dough in half. Keep one half tightly wrapped in plastic wrap while you work with the other to prevent it from drying. Gently flatten the working dough piece with your hands or a rolling pin until it’s thin enough to easily fit into the widest setting of your pasta machine (usually marked as number 0 or 1) (photos 9 and 10).
2. Pass the flattened dough through the widest setting of your pasta machine. Once it emerges, take one end and fold it into the middle of the dough sheet, then fold the other end directly over it, as if creating a compact leaflet or envelope. Gently flatten the folded dough again and pass it through the widest setting once more. Repeat this folding and passing process two more times. This crucial step further kneads the dough, develops its structure, and helps achieve a perfectly rectangular, smooth sheet (photos 11 and 12).
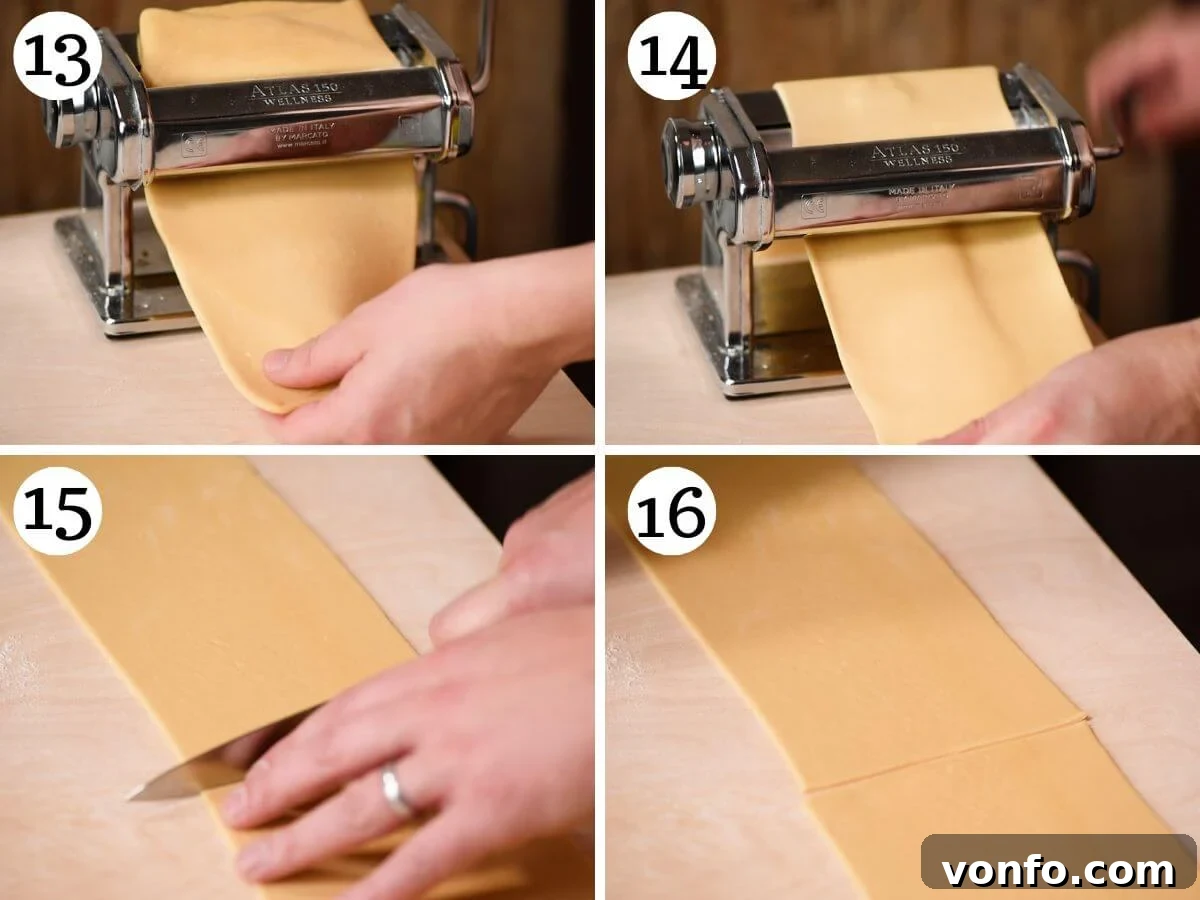
3. Your dough is now beautifully conditioned and ready to be rolled to its final thinness. Pass the dough through each subsequent setting of your pasta machine, increasing the number by one each time, until you reach setting number 6 (or your machine’s equivalent for a thin sheet). Pass it through each setting only once. As the pasta sheet gets longer, you may need to cut it in half to make it more manageable to handle without tearing (photos 13-16).
Filling and Shaping Your Agnolotti: Method 1 (Continuous Line)
This is the classic method for shaping Agnolotti, creating its signature “pinch.”
1. Lay one long, thin sheet of pasta dough flat on your lightly floured work surface. Prepare your chosen filling (e.g., the ricotta and provolone mixture) by placing it in a piping bag with a plain round tip. Pipe a continuous line of filling down the middle of the pasta sheet, leaving approximately 1 inch of free pasta at both ends and along the edges (photo 17).
2. Carefully fold the bottom half of the pasta sheet directly over the piped filling. Gently but firmly press the pasta around the filling, using the side of your hand or fingers to secure it tightly and remove any trapped air. The goal is to create a snug roll of pasta around the filling (photos 18 and 19).
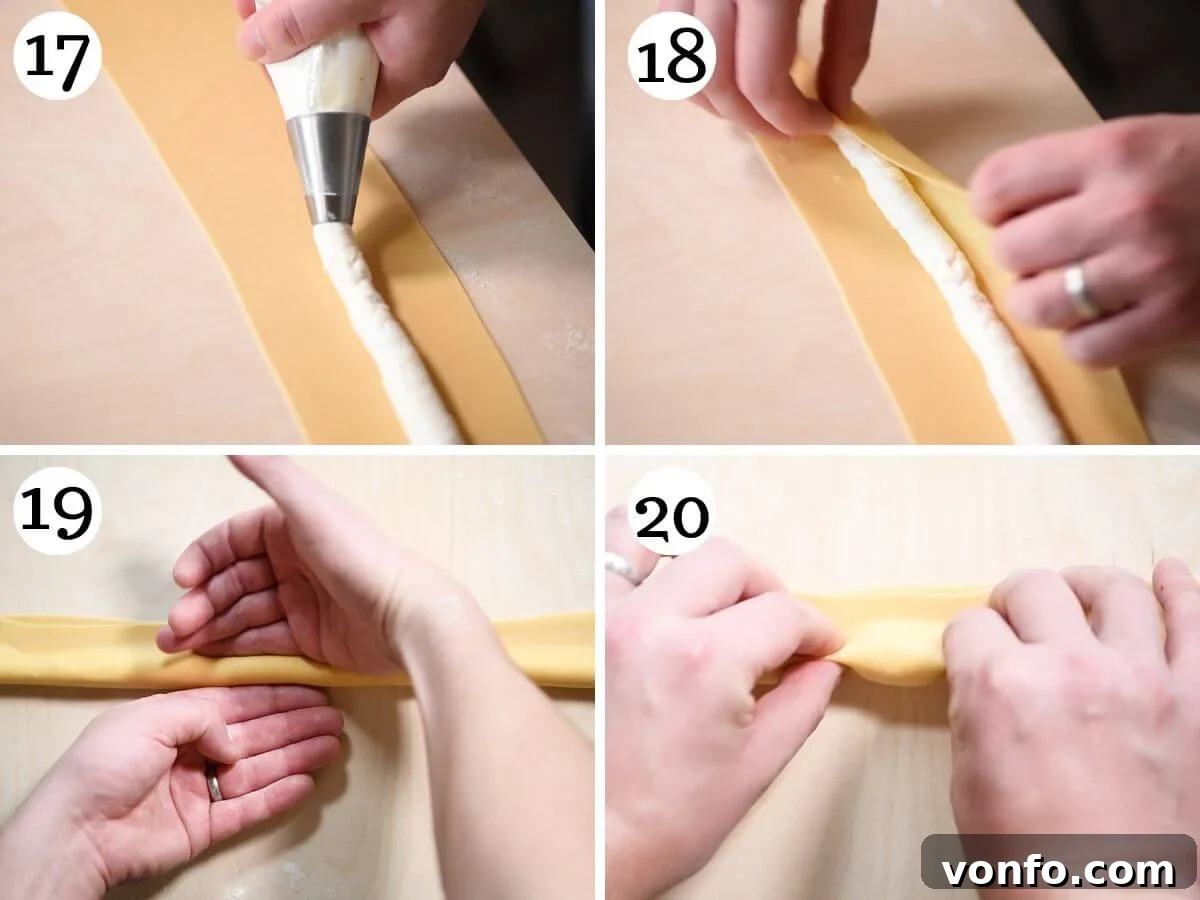
3. Now, for the “plin” (pinch)! Along the length of the filled pasta log, use your thumb and forefinger to pinch the pasta firmly at roughly 1-inch intervals. This creates individual little pillows of filling, separated by a distinctive pinched ridge. Trim any excess pasta along the long edge of the dough. Then, using a fluted pasta wheel or a sharp knife, swiftly cut through each pinched section to separate the pasta into individual Agnolotti. Ensure your cuts are clean (photos 20-24).
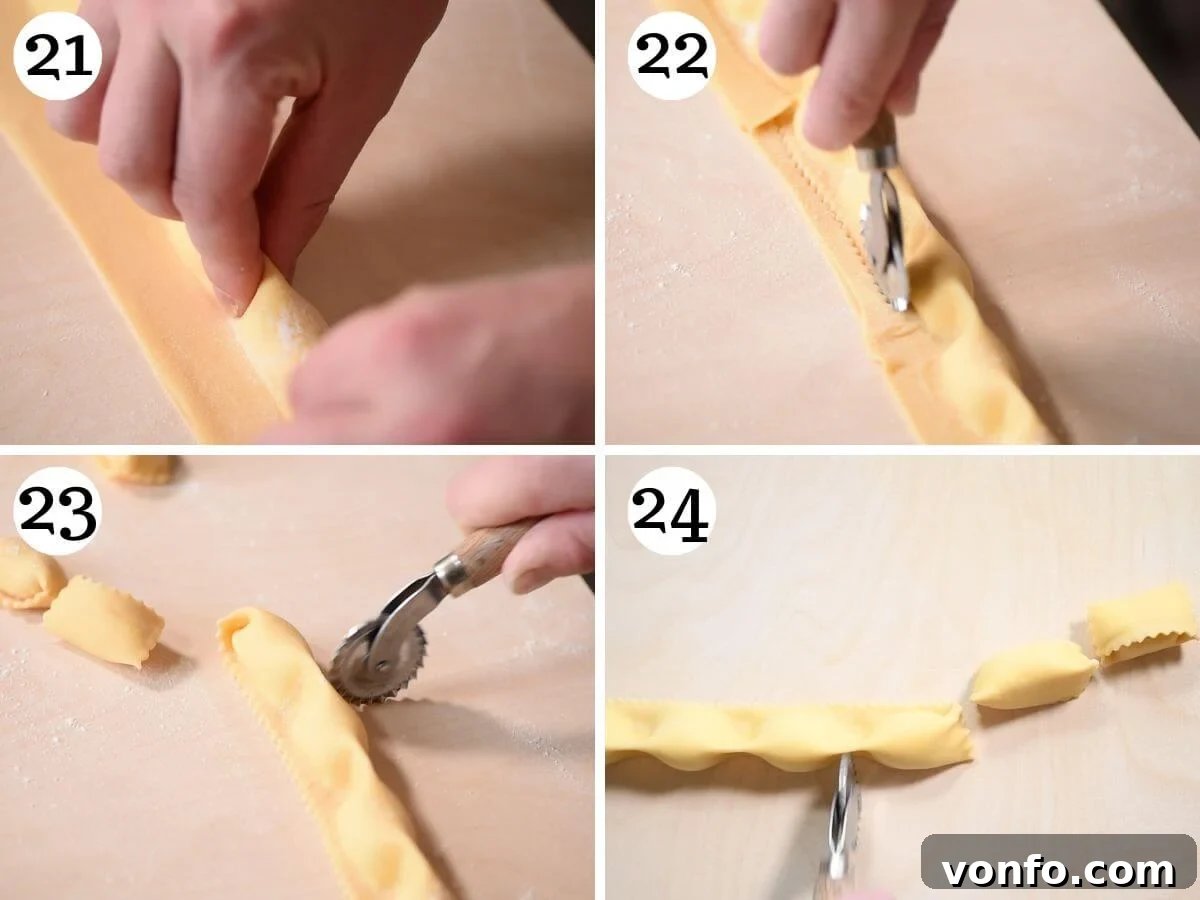
4. As you cut each Agnolotto, gently place them on a clean surface that has been lightly dusted with flour or fine semolina. This prevents them from sticking while you continue to make the rest of your pasta.
Alternative Filling Method 2: Individual Sections
This method offers more control, especially for fillings that aren’t completely smooth.
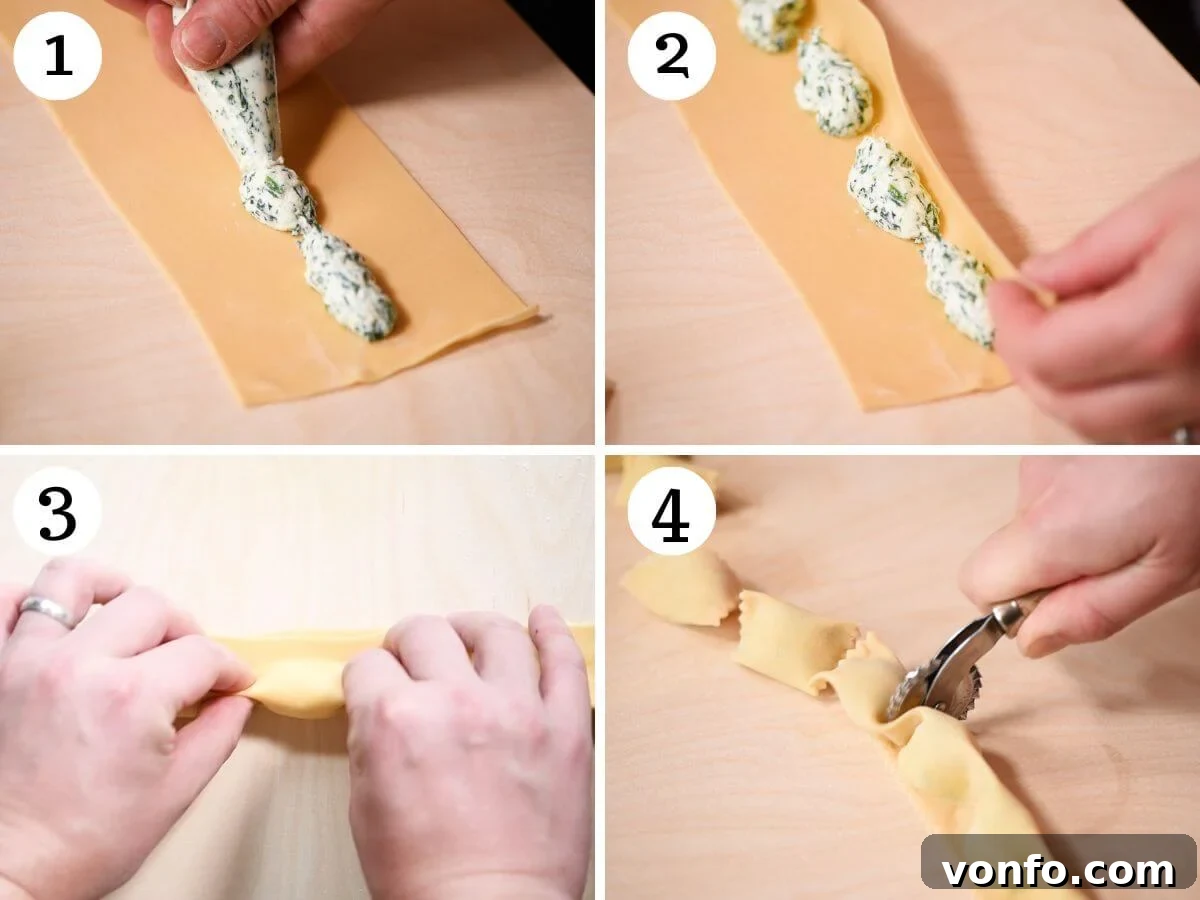
The method below (filling method 2) involves piping the filling in small, distinct sections along the pasta sheet, rather than in one continuous line. This technique is particularly useful if your filling contains small pieces, such as spinach and ricotta or finely diced vegetables, which might otherwise get caught or create an uneven line when folded using Method 1.
Tip: When using this method, there’s a slightly higher chance of trapping air bubbles inside the pasta, which can cause them to burst during cooking. To avoid this, carefully pinch the Agnolotti between each mound of filling before securing the long edge of the pasta. This allows any trapped air to escape easily before the final seal.
Alternative Filling Method 3: Spooning the Filling
For those without a piping bag or preferring a simpler approach, a spoon works just as well.
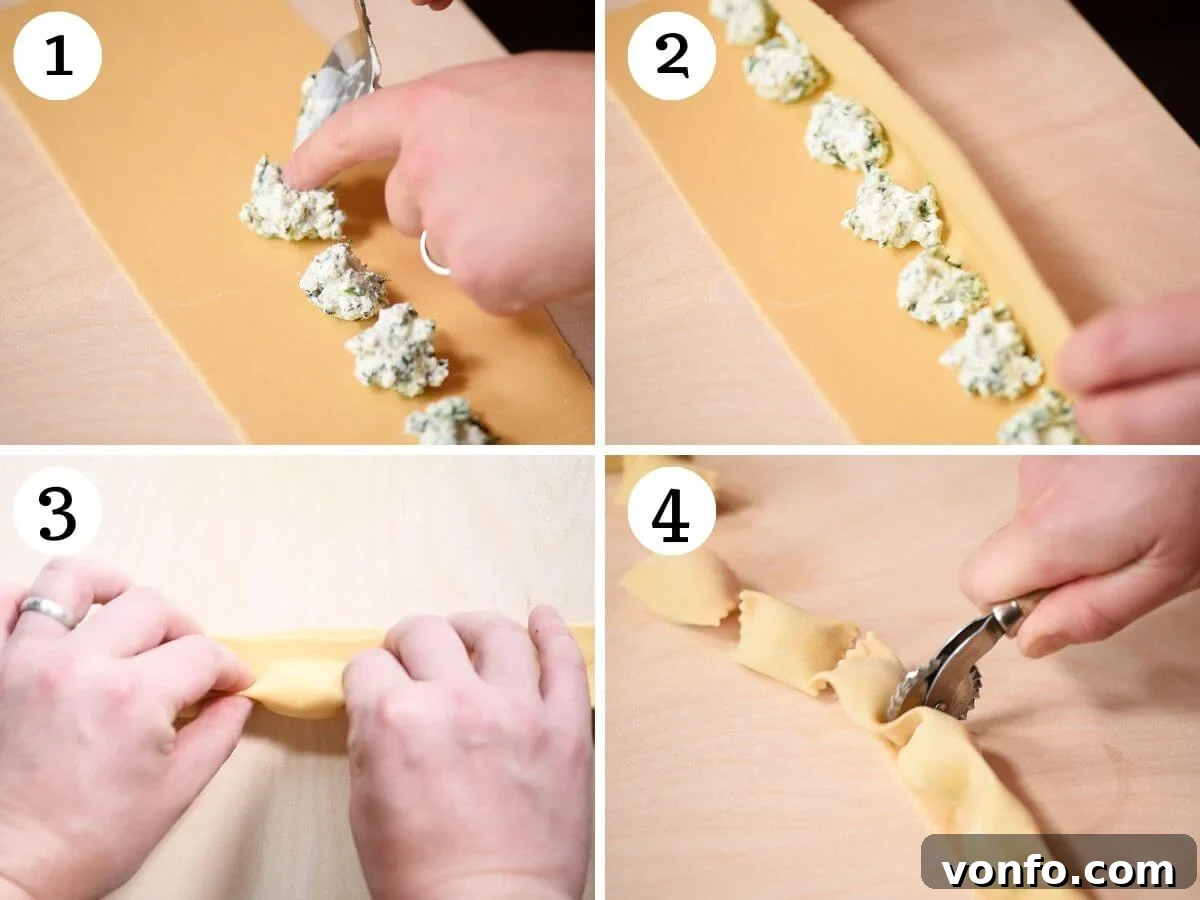
The third way to fill your Agnolotti (filling method 3) demonstrates how to place your filling using a small spoon. Simply dollop small, evenly spaced mounds of filling along the center of the pasta sheet, leaving ample space between them for pinching and sealing. Then proceed with the folding and pinching steps as described in Method 1.
Cooking Your Homemade Agnolotti
Fresh pasta cooks quickly, so be ready to serve as soon as it’s done!
1. Bring a large pot of water to a rolling boil. It’s crucial to generously salt the water until it tastes like the sea; this seasons the pasta from within. A general rule of thumb is 1-2 tablespoons of salt per gallon of water.
2. Gently add the fresh Agnolotti to the boiling water. Do not overcrowd the pot, as this can lower the water temperature and make the pasta stick together. Cook for approximately 3 minutes. Fresh pasta cooks much faster than dried pasta; the Agnolotti will usually float to the surface when done.
3. Using a slotted spoon or a spider strainer, carefully remove the cooked Agnolotti directly from the boiling water and transfer them into your prepared pasta sauce. Avoid draining them entirely in a colander, as the starchy pasta water can help emulsify the sauce.
4. Toss the Agnolotti gently in the sauce to ensure each piece is beautifully coated. Serve immediately and enjoy the fruits of your labor!
Inspiring Sauces and Filling Ideas for Agnolotti
The versatility of Agnolotti shines through in the endless possibilities for fillings and sauces. Here are some delectable ideas to inspire your culinary creations:
- Traditional Meat Ragu: Embrace Piedmontese tradition by filling your Agnolotti with a rich, slow-cooked meat mixture. Popular choices include braised beef, pork, or even a combination of meats, often blended with finely minced vegetables like carrots, celery, and onions. The braising liquid can also be reduced and served as a simple, yet intensely flavorful sauce.
- Creamy Ricotta Filling Variations: Our recipe uses ricotta with provolone and black pepper, but you can elevate it further. Beyond Parmigiano Reggiano, consider adding smoked scamorza or Fontina for an incredibly creamy and nuanced flavor. For a brighter profile, a hint of lemon zest adds wonderful freshness, or finely chopped fresh herbs like parsley or chives can introduce an aromatic dimension. Remember to strain the ricotta thoroughly (about 2 cups or 500g) for the best texture.
- Earthy Mushroom Filling: If you’re a fan of umami-rich flavors, adapt the beloved filling from our mushroom ravioli recipe to create an equally fantastic Agnolotti. Sautéed wild mushrooms, mixed with herbs and a touch of cheese, make for a deeply satisfying filling.
- Sweet Squash or Pumpkin Filling: For a taste of autumn, a sweet and savory squash or pumpkin filling is sublime. You can use the same delicious filling from our butternut squash ravioli. Roast or steam the squash until tender, then mash it with amaretti cookies, nutmeg, and perhaps some Parmesan for a truly Piedmontese touch.
- Simple Tomato Sauce: A classic quick tomato sauce is always a winner. Alternatively, for a lightning-fast option, gently sauté some minced garlic and/or onion, then add high-quality tomato passata (tomato puree in the US). Finish with fresh basil leaves for a burst of flavor.
- Aromatic Butter and Sage Sauce: This elegant and easy sauce is a perfect match for delicate filled pastas. It needs to be made fresh, just before serving, to preserve its vibrant flavor. Follow the instructions for the butter and sage sauce from our squash ravioli recipe for a truly authentic experience.
- Rich Cream or Cheesy Sauces: For a decadent treat, Agnolotti pairs wonderfully with a variety of cream-based or cheesy sauces. Some favorites include our Gorgonzola cream sauce for a pungent kick, a comforting Parmesan cream sauce, or the delightful Cream, Parmigiano and peas sauce for a touch of sweetness.
Expert Recipe Tips and Frequently Asked Questions
To ensure your homemade Agnolotti turn out perfectly every time, keep these valuable tips in mind. We’ve also addressed some common questions to help you master this beautiful pasta.
- Always Weigh Your Flour: This cannot be stressed enough! Baking and pasta making require precision, and the only truly accurate way to measure flour is by weight, using a kitchen scale. While we provide cup measurements, inconsistencies in how flour is scooped can drastically alter your dough’s hydration. For cup measurements, the best method is to lightly spoon the flour into the cup and then level it off with a straight edge, like a knife.
- Adjust Eggs Based on Size: Our recipe accounts for medium-sized eggs and an extra yolk for optimal richness and dough consistency. If you are using large eggs, you may want to skip the extra egg yolk to avoid an overly wet dough. Conversely, if your dough feels too soft or sticky after initial mixing, don’t hesitate to incorporate a little more flour, a tablespoon at a time, until the desired elasticity is achieved.
- Ensure Proper Pasta Sealing: A common issue with filled pasta is the filling leaking during cooking due to improper sealing. If your pasta dough feels too dry or isn’t tacky enough to seal properly, lightly dab a minimal amount of water along the edges before folding and pressing the pasta over the filling. This creates a stronger bond.
- Avoid Excessive Flour During Kneading and Rolling: While a light dusting of flour is necessary to prevent sticking, too much flour can dry out your dough, making it stiff, difficult to work with, and resulting in a tougher final product. Use flour sparingly when kneading and rolling out the pasta sheets, adding only when absolutely needed.
- The Importance of Resting the Dough: After the kneading process, it is paramount to allow the dough to rest for at least 30 minutes. This period is crucial for relaxing the gluten strands that have been activated during kneading. A rested dough is significantly more pliable, elastic, and much easier to roll out thinly without tearing or snapping back.
The primary difference between these two popular filled pastas lies in their shaping technique. Ravioli typically involves placing a mound of filling onto one sheet of pasta, then covering it with another sheet before cutting, resulting in four distinct cut edges (or can be rounded like our egg yolk ravioli). Agnolotti, on the other hand, is made from a single sheet of pasta that is folded over a line of filling, then pinched and cut along that fold, giving it its characteristic ‘pinch’ and often a slightly smaller, more compact shape.
Storing Your Culinary Creations: How to Freeze Fresh Agnolotti
One of the greatest advantages of making homemade pasta, particularly filled varieties, is the ability to freeze it for later enjoyment. Freezing fresh pasta is the perfect solution for having a delicious, home-cooked meal on hand even when time or energy is scarce.
Here’s my highly recommended method for freezing homemade Agnolotti or any other filled pasta, ensuring they retain their quality and texture:
- A Note on Blanching Filled Pasta: Filled pastas like ravioli or Agnolotti can become brittle and prone to cracking once frozen, both in the freezer and when introduced to boiling water. To prevent this disappointing outcome, the best practice is to blanch them lightly before freezing. While it’s an extra step, it safeguards all the effort you’ve put into making fresh pasta.
- How to Blanch Your Pasta: Bring a large pot of generously salted water to a rolling boil. Carefully add the Agnolotti to the water. They will cook very quickly; as soon as they float to the top, or after just 1-2 minutes, remove them immediately with a slotted spoon. Do not let them fully cook. Lay the blanched Agnolotti in a single layer on a clean kitchen towel or wire rack to air dry and cool completely. This prevents them from sticking together.
- Freezing or Refrigerating: Once the blanched pasta has cooled and dried, it can be stored in the refrigerator for up to 3 days. For longer storage, proceed with freezing. Arrange the cooled Agnolotti in an even, single layer on a baking sheet lined with parchment paper. Place the baking sheet in the freezer until the Agnolotti are solid (this can take 1-2 hours). Once completely frozen, you can transfer the individual Agnolotti to freezer-safe bags or airtight containers. This “flash freezing” method prevents them from sticking together, allowing you to easily grab only what you need. Frozen Agnolotti can be stored for up to 3 months. When ready to cook, boil them directly from frozen, adding a couple of extra minutes to the cooking time.
Explore More Homemade Pasta Tutorials
If you’ve enjoyed making Agnolotti, we invite you to delve deeper into the world of fresh pasta with our other comprehensive tutorials. Expand your pasta-making repertoire with these delightful recipes:
More Fresh Pasta Recipes to Try
Tips & Tricks
How to Make Homemade Ravioli – The Ultimate Guide
Fresh Pasta
Homemade Tonnarelli Pasta (Spaghetti alla Chitarra)
Fresh Pasta
Homemade Cavatelli Pasta
Fresh Pasta
How to make Pici Pasta
If you’ve tried this Homemade Agnolotti Recipe or any other recipe from our blog, please don’t forget to rate the recipe and share your experience in the comments below – we absolutely love hearing from you! You can also follow us on Facebook, Instagram, and Pinterest, or subscribe to our Newsletter to discover more of our delicious Italian food creations.
Step-by-Step Photos Above
Most of our recipes come with detailed step-by-step photos, helpful tips and tricks to ensure perfect results on your first attempt, and even a video tutorial!
Homemade Agnolotti (Step-by-Step Guide)
By Emily
1 hr
5 mins
30 mins
1 hr
35 mins
4
servings (40-50 agnolotti)
Print Recipe
See step-by-step photos and video above! Learn how to make Homemade Agnolotti from scratch. This beautiful filled pasta may look complicated but it’s actually fairly easy to make at home.
Equipment
-
Pasta machine or rolling pin
-
Piping bag (optional, for filling)
Ingredients
Pasta dough
- 3 medium eggs
- 1 medium egg yolk
- 300 g Italian 00 flour, plus extra for dusting (approximately 2 and 1/4 cups)
Filling (optional, see notes for more ideas)
- 2 cups ricotta, (500g) strained for at least 1 hour
- 1 cup grated provolone piccante cheese, (100g) (can also use smoked scamorza or Fontina)
- Pinch of black pepper
Instructions
Preparation tips
-
This recipe will show you how to make homemade Agnolotti that you can prepare with any filling or sauce you like. If you’d like to use ricotta as your filling I recommend straining it for at least 1 hour before using.
-
I also recommend making your sauce in advance so all you need to do is heat it up when you’re ready to cook the Agnolotti. If you’re making a butter sauce you can do this last minute.
Make the pasta dough
-
Place the flour on a clean work surface and make a large well in the middle. Add the eggs and egg yolk to the well and beat them with a fork.
-
Start to incorporate the flour into the beaten egg a little at a time until a rough dough forms. Use your hands to bring the dough together and knead the dough for about 10 minutes until smooth and elastic. If you find the dough is too sticky use a little extra flour.
-
Wrap the dough in plastic wrap (cling film) and let it rest at room temperature for at least 30 minutes. You can make the dough the night before and store it in the fridge overnight (bring it to room temperature before using).
Make your filling
-
If using our filling, mix the strained ricotta in a bowl with grated provolone cheese and add a pinch of black pepper, then set aside.
To roll out the pasta dough
-
Cut the dough in half and keep one half wrapped in plastic wrap while using the other. Press the dough flat enough to fit into the widest setting of your pasta machine (you can use a rolling pin to help).
-
Pass the dough through the widest setting of your pasta machine (usually number 0) then fold one end into the middle of the dough and the other end directly over it as if you were creating a leaflet. Flatten the dough again and pass it through the widest setting once more. Repeat this process another two times.
-
Your dough is now ready to roll out. Roll the dough through each setting once, finishing on number 6. You may need to cut the dough in half if it gets too long to handle easily.
-
Lay a sheet of pasta out on your work surface and pipe the filling along the middle of the pasta in one long line, leaving about 1 inch free at both ends.
-
Fold the pasta right over the filling and secure it tightly using the side of your hand or finger (see photos or video for visual explanation).
-
Pinch along the filling to create roughly 1 inch wide Agnolotti. Trim the excess pasta along the edge, then using your pasta wheel swiftly cut through each pinched section to cut the pasta into individual Agnolotti.
-
Lay the cut Agnolotti on a surface lightly dusted with flour or semolina while you make the rest.
Cook the Agnolotti
-
Bring a large pot of water to a boil and salt it well. Add the Agnolotti and boil for around 3 minutes.
-
Use a slotted spoon to drain the Agnolotti from the water and place directly in your pasta sauce. Toss to coat in your sauce and serve immediately.
Video Tutorial
A comprehensive video guide demonstrating each step of making homemade Agnolotti, from dough preparation to filling and shaping, ensures you can follow along with ease.
Notes
- Weigh your flour – As emphasized, weighing your flour with a kitchen scale is crucial for accurate results and perfect dough consistency. If using cups, spoon flour lightly into the cup and level off with a knife.
- Eggs – If using large eggs, you might consider omitting the extra egg yolk to prevent the dough from becoming too soft or sticky. Be prepared to incorporate a little more flour if necessary, regardless of egg size, to achieve the right dough texture.
- Sealing the pasta – To prevent fillings from escaping during cooking, ensure your pasta edges are well sealed. If the dough feels a bit dry, lightly dampen the edges with a tiny bit of water before pressing them together to create a secure seal.
- Don’t use too much flour – Excessive flour during kneading or rolling can lead to dry, tough pasta. Use just a light dusting to prevent sticking, adding only when genuinely needed to maintain the dough’s moisture and pliability.
- Resting the dough – Allowing the dough to rest for at least 30 minutes after kneading is a non-negotiable step. This relaxation period lets the gluten develop and relax, making the dough significantly more elastic and easier to roll out to the desired thinness.
Helpful Info for All Recipes
- I always use extra virgin olive oil in all of my recipes unless stated otherwise. Its robust flavor enhances many Italian dishes.
- When I use canned or jarred tomatoes of any kind, I exclusively use Cirio or Mutti brands for their superior quality, consistent flavor, and rich texture, which contribute significantly to the best results.
- All vegetables are assumed to be medium-sized unless specifically stated otherwise in the ingredient list.
- All recipes are meticulously tested and developed using a fan (convection) oven, so cooking times may vary slightly with different oven types.
- Find out more about how nutrition is calculated and its approximate nature.
- Check out our must-have Italian Pantry Staples to stock your kitchen with essential ingredients for authentic Italian cooking.
- You can also find all our Essential Kitchen Tools for Italian Cooking to equip yourself for culinary success.
Nutrition Information (per serving)
Calories:
625kcal
|
Carbohydrates:
62g
|
Protein:
32g
|
Fat:
27g
|
Saturated Fat:
16g
|
Polyunsaturated Fat:
2g
|
Monounsaturated Fat:
8g
|
Trans Fat:
0.01g
|
Cholesterol:
204mg
|
Sodium:
335mg
|
Potassium:
292mg
|
Fiber:
2g
|
Sugar:
1g
|
Vitamin A:
954IU
|
Calcium:
477mg
|
Iron:
5mg
Nutrition information is automatically calculated and should only be used as an approximation. Actual values may vary based on specific ingredients and preparation methods.
Did you try this recipe?
Leave a comment below! We love to hear your feedback.