
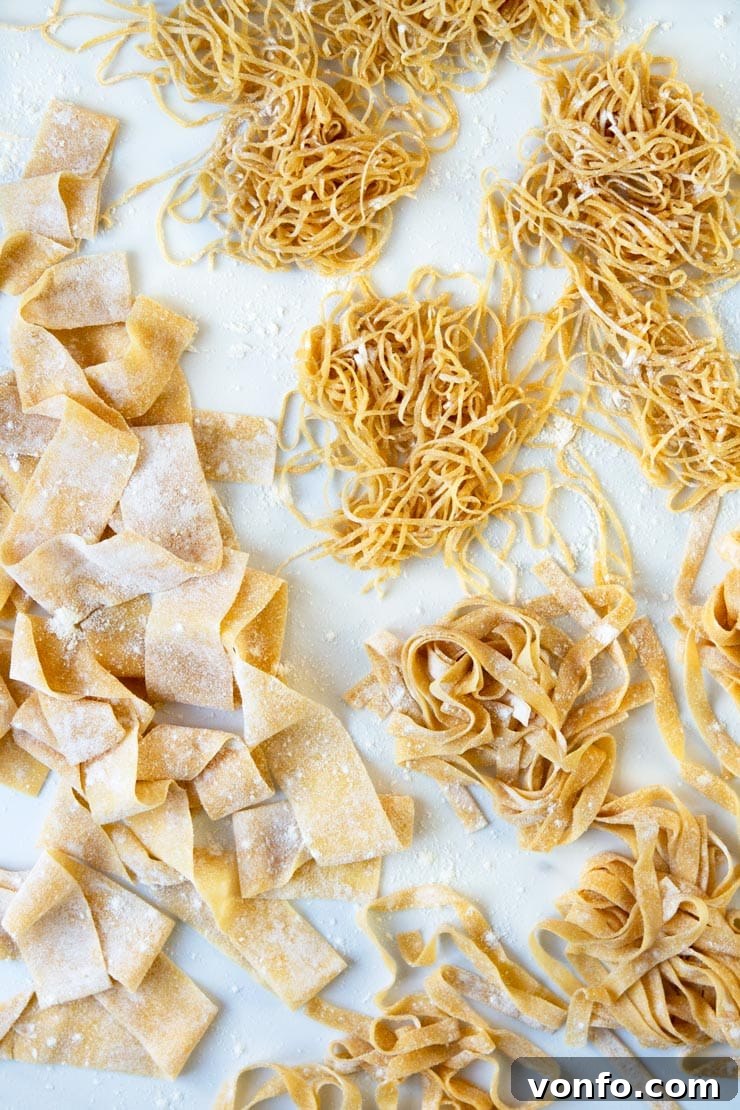
Embark on a delightful culinary journey to Italy right from your kitchen! This comprehensive guide provides a basic yet incredibly versatile recipe for homemade pasta dough. With this fundamental dough, you can effortlessly create a delightful array of classic Italian pasta shapes, from delicate lasagne sheets and charming farfalle to classic ravioli, elegant tagliatelle, rustic pappardelle, and so much more. Don’t let the idea of making pasta from scratch intimidate you – it’s far simpler and more rewarding than it seems, and the unparalleled taste and texture are truly worth every ounce of effort!
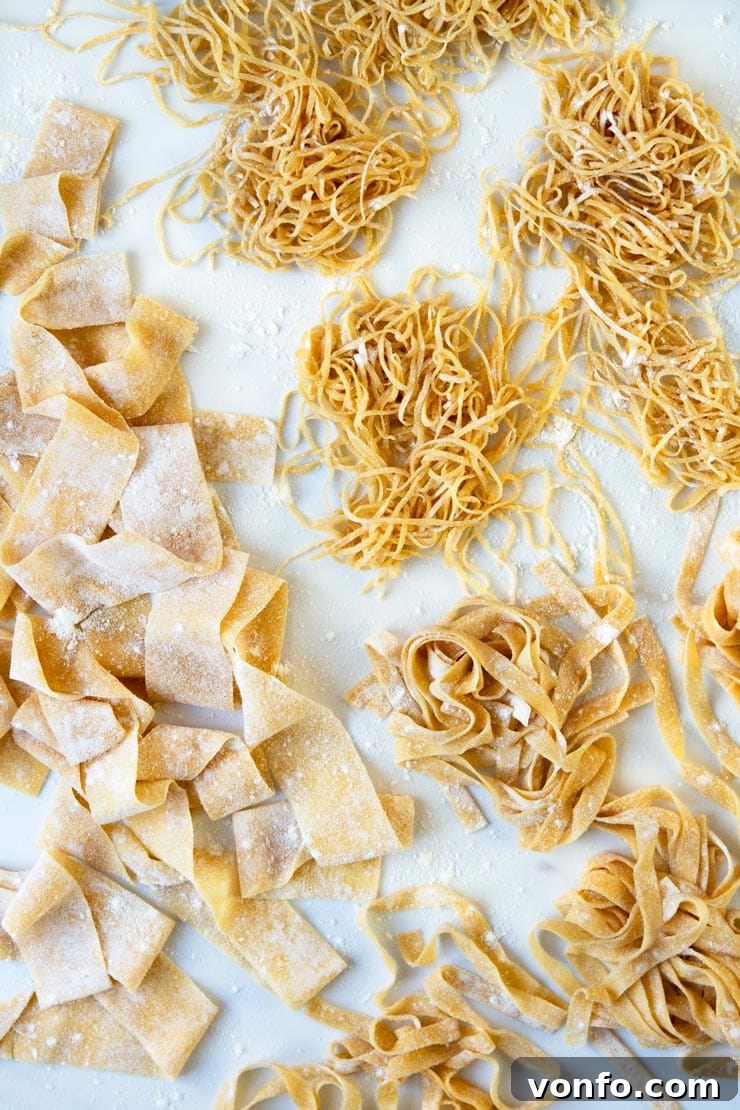
Mastering Homemade Pasta Dough: An Authentic Italian Culinary Experience
For any genuine admirer of Italian cuisine, the allure of homemade pasta is utterly undeniable. There’s a profound satisfaction that comes from transforming simple ingredients into something truly extraordinary. Whether you dream of a rich and deeply comforting lasagne, meticulously layered with the most exquisite meat ragù and velvety, creamy béchamel sauce, or perhaps fresh and vibrant orecchiette tossed with tender broccoli and a hint of chili, or even the hearty indulgence of pappardelle paired with earthy wild mushrooms and savory speck – the culinary experience is always elevated, and indeed perfected, when the pasta is fresh and made by hand.
The vast and diverse world of Italian cooking offers an incredible spectrum of pasta sauces and shapes, so rich and varied that one could easily enjoy pasta every single day without ever encountering a hint of boredom! Yet, truly, nothing quite compares to a meal crafted with tender, fresh homemade pasta dough. The flavor transcends anything store-bought, offering a depth, richness, and nuance that is simply unreal. Beyond the exquisite taste, the texture – a perfect al dente bite that holds its form beautifully, yielding just the right resistance – and the sheer satisfaction derived from that first forkful of warm, cozy, home-cooked goodness are enough to transport you directly to food heaven. It’s not just a meal; it’s an act of love, a connection to generations of Italian culinary tradition that brings immense joy.
This comprehensive, step-by-step guide is designed to empower you with a basic, foundational pasta dough recipe that is both easy to master and incredibly versatile. Once you learn this core technique, you can transform it into an endless variety of delicious and comforting meals. We’ll walk you through the entire process, from preparing the dough from scratch, complete with clear, illustrative photos for each stage, to expertly shaping it into versatile lasagne sheets, elegant tagliatelle, broad pappardelle, and classic fettuccine. While these are just a few popular examples, the possibilities for different pasta shapes are truly limitless once you have mastered this foundational dough.
The Magic of Ingredients: Achieving the Perfect Egg-to-Flour Ratio
The cornerstone of making consistently excellent homemade pasta lies in understanding and precisely adhering to the correct ratio of eggs to flour. This balance is crucial for a dough that is both pliable and strong. The general, tried-and-true rule of thumb, passed down through generations of Italian cooks, is to use one large egg for every 100 grams (approximately 3.5 ounces) of “00” flour. This particular type of flour is finely milled and has a specific protein content that is ideal for creating tender yet resilient pasta.
For an extra touch of richness, a silkier texture, and a more vibrant golden hue, I personally love to add one additional egg yolk to the entire mixture – please note, this is one extra egg yolk for the whole batch of dough, not per 100g of flour. This small addition makes a remarkable difference in the pasta’s overall quality and appearance.
For instance, if you’re preparing enough dough for approximately 4 to 6 servings, which is perfect for a generous batch of ravioli or a substantial amount of long pasta, I recommend using 3 large eggs, 300 grams (about 10.5 ounces) of “00” flour, and that single extra egg yolk. This precise balance ensures a dough that is wonderfully pliable, deeply flavorful, and incredibly easy to work with through all stages of pasta making.
Selecting the Best Eggs for Superior Pasta
The quality of your ingredients profoundly impacts the final culinary product, and this is especially true for the eggs you choose when making pasta. Always strive to use the highest quality, freshest free-range eggs you can find. In Italy, there’s even a special type of egg renowned specifically for pasta making, often lovingly referred to as ‘Pasta Gialla’ (meaning ‘yellow dough’ or ‘yellow pasta’). These exceptional eggs boast remarkably bright orange yolks, which naturally impart a stunning, deep yellow color to the pasta, making it not only more visually appealing but also significantly richer and more robust in flavor.
While true ‘Pasta Gialla’ eggs might be a rare find outside of Italy, many local farmers’ markets or specialty grocery stores offer high-quality free-range eggs with delightfully vibrant yolks. Taking the time to search for the best options in your area will undoubtedly make an unmistakable difference in the quality and character of your homemade pasta. Furthermore, remember that the size of your eggs is also a critical factor. This recipe has been meticulously developed using large eggs. If you opt for smaller or medium-sized eggs, you might need to slightly adjust the amount of flour, possibly reducing it by a small amount, to achieve the desired dough consistency and prevent it from becoming too dry.
Crafting the Dough: Detailed Step-by-Step Instructions
Making pasta dough is a truly hands-on experience that many find to be both therapeutic and immensely satisfying. Follow these carefully detailed steps to achieve a perfectly formed, smooth, and workable dough:
-
Prepare Your Workspace: Begin by placing the measured “00” flour directly onto a clean, spacious work surface. A large wooden board or a meticulously clean countertop works best. Form the flour into a neat, uniform mound, then create a deep, wide well in the center, much like a volcano with high, stable walls, ensuring it’s ample enough to comfortably contain the liquid ingredients (refer to photo 1 for visual guidance).
-
Combine Eggs and Flour: Carefully crack the large eggs and the single extra egg yolk directly into the well. Using a fork, gently whisk the eggs in the very center of the well. As you whisk, slowly and deliberately start to incorporate the flour from the inner walls of the well into the egg mixture. Continue this process, gradually widening your whisking motion, until most of the egg is absorbed and the mixture begins to resemble a very rough, shaggy dough with no streaks of dry flour (see photos 2 & 3). At this point, don’t hesitate to abandon the fork and use your hands to fully bring the remaining flour into the mix, ensuring everything is thoroughly combined into a cohesive mass.
-
Kneading for Perfection: Gather the rough dough together with your hands and form it into a firm ball. Now comes the kneading – this is a truly crucial step for developing the gluten that gives homemade pasta its characteristic elasticity, strength, and perfect al dente bite. Knead the dough vigorously and continuously for a full 10 minutes. The traditional motion involves pushing the dough away from you with the heel of your hand, then folding it back over itself, rotating it slightly, and repeating the process. As you knead, the dough will undergo a remarkable transformation, evolving from sticky and shaggy to wonderfully smooth, firm, and pliable. A good test for readiness is to cut the dough in half; if you observe tiny, evenly distributed air bubbles throughout the cross-section, your dough is perfectly kneaded and ready for the next stage.
-
Resting the Dough: Once adequately kneaded, wrap the smooth, elastic dough tightly in cling film (plastic wrap) to prevent it from drying out and forming a crust. Leave it to rest undisturbed at room temperature for at least 30 minutes (as shown in photos 4-6). This resting period is absolutely vital, as it allows the gluten strands, which were tightened during kneading, to relax. This relaxation makes the dough much more cooperative and easier to roll out thinly without resistance, shrinking, or tearing.
Rolling the Dough to Perfection with a Pasta Machine
After its essential resting period, your pasta dough is now perfectly conditioned and ready to be transformed into delicate sheets. A manual pasta machine is an invaluable tool for achieving consistent thickness and wonderfully smooth results that are difficult to replicate by hand.
-
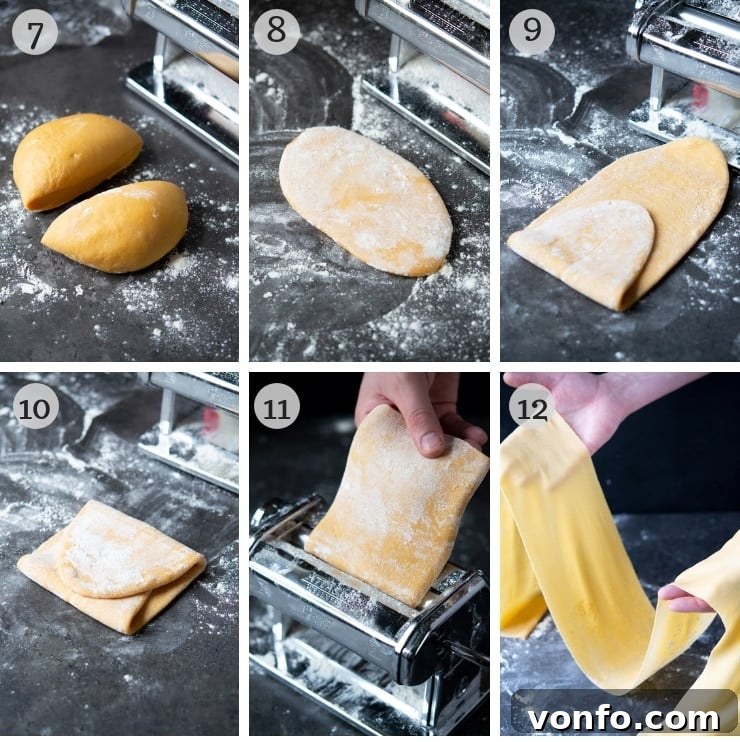
Prepare for Rolling: Take the rested dough and cut it in half (or into smaller, more manageable portions if your original dough ball is quite large). This makes it significantly easier to handle. Gently flatten each portion with the palm of your hand into an oval or rectangular shape. This initial flattening helps the dough feed smoothly and evenly through the widest setting of your pasta machine, which is typically marked as ‘0’ or ‘1’ on most models (illustrated in photos 7 & 8).
-
First Passes and Folding (A Critical Step!): Set your pasta machine to its widest opening. Pass one flattened dough portion through this setting once. You will now have a somewhat irregular, thick sheet. Take this sheet, fold one side inwards towards the center, then fold the other side over it, creating a neat, rectangular package (as demonstrated clearly in photos 9 and 10). Gently flatten this folded dough again with your hand, pressing out any air, and pass it through the widest setting once more. Repeat this crucial folding and passing process at the widest setting three more times, for a total of four passes. This step is incredibly important as it helps to further strengthen the gluten, smooth out any remaining lumps or inconsistencies in the dough, and ensure a silky, consistent texture for your final pasta.
-
Gradually Thinning the Dough: Once you’ve completed the folding and initial passes, you’re ready to progressively thin the dough. Pass the dough through each subsequent setting on your pasta machine, moving one setting at a time from the widest down to your desired final thickness. For most common pasta types like lasagne or tagliatelle, I highly recommend going down to the second-to-last setting (often marked as ‘8’ on many machines). For more delicate applications, such as stuffed ravioli, you might stop at the third-to-last setting (typically ‘7’). Always ensure your work surface and, crucially, the rollers of your pasta machine are lightly dusted with a fine layer of “00” flour or fine semolina to prevent any sticking and ensure smooth operation.
The Art of Thickness: Choosing the Right Setting for Your Pasta Type
Selecting the optimal thickness for your pasta sheets is a key factor in achieving the perfect al dente bite and ensuring the overall integrity and success of your final dish. While most pasta machines offer a wide range of settings, from very thick to incredibly thin, I personally very rarely roll my pasta to the very last, thinnest setting. My experience has shown that this extreme thinness can make the dough too delicate and challenging to work with, prone to tearing during handling, and sometimes it even compromises its structural integrity when cooked, resulting in a less satisfying texture.
- For Delicate Fillings like Ravioli: If I am making stuffed pasta, such as beautiful ravioli or tortellini, I typically roll the dough out to the third-to-last setting on my machine (which often corresponds to number 7 on many common models). This specific thickness provides sufficient strength and body to hold the filling securely without being overly thick, heavy, or chewy once cooked.
- For Lasagne, Tagliatelle, or Pappardelle: For broader, flat pasta shapes like versatile lasagne sheets, or classic long strands such as tagliatelle and pappardelle, I consistently prefer to roll the dough out to the second-to-last setting (usually number 8). This thickness offers a wonderful and desirable balance of tenderness and chewiness, allowing the pasta to beautifully absorb and hold rich, flavorful sauces without becoming either too flimsy or too substantial. I encourage you to experiment with your own pasta machine and personal preferences to discover your ideal thickness!
Transforming Your Dough into Different Classic Pasta Shapes
Once you have your beautifully rolled, silky smooth pasta sheets, the truly enjoyable and creative part of shaping begins! This is where your homemade dough comes to life. Here’s how to create some of the most popular and beloved Italian varieties:
Creating Perfect Lasagne Sheets
Making lasagne sheets from your fresh pasta dough is wonderfully straightforward and incredibly satisfying. Simply continue to roll your pasta dough through the machine until you reach your preferred thickness – usually the second-to-last setting (which is my personal preference for achieving an optimal al dente bite and robust texture in a layered lasagne), or, if you desire a very delicate and thin lasagne, you can go all the way to the very last setting. Once rolled into long, even sheets, use a sharp knife or a specialized fluted pasta wheel to cut the sheets to the precise dimensions needed to fit your baking dish. And just like that, you’re ready to layer your magnificent lasagne masterpiece!
Looking for some delicious inspiration for your fresh lasagne sheets? Be sure to check out my classic Beef Lasagne recipe, featuring a rich, slow-cooked ragù and a silky, creamy béchamel sauce. For those seeking equally satisfying vegetarian options, I also offer a hearty and flavorful Lentil Ragù Lasagna and a comforting Butternut Squash Lasagna, which is absolutely perfect for the cozy autumn season.
Shaping Tagliatelle, Pappardelle & Fettuccine
These three beloved long pasta shapes share a very similar preparation process, differing primarily in their width, which gives each its unique character. The main exception among them is pappardelle, the widest of the trio, which is traditionally cut by hand, adding to its authentic rustic charm and texture.
Hand-Cutting Rustic Pappardelle:
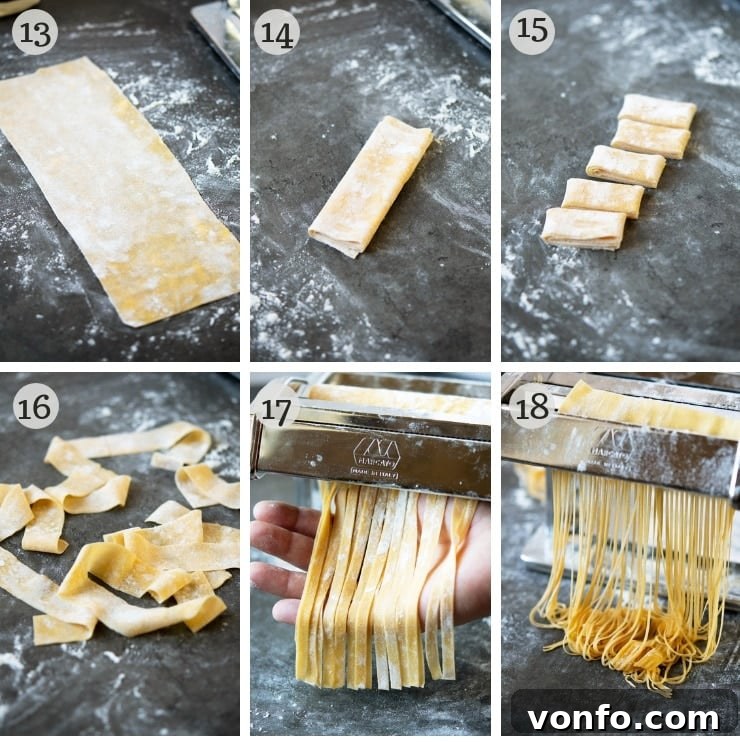
To craft beautiful pappardelle, take one of your prepared, thin lasagne sheets and lightly dust it on both sides with fine semolina flour. This helps prevent sticking. Carefully fold the pasta sheet in half, lengthwise, repeatedly until you achieve a strip approximately 1-inch wide (as delightfully depicted in photos 13 & 14). With a very sharp knife or a clean chef’s knife, carefully slice this folded roll into 1/2-inch wide pieces. You can trim the uneven ends for a more uniform and polished look if desired (photo 15). Gently unravel the cut pappardelle strands and use them immediately for cooking. If you plan to store them, shape a few strands at a time into loose, airy nests and dust them lightly with semolina. Arrange them on a clean, floured surface or a pasta drying rack, allowing them to air dry for an hour or two to firm up before storing (photo 16).
Machine-Cutting Tagliatelle and Fettuccine:
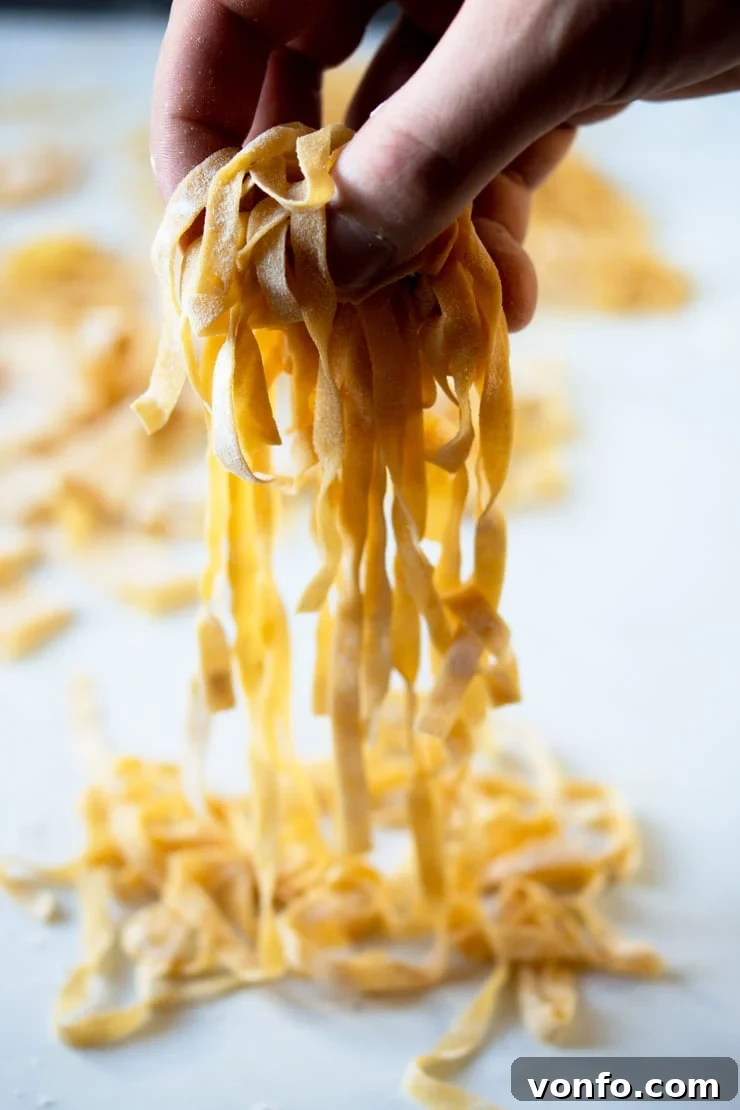
Creating uniform tagliatelle and fettuccine with a pasta machine is remarkably simple, efficient, and ensures consistent results. Most manual pasta makers come conveniently equipped with attachments specifically designed for these popular long pasta shapes. Secure the appropriate cutting attachment onto your pasta machine (for reference and an idea of the type, here’s the type I typically use). Once securely attached, feed your thinly rolled pasta sheets through the rollers of the cutting attachment, and watch as perfectly uniform strands of tagliatelle or fettuccine effortlessly emerge (as clearly seen in photos 17 & 18). Just like with hand-cut pappardelle, if you’re not planning to cook the pasta immediately, gently form the freshly cut strands into individual, loose nests and allow them to air dry slightly on a lightly floured surface or a pasta drying rack to prevent them from sticking together and to aid in proper storage.
Essential Tips for Consistently Perfect Homemade Pasta
Achieving consistently perfect homemade pasta is a skill that undoubtedly improves with practice and experience, but these expert tips will significantly boost your success from your very first attempt:
- Choose the Right Flour: Always, without exception, use “00” flour for the best results when making traditional egg pasta dough from scratch. Its incredibly fine texture and specific protein content are perfectly suited for creating a dough that is both tender and wonderfully strong.
- Quality Eggs are Paramount: As emphasized earlier, using the highest quality, freshest free-range eggs possible will consistently yield superior flavor, texture, and a beautiful, vibrant golden color in your finished pasta.
- Knead Thoroughly and Patiently: Do not ever skimp on the kneading process! A minimum of 10 minutes of active kneading is absolutely required to properly develop the gluten structure in the dough. The dough should transform to feel smooth, elastic, and visibly spring back when gently pressed. If you’re ever unsure, a good test is to cut the dough ball in half; if you observe tiny, evenly distributed air bubbles throughout the cross-section, it’s a clear indication that your dough is perfectly kneaded and ready.
- Rest is Crucial: Always, always allow the pasta dough to rest for at least 30 minutes at room temperature (not in the fridge) before you begin rolling it out. This vital resting period allows the gluten to fully relax, making the dough much more pliable, cooperative, and significantly easier to roll out thinly without it snapping back or tearing.
- Generously Dust Your Surfaces: Lightly but consistently sprinkle your work surface, your hands, and the dough itself with a little extra “00” flour or fine semola during the entire rolling and shaping process to prevent any sticking.
- Flour the Pasta Machine Rollers: A light dusting of flour on the rollers of your pasta machine between each pass is absolutely essential to stop the dough from adhering to the metal and potentially tearing or jamming.
- Mind the Humidity: Be aware that environmental humidity can significantly affect your dough’s consistency. High humidity can make your dough stickier, potentially requiring a little more flour during kneading and rolling. Conversely, very dry conditions might necessitate adding a tiny bit more liquid (a few drops of water or an extra egg yolk) if the dough feels too stiff and crumbly.
- Experiment with Natural Colors: Want to add a beautiful visual twist to your homemade pasta? Explore making different colored pasta! Check out our super easy Spinach Pasta Dough recipe for a vibrant green pasta, and our Beetroot Pasta Dough recipe for a stunning naturally red pasta.
- Storage of Fresh Pasta: If you’re not cooking your freshly cut pasta immediately, it can be gently tossed with a bit of semolina flour and then laid out on a clean kitchen towel or a pasta drying rack for 1-2 hours to partially air dry and prevent sticking. For longer storage, fresh pasta can be safely frozen in airtight containers or freezer bags for up to a month.
- Cooking Fresh Pasta: Remember that fresh pasta cooks significantly faster than dried, store-bought pasta, usually in a mere 2-4 minutes. Always cook it in generously salted boiling water until it reaches that perfect al dente texture.
Delicious Pasta Sauces to Complement Your Homemade Creation
The true beauty and versatility of homemade pasta lie in its incredible ability to perfectly pair with an almost endless variety of delicious sauces. Because of its superior texture and fresh flavor, homemade pasta elevates any accompanying sauce. Here are some of our favorite tried-and-tested recipes to get you started and inspire your next meal:
- Light & Fresh: For a delicate and vibrant option, especially delightful in spring, try our Artichokes and Peas Pasta.
- Umami-Rich & Flavorful: Packed with deep, savory flavors, our Sun-Dried Tomato & Roasted Red Pepper Pasta is a robust choice.
- Classic Sicilian Indulgence: Experience a truly robust and satisfying dish with our Eggplant Pasta Alla Norma, featuring tender fried eggplant, a rich tomato sauce, and salty ricotta salata.
- Simple & Elegantly Comforting: Sometimes, the simplest sauces are the most sublime, allowing the exquisite quality of the homemade pasta to truly shine. Our Parmesan and Butter Pasta is a testament to this philosophy.
- Hearty & Robust Ragù: A rich, slow-cooked sauce like our Easy Sausage Ragù beautifully coats wider pasta shapes such as pappardelle or tagliatelle, creating a truly satisfying meal.
Step By Step Photos Above
Most of our recipes come with step by step photos, helpful tips and tricks to make it perfectly first time and even video!
Homemade Pasta Dough Recipe
By Emily
20
30
50
4 servings
Print Recipe
Ingredients
- 400 g 00’ Flour, (approximately 3 cups, spooned and levelled)
- 4 large eggs, high-quality, free-range
- 1 egg yolk, from a high-quality, free-range egg (for extra richness and vibrant color)
Instructions
-
1. Prepare the Dough: Place the 00′ flour on a clean work surface, form a well in the middle, and add the large eggs and extra egg yolk into the well (refer to photo 1).
-
2. Mix Ingredients: Using a fork, gently whisk the eggs in the center, slowly incorporating the surrounding flour until combined and it forms a very rough, shaggy dough (photos 2 & 3). Use your hands to fully bring the dough together.
-
3. Knead the Dough: Gather the rough dough to form a ball. Knead vigorously for 10 minutes until it becomes smooth, firm, and wonderfully pliable.
-
4. Rest the Dough: Wrap the kneaded dough tightly in cling film (plastic wrap) and leave it to rest at room temperature for 30 minutes (photos 4-6). This is crucial for gluten relaxation.
-
5. Prepare for Rolling: After resting, cut the dough in half for easier handling. Flatten each piece with the palm of your hand so it will fit through the widest setting on your pasta machine (usually ‘0’ or ‘1’) (photos 7 & 8).
-
6. Initial Machine Passes & Folding: Pass the dough through the widest setting once. Fold one side over the other (as shown in photos 9 and 10), flatten, and pass through the widest setting again. Repeat this folding and passing process at the widest setting a total of four times. This step strengthens and smooths the dough.
-
7. Thinning the Dough: After the initial folding, pass the dough through each subsequent setting on your pasta machine, from the widest down to your desired thickness. For most shapes, aim for the second-to-last setting (number 8). For delicate ravioli, stop at the third-to-last setting (number 7).
Shaping Your Homemade Pasta: Lasagne Sheets, Tagliatelle, Pappardelle, and Fettuccine
Lasagne Sheets
-
1. Roll & Cut: To make lasagne sheets, simply roll the pasta dough through the machine until you reach the second-to-last setting (my preference for optimal texture) or the very last setting for a thinner sheet. Cut the long sheets to the appropriate size to fit your baking dish.
-
2. Recipe Suggestions: For classic layered lasagne, explore my classic Beef Lasagne recipe. Alternatively, try my vegetarian Lentil Ragù Lasagna or the seasonal Butternut Squash Lasagna.
Tagliatelle, Pappardelle & Fettuccine
-
1. Pasta Widths: These long pasta types primarily differ in their width. Pappardelle, the widest of the three, is traditionally cut by hand.
-
2. For Hand-Cut Pappardelle: Take a thin pasta sheet and gently fold it in half repeatedly until you achieve a width of about 1 inch (photos 13 & 14). Using a sharp knife, cut this folded roll into 1/2-inch wide pieces. Trim the ends if needed (photo 15). Unravel the pappardelle strands gently.
-
3. Drying Pappardelle: If not using immediately, shape a few strands of pappardelle at a time into loose nests and dust lightly with semolina flour. Allow them to dry for an hour or two on a floured surface to prevent sticking (photo 16).
-
4. For Machine-Cut Tagliatelle & Fettuccine: Attach the relevant cutting attachment to your pasta machine (most machines include these; this is an example of the one I use). Feed your thin pasta sheets through the attachment to produce perfectly uniform tagliatelle or fettuccine (photos 17 & 18).
-
5. Drying Machine-Cut Pasta: Use the same method as pappardelle to shape the machine-cut pasta into nests and let them dry out slightly if you’re not cooking them straight away.
Recipe Notes & Expert Advice
Optimal Pasta Thickness
Finding your ideal pasta thickness is crucial for the perfect texture and mouthfeel. I generally advise against rolling pasta to the very last, thinnest setting on the machine, as it often becomes too delicate and difficult to manage, prone to tearing, and can lose its desirable bite when cooked.
For delicate ravioli or other filled pasta, I recommend rolling the dough to the third-to-last setting (number 7 on most machines). For broader pasta shapes like lasagne sheets, tagliatelle, or pappardelle, the second-to-last setting (number 8) typically offers the best balance of tenderness and chewiness.
Understanding the Egg-to-Flour Ratio
The standard guideline for classic egg pasta is one large egg for every 100g (approximately 3.5 oz) of 00′ flour. This precise ratio ensures a dough that is firm yet flexible and easy to work with.
To enhance the richness of the pasta and achieve a truly beautiful golden hue, I always prefer to incorporate one additional egg yolk into the total dough mixture (this is one extra yolk for the entire batch, not per 100g of flour).
As a practical example, for preparing 4-6 servings, I typically use 3 large eggs, 300g (10.5oz) of 00′ flour, and 1 extra egg yolk.
The quality of your eggs significantly influences both the color and flavor of your finished pasta. Whenever possible, seek out high-quality free-range eggs, ideally those with naturally vibrant, deep orange yolks, which Italians often refer to as ‘Pasta Gialla’. These contribute to that signature bright yellow pasta color.
Important Note on Egg Size: The size of your eggs is a critical factor for dough consistency. This recipe assumes the use of large eggs. If you use smaller or medium-sized eggs, you may need to slightly reduce the flour or add a tiny splash of water to achieve the correct dough consistency. Conversely, if your eggs are extra-large, you might need a touch more flour.
Additional Expert Tips for Perfect Homemade Pasta Dough
- Flour Choice: For optimal results and a wonderfully tender texture, consistently use 00′ flour when making pasta from scratch.
- Egg Quality: Always prioritize using the freshest, highest quality free-range eggs available; they make a noticeable difference.
- Kneading Duration: Knead the dough for a minimum of 10 minutes. The dough should become noticeably smooth, elastic, and springy. A quick check involves cutting the dough in half; the presence of small, even air bubbles indicates adequate gluten development.
- Resting Period: Ensure the pasta dough rests for at least 30 minutes at room temperature before rolling. This step is absolutely essential for gluten relaxation, making the dough much easier to handle.
- Dusting Surfaces: Lightly dust your work surface and the dough itself with either 00′ flour or fine semola during the rolling process to prevent any sticking.
- Machine Maintenance: Always sprinkle a small amount of flour on the rollers of your pasta machine before and during use to prevent the dough from sticking and to ensure smooth operation.
- Color Variations: Get creative and explore! Discover our recipes for vibrant Spinach Pasta Dough (yielding beautiful green pasta) and Beetroot Pasta Dough (for stunning naturally red pasta) to add natural color to your homemade creations.
Helpful Information for All Our Recipes
- We consistently use extra virgin olive oil in all our recipes unless a different type of oil is specifically mentioned.
- For canned or jarred tomatoes of any kind, we exclusively recommend premium brands like Cirio or Mutti to ensure the best possible flavor and quality in your dishes.
- Unless otherwise specified within a recipe, all vegetables are assumed to be of medium size.
- All recipes provided on our site have been thoroughly tested and developed using a fan (convection) oven.
- Find out more about how our nutrition information is calculated for each recipe.
- Explore our essential guide to Italian Pantry Staples to stock your kitchen with authentic ingredients like a true Italian cook.
- Discover all our recommended Essential Kitchen Tools for Italian Cooking to simplify and enhance your culinary adventures.
Nutrition Information (per serving)
Carbohydrates: 71g |
Protein: 21g |
Fat: 8g |
Saturated Fat: 2g |
Cholesterol: 211mg |
Sodium: 83mg |
Potassium: 506mg |
Sugar: 1g |
Vitamin A: 306IU |
Calcium: 65mg |
Iron: 4mg
Nutrition information is automatically calculated and should be used as an approximation. Actual values may vary based on specific ingredients and preparation methods.
If you’ve tried this Homemade Pasta Recipe or any other delightful recipe on the blog, we would absolutely love to hear from you! Don’t forget to rate the recipe and let me know how you got on in the comments section below – your feedback is incredibly valuable and I genuinely love hearing from you! You can also FOLLOW US on FACEBOOK, INSTAGRAM and PINTEREST or sign up to our exclusive NEWSLETTER to receive our latest delicious food creations and cooking tips directly in your inbox.