
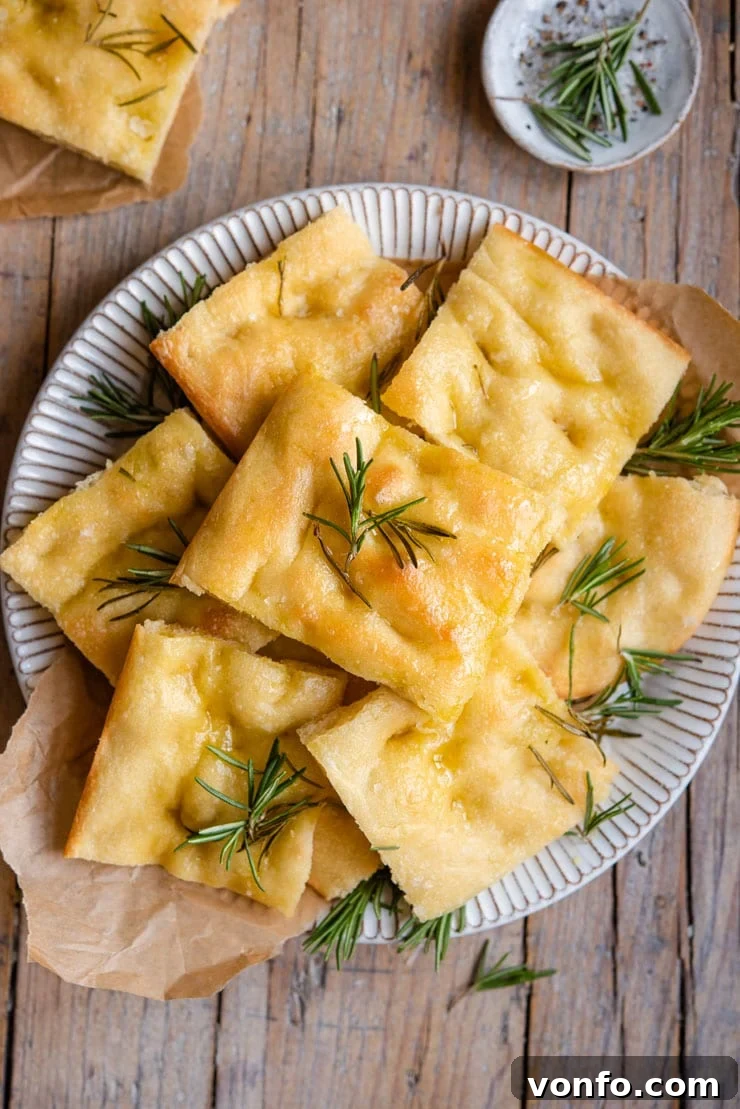
The Best Homemade Rosemary Focaccia Bread: An Authentic Italian Recipe
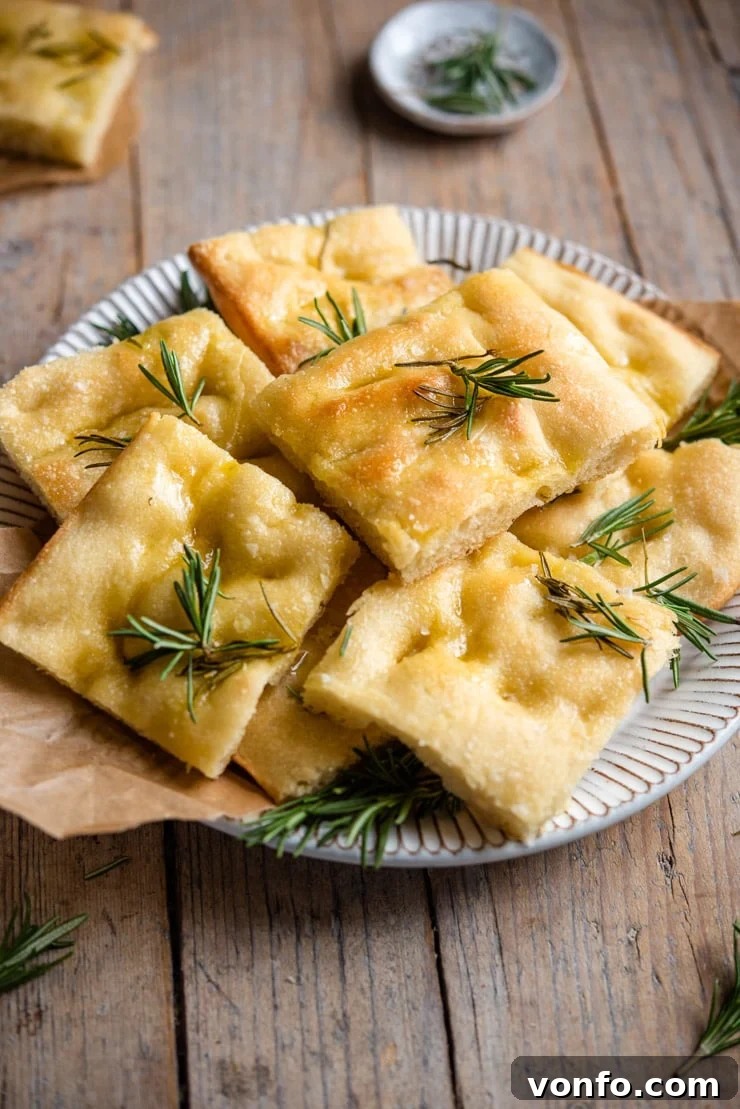
Imagine a bread that’s wonderfully aromatic, with a golden-crisp crust, an incredibly soft and airy interior, and the irresistible fragrance of fresh rosemary and rich olive oil. That’s the magic of **Rosemary Focaccia Bread**, a beloved Italian classic. This traditional focaccia is not just delicious; it’s surprisingly simple to make right in your own kitchen, using basic pantry ingredients. Whether you serve it as a stand-alone snack, use it to craft gourmet sandwiches, or tear off a piece to dunk into a hot bowl of soup, this homemade focaccia is guaranteed to impress with its authentic taste and texture.
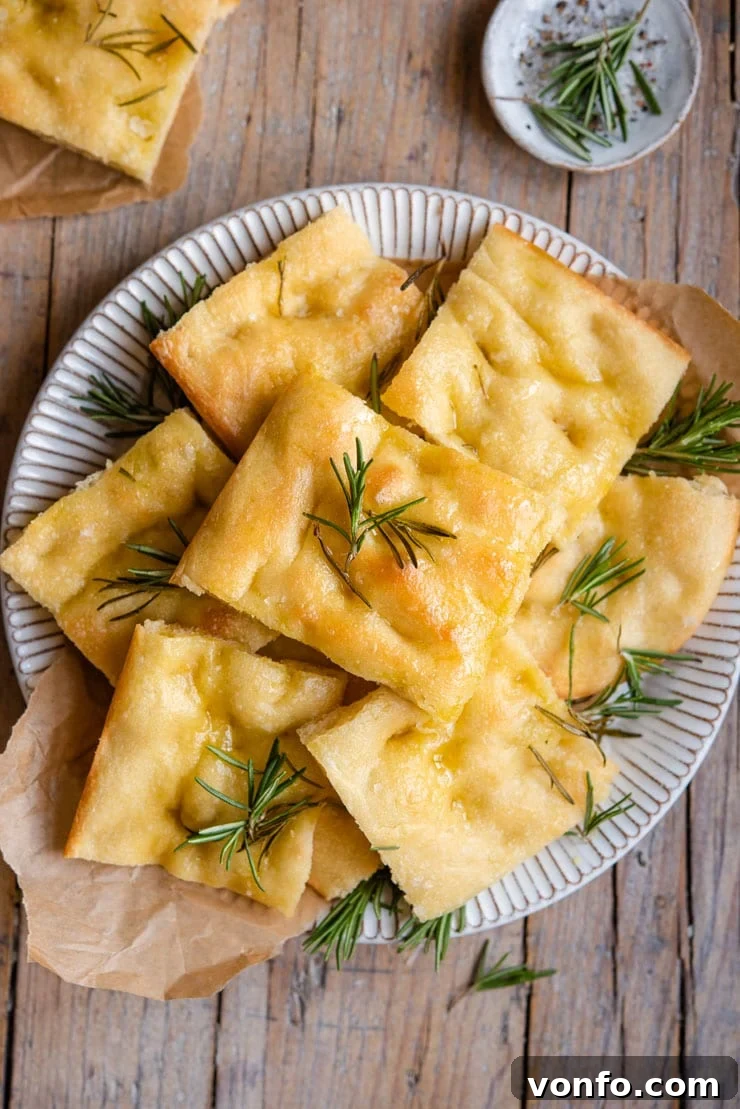
Rosemary focaccia holds a special place in the hearts of bread lovers worldwide, and for good reason. Its unique texture—crispy on the outside, yet wonderfully light and airy within—is truly unmatched. Each bite offers a delightful burst of flavor, from the earthy, fragrant rosemary to the peppery notes of high-quality extra virgin olive oil, all perfectly balanced by the subtle salinity of sea salt flakes. There’s truly nothing quite like a slice of focaccia, especially when it’s still warm from the oven, filling your home with its inviting, comforting aroma. It’s a culinary experience that transports you straight to the sun-drenched kitchens of Italy.
If you’ve ever felt intimidated by the idea of baking bread from scratch, let this easy rosemary focaccia recipe be your gentle introduction to the rewarding world of homemade baking. You might be surprised at how accessible and forgiving it is, even for beginners. Unlike some other bread recipes that demand intricate shaping or multiple complex steps, focaccia’s beauty lies in its rustic simplicity. It relies on a straightforward **yeast dough** that undergoes two essential rising periods: first in a bowl to develop deep flavors and elasticity, and then directly in the baking tray, where it proudly achieves its characteristic bubbly and dimpled surface. This hands-on process, from mixing to kneading, is incredibly satisfying and yields a loaf far superior to anything store-bought.
While the combination of **fresh rosemary, coarse sea salt flakes, and a generous drizzle of good olive oil** forms the quintessential flavor profile of classic focaccia, the real allure of this bread lies in its incredible versatility. The potential for different toppings is virtually endless, allowing you to customize each batch to suit your mood or meal. You can stick to the traditional trio for a purist’s delight, or venture into more adventurous culinary territory. Imagine transforming your focaccia into a savory Focaccia Pizza, crowned with vibrant tomato sauce and melted mozzarella, a popular choice that kids and adults adore. Or perhaps explore a medley of garden vegetables, sweet caramelized onions, or even various Italian cheeses. This flexibility makes focaccia not just a bread, but a fantastic canvas for your culinary creativity.
Essential Ingredients for Crafting Your Perfect Rosemary Focaccia
Creating this irresistible bread begins with a careful selection of a few pantry staples. Using high-quality ingredients will undeniably elevate the final flavor and texture, so always opt for the best you can find.
- 00 Flour (or Strong Bread Flour): This is the fundamental building block of our focaccia. Authentic Italian 00 flour is incredibly finely milled, resulting in a wonderfully tender crumb. However, a strong bread flour, known for its higher protein content, is an excellent and more readily available substitute. It provides the necessary gluten development for focaccia’s characteristic chewy yet airy structure.
- Fast-Action Yeast (Instant Yeast): The magical leavening agent responsible for making our dough light and fluffy. Always ensure your yeast is fresh and active. Fast-action yeast is convenient as it can be mixed directly with the dry ingredients without prior proofing.
- Granulated Sugar: A small amount of sugar serves multiple purposes. It acts as an initial food source for the yeast, helping to activate it efficiently. It also contributes to the beautiful golden-brown color of the crust and imparts a very subtle sweetness that balances the savory flavors.
- Sea Salt Flakes: Crucial for both enhancing the internal flavor of the dough and providing a delightful, textural crunch as a topping. Sea salt flakes offer a superior taste and visual appeal compared to standard table salt.
- High-Quality Extra Virgin Olive Oil: This is arguably the star ingredient of any authentic focaccia. Invest in a good quality extra virgin olive oil; its fruity, peppery notes will infuse the bread with unparalleled richness. It’s used generously in the dough, to oil the bowl and baking tray, and as a final decadent drizzle over the top before baking to achieve that signature crisp and flavorful crust.
- Warm Water: The correct temperature of water is vital for successful yeast activation. Aim for warm, not hot, water—ideally between 105-115°F (40-46°C). Water that’s too hot will kill the yeast, while water that’s too cold won’t activate it effectively.
Step-by-Step Guide: How to Bake Rosemary Focaccia at Home
Follow these detailed, yet simple, instructions to create a beautiful, aromatic focaccia that will undoubtedly become a much-loved staple in your kitchen. Remember, a little patience during the rising stages will be greatly rewarded with superior flavor and texture!
1. Prepare Your Dough Ingredients Carefully
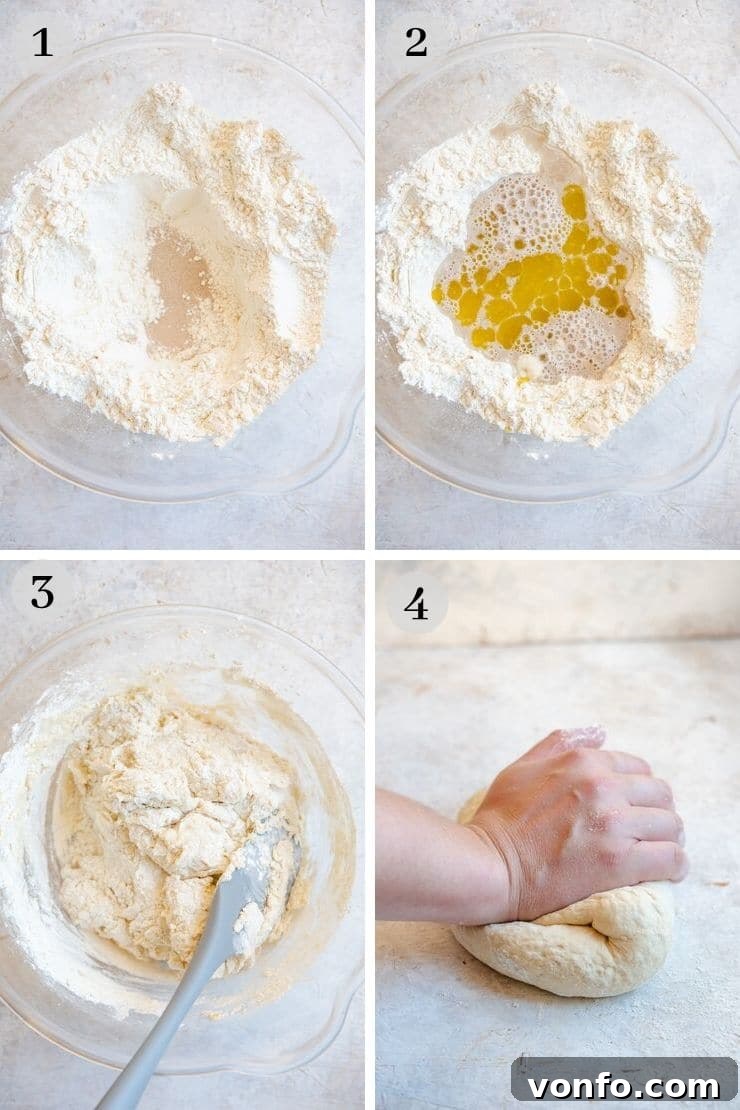
Begin by adding your measured flour to a large, spacious mixing bowl. Using your hand or the back of a spoon, create a shallow well in the very center of the flour. Carefully pour the fast-action yeast and the granulated sugar into this central well. It’s crucial at this stage to place the salt at the edge of the bowl, well away from the yeast and sugar. Direct contact between salt and yeast at this initial stage can inhibit or even kill the yeast, preventing your dough from rising effectively. (For a visual reference, you can imagine the ingredient placement shown in the first step-by-step image.)
2. Combine Wet and Dry to Form the Dough
Next, pour the measured warm water and the specified amount of olive oil directly into the middle well, over the yeast and sugar. Take a sturdy wooden spoon or a durable spatula and begin to gently mix all the ingredients together. Start by stirring the liquids in the well, gradually incorporating the surrounding flour from the sides of the bowl. Continue mixing until all the flour is hydrated and a shaggy, cohesive dough starts to form. There’s no need for it to be perfectly smooth at this point; just ensure all ingredients are well combined.
3. Knead the Dough to Develop Gluten
Once the dough has come together in the bowl, lightly dust a clean work surface with a little extra flour. Tip the dough out onto this surface. Now, begin to knead the dough vigorously for a full 10 minutes. This essential process develops the gluten strands within the flour, which are crucial for giving focaccia its characteristic chewy texture and desirable airy pockets. You’ll observe the dough transforming; it will become noticeably smoother, more elastic, and wonderfully springy to the touch. A reliable test for readiness is to gently press your finger into the dough; if it springs back quickly and fully, your dough has been perfectly kneaded and is ready for its first rise. (Observe the dough consistency in corresponding images, if available, for visual cues.)
4. First Rise: The Foundation of Flavor
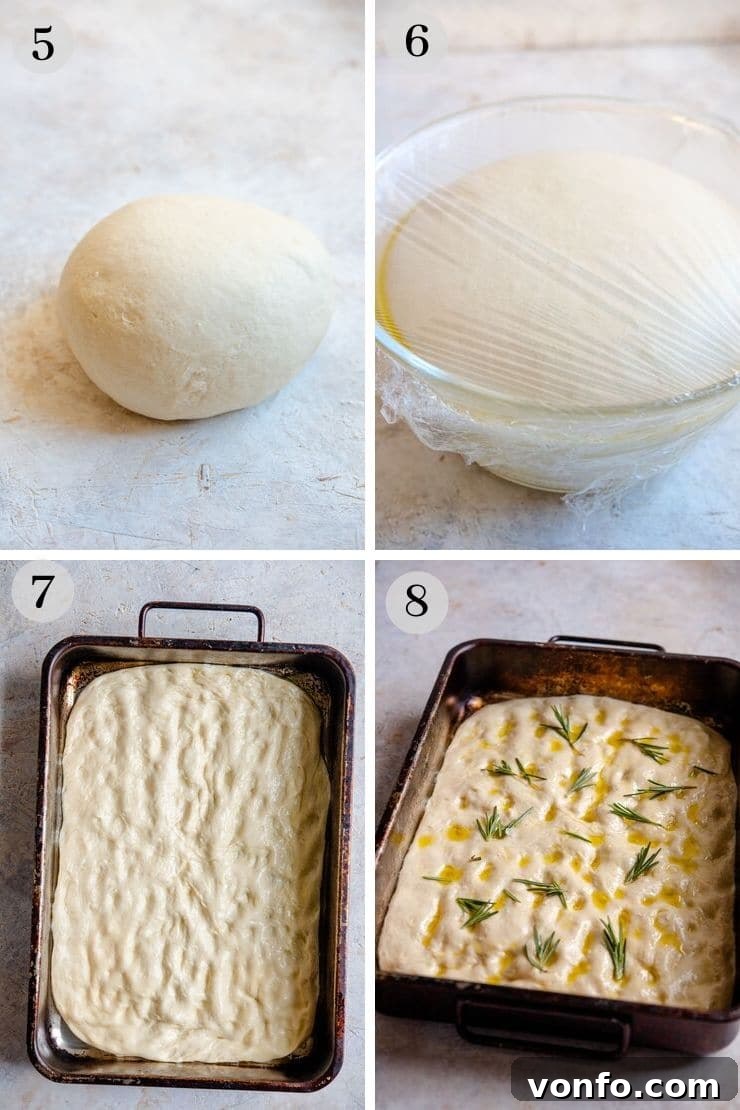
After kneading, thoroughly clean and dry your mixing bowl, then lightly coat the entire inside surface with a thin layer of olive oil. Place the newly kneaded ball of dough into the oiled bowl, turning it once or twice to ensure it’s lightly covered in oil on all sides. This prevents the dough from sticking to the bowl and helps maintain its moisture during rising. Cover the bowl tightly with plastic wrap or cling film to create a warm, humid environment. Place the covered bowl in a warm, draft-free spot—ideally a kitchen countertop away from open windows or air conditioning vents, but not in direct, hot sunlight—for approximately 1 hour, or until the dough has proudly doubled in its original size. This crucial first rise is where the yeast truly works its magic, developing the complex flavors and airy structure of your focaccia.
5. Prepare for the Second Rise in Baking Trays
Once the dough has completed its first rise and doubled in size, gently punch it down to release the trapped air. Carefully remove the dough from the bowl. At this stage, you have the option to cut the dough in half if you prefer to make two smaller focaccias, which is often easier to handle and bakes more evenly. Lightly oil two separate baking trays (rectangular trays approximately 10×15 inches work well, or use one larger tray if making a single, substantial focaccia). Place each half of the dough into its respective oiled tray and gently spread it out with your fingertips to fit the dimensions of the tray. Don’t worry about achieving perfectly uniform corners; the rustic, free-form shape is part of focaccia’s authentic charm. A handy tip: if you only plan to bake one focaccia immediately, you can tightly wrap and freeze the other half of the dough for a fresh bake another day.
6. Second Rise: The Final Proof
Loosely cover the baking trays containing the shaped dough with plastic wrap or a clean, damp kitchen towel. This prevents a skin from forming. Allow the dough to rise in the trays for another hour, or even slightly longer, in a warm spot. During this second rise, the dough should appear noticeably puffy, light, and will have gracefully spread to fill the tray. This final proof is absolutely vital for achieving that characteristic open, airy crumb and signature texture of a truly great focaccia.
7. Dimple, Top, and Prepare for Baking!
As the dough finishes its second rise, preheat your oven to a high temperature: 230°C (450°F), or if your oven allows, its hottest possible setting. The intense heat is key to developing that beautiful, crisp golden crust. Once the dough is fully risen and your oven is preheated, use your fingers to gently, yet firmly, make deep dimples all over the surface of the dough. Be careful not to press so hard that you deflate it completely, but create distinct indentations. These dimples are more than decorative; they create wonderful pockets for the olive oil and prevent the formation of large, uneven air bubbles. Finally, generously sprinkle fresh rosemary sprigs, a scattering of coarse sea salt flakes, and a final luxurious drizzle of high-quality olive oil over the dimpled surface. (This step is visually depicted in the final preparation images.)
8. Bake to Golden Perfection and Aromatic Bliss
Carefully transfer the prepared focaccia, in its baking tray, to your preheated oven. Bake for approximately 15-20 minutes. The exact baking time may vary slightly depending on your specific oven and the thickness of your focaccia, so keep a close eye on it. The focaccia is perfectly baked when its top is a beautiful golden-brown, its crust is crisp, and it sounds hollow when tapped. Your kitchen will be filled with an incredibly inviting, aromatic scent—the true sign of a successful bake.
Creative Focaccia Topping Ideas to Elevate Your Bread
While the classic rosemary and sea salt combination is undeniably delicious and timeless, focaccia’s simple yet robust base makes it an extraordinarily versatile canvas for a myriad of other delightful flavors. Don’t hesitate to experiment with these exciting topping variations to customize your next batch:
- Fresh Mozzarella: For a wonderfully soft and gooey texture, tear pieces of fresh mozzarella and scatter them generously over the dimpled dough just before baking. The cheese will melt into savory, creamy pools, creating a satisfying, pizza-like experience.
- Authentic Italian Tomato Sauce: Transform your focaccia into a rustic and flavorful pizza bread by spreading a thin, even layer of our Authentic Italian Tomato Sauce over the dough. You can then add mozzarella or other toppings on top; this is a very popular and delicious option across Italy.
- Caramelised Onions: For a sweet and deeply savory umami hit, scatter slowly cooked, tender caramelized onions over the dough. Their rich, sweet flavor beautifully complements the olive oil and the subtle sweetness of the bread.
- Roasted or Fresh Vegetables: Thinly sliced mushrooms, vibrant bell peppers (red, yellow, or orange), juicy cherry tomatoes (halved), or delicate zucchini ribbons make fantastic and colorful toppings. You can roast them lightly beforehand to intensify their flavors or place them fresh on the dough.
- Different Italian Cheeses: Explore beyond the familiar! Soft, spreadable Italian cheeses like Taleggio or Stracchino melt wonderfully and add a unique creamy, tangy, and slightly pungent dimension to your focaccia, taking it to a gourmet level.
- Briny Olives and Aromatic Garlic: Pitted Kalamata, Castelvetrano, or other green olives, along with thinly sliced fresh garlic cloves, offer a pungent, briny, and incredibly aromatic topping that’s a true Mediterranean delight.
- Sun-Dried Tomatoes & Mixed Herbs: Chopped oil-packed sun-dried tomatoes provide a concentrated burst of sweet-tart flavor. Pair them with a medley of fresh herbs like oregano, thyme, marjoram, or even a touch of chili flakes for an extra kick.
Can You Use a Stand Mixer for Making Focaccia Dough?
Yes, absolutely! You can certainly utilize a KitchenAid or any robust stand mixer equipped with a dough hook to prepare your focaccia dough. This method can significantly reduce the manual effort and time required for kneading, especially beneficial when making larger batches. However, for those new to bread baking, or if it’s your very first time making focaccia, I highly recommend making the dough by hand. The reason is quite simple and experiential: kneading by hand allows you to truly feel the dough’s texture and understand its gradual transformation and development. You’ll intuitively learn what “smooth, elastic, and springy” feels like, which is an invaluable skill that will serve you well in all your future bread-baking endeavors.
If you choose to use a stand mixer, attach the dough hook and knead the dough on a medium-low speed for approximately 5-7 minutes. During this time, the dough should gradually pull away from the sides of the bowl and gather around the hook. It will transform into a soft, smooth, and noticeably elastic ball. To confirm its readiness, use the same simple finger-press test: gently push your finger into the dough, and if it springs back promptly and fully, your dough is perfectly kneaded and optimally prepared for its first rise.
Storing and Freezing Your Homemade Focaccia for Future Enjoyment
Focaccia, like most fresh breads, is truly at its peak when enjoyed on the day it’s baked, still warm and fragrant from the oven. However, should you have any delightful leftovers, or wish to prepare ahead, there are excellent ways to store and even freeze it for later enjoyment:
- Storing Baked Focaccia: Once your focaccia has completely cooled to room temperature, you can store any leftover portions. Wrap it tightly in plastic wrap, or place it in an airtight container, and keep it at room temperature for 1-2 days. To refresh it and bring back some of its crispy texture, gently reheat it in a preheated oven for a few minutes before serving.
- Freezing Baked Focaccia: For longer preservation, baked rosemary focaccia freezes beautifully. Once it’s completely cooled, cut it into individual portions. Wrap each portion tightly in plastic wrap, then wrap again in aluminum foil to prevent freezer burn. Place the wrapped portions in a freezer-safe bag. It can be frozen for up to 3 months. When you’re ready to enjoy, thaw the frozen focaccia at room temperature for an hour or two, then reheat it in a preheated oven (around 180°C/350°F) until it’s warmed through and the crust has regained its crispness.
- Freezing Focaccia Dough: This recipe typically yields enough dough for two large focaccias. If your plans only call for one, you can easily freeze the other half of the dough before it undergoes its second rise. Simply wrap the dough ball tightly in plastic wrap, then encase it in aluminum foil, and freeze for up to 1 month. When you decide to bake it, transfer the frozen dough to the refrigerator overnight to thaw. The next day, bring it to room temperature (this might take an hour or two) before proceeding with shaping it in the tray, allowing for the second rise, and baking as instructed in the recipe.
Top Tips for Achieving Focaccia Baking Perfection
To ensure your homemade focaccia turns out perfectly every time—fluffy on the inside, wonderfully crisp on the outside, and bursting with flavor—keep these invaluable tips in mind:
- The Right Flour Matters: While true authentic Italian focaccia often calls for 00 flour for its incredibly tender crumb, don’t fret if you can’t find it. A good quality strong bread flour (which has a higher protein content) is an excellent and widely available alternative that will still yield a focaccia with fantastic structure and chew.
- Mind the Yeast and Salt: This is a common pitfall! Always ensure that the salt is added to the flour away from the yeast in the initial mixing stage. Direct contact between salt and yeast can “kill” the delicate yeast organisms, which will severely inhibit your dough from rising effectively.
- Quality Olive Oil is Key: Don’t skimp on the olive oil. Invest in a good quality extra virgin olive oil. It’s not just a cooking fat; it’s a fundamental flavor component in focaccia. Use it generously within the dough, for oiling your bowls and trays, and as the crucial final drizzle on top to achieve that signature rich flavor and perfectly crisp crust.
- Patience During Cooling: It can be tempting to slice into a warm, fragrant focaccia immediately, but resist the urge! Allow your freshly baked rosemary focaccia to cool for at least 10-15 minutes on a wire rack before cutting and serving. This crucial cooling time allows the internal structure of the bread to set properly, preventing it from becoming gummy.
- Versatile Serving: For an effortless sandwich base, simply slice a piece of focaccia horizontally to create two sturdy, flavorful layers ready for your favorite fillings.
- Pan Flexibility: The beauty of focaccia is its adaptability. Feel free to use a round or square baking tray if those are what you have on hand or prefer. The shape of the pan will not impact the delicious flavor, only the final presentation. Just be mindful to adjust the baking time slightly if you are using a pan with a significantly different surface area.
- Respect Rising Times: Don’t try to rush the rising times. A slow, proper rise is essential for developing the best possible flavor and an exquisite, airy texture in your focaccia. If your kitchen is cooler, the rising might take a bit longer.
- Hot Oven is Crucial: A high oven temperature is non-negotiable for focaccia. It’s what creates that beautiful, deeply golden, and wonderfully crisp crust, while ensuring the interior remains light and airy. Always make sure your oven is fully preheated to the specified temperature before placing the focaccia inside.
More Authentic Italian Snack Recipes You Might Love
If you’ve thoroughly enjoyed the process of baking this classic Italian bread, we invite you to explore more delightful Italian snacks and light bites from our curated collection. Expand your Italian culinary repertoire!
- La Piadina: Italian Flatbread – A quick-to-make and incredibly versatile flatbread from Emilia-Romagna, perfect for savory fillings or sweet spreads.
- Gnocco Fritto (Italian Fried Dough) – Light, puffy squares of fried dough, traditionally served with cured meats and soft cheeses. A true treat!
- Cecina Toscana: Tuscan Chickpea Flatbread – A naturally gluten-free and wonderfully savory flatbread, crisp on the outside and tender within, originating from Tuscany.
- Bagna Cauda Recipe (Anchovy, Garlic & Butter Dip) – A warm, pungent, and incredibly flavorful dip from Piedmont, perfect for serving with an assortment of fresh or cooked vegetables.
- Easy Marinated Olives – Ready In 5 Minutes – A simple yet sophisticated appetizer featuring mixed olives marinated in herbs and citrus, ready in no time.
- Fried Sausage Stuffed Olives – Delicious And Crispy – A unique and incredibly tasty fried appetizer where briny olives are stuffed with savory sausage and then fried to crispy perfection.
We sincerely hope you thoroughly enjoy baking and savoring this delightful **Rosemary Focaccia Bread**! Your feedback and experiences mean the world to us. If you’ve tried this recipe or any other on our blog, please take a moment to share your thoughts and let us know how you got on in the comments section below; we always love hearing from you! For more delicious, authentic recipes, helpful culinary tips, and to see what we’re cooking next, make sure to **FOLLOW US** on FACEBOOK, INSTAGRAM, and PINTEREST.
Rosemary Focaccia Bread Recipe
Easy Rosemary Focaccia, it’s light, delicious and so simple to prepare. There’s nothing better than the smell of homemade fresh focaccia bread baking in the oven.
By Emily
Prep time: 25 mins
Cook time: 20 mins
Rising Time: 2 hrs
Total time: Approximately 2 hours 45 mins (includes rising)
Yields: 12 servings (makes 2 large focaccias)
Ingredients
For the Dough:
- ~4 cups (500g) 00 flour, plus extra for dusting (or strong bread flour)
- 1 1/3 cups + 1 tbsp (320ml) warm water
- 4 tbsp olive oil (recommended olive oil)
- 1 tsp sugar
- ~2 tsp (7g) fast action dried yeast
- 1 tsp salt
For the Topping:
- 1-2 large sprigs fresh rosemary
- 1-2 tbsp olive oil (recommended olive oil)
- Sea salt flakes
Instructions
- First, add the flour to a large mixing bowl. Make a well in the middle of the bowl then pour the yeast and sugar in the middle. Make sure to place the salt at one side away from the yeast.
- Pour the water and olive oil into the middle of the well and using a wooden spoon or spatula mix everything together. Once the dough comes together tip it out onto a clean work surface lightly dusted with flour.
- Knead the dough for 10 minutes until smooth and springy (press your finger lightly into the dough and if it springs back it’s ready).
- Clean and dry the mixing bowl then lightly coat it in olive oil. Place the ball of dough in the bowl and lightly rub the top of it with olive oil.
- Cover with plastic wrap or cling film and place in a warm place for 1 hour or until doubled in size (not hot and not in direct sunlight).
- Once the dough has doubled in size remove it and cut it in half. Place the dough in two separate oiled baking trays (e.g., 10×15 inches each) and spread it out to fit the trays. If you only want to make one then you can freeze the other half.
- Let the dough rise in the trays for another hour or more.
- Preheat the oven to 230°C (450°F) or your hottest setting. When ready to bake use your fingers to make dimples over the dough, sprinkle over fresh rosemary, sea salt flakes and olive oil.
- Bake for 15-20 minutes until golden and baked through.
Notes
- If you don’t have type 00 flour you can use strong bread flour.
- Make sure not to place the salt directly on top of the yeast as it can kill it and prevent the dough from rising so well.
- Use a good quality extra virgin olive oil for making the focaccia and drizzling on top.
- Let the rosemary focaccia cool for around 10 minutes before cutting and serving.
- To use it as a sandwich simply cut in half.
- You can also make the focaccia in a round or square tray if you prefer.
Nutrition Information (per serving)
Calories: 206 kcal |
Carbohydrates: 31g |
Protein: 5g |
Fat: 7g |
Saturated Fat: 1g |
Sodium: 196mg |
Potassium: 48mg |
Fiber: 1g |
Sugar: 1g |
Calcium: 6mg |
Iron: 1mg
Nutrition information is automatically calculated, so should only be used as an approximation.
Helpful Information for All Recipes
- I always use extra virgin olive oil in all of my recipes unless stated otherwise.
- When I use canned or jarred tomatoes of any kind, I always recommend Cirio or Mutti brands for the best results and flavor.
- All vegetables are medium sized unless stated otherwise.
- All recipes are tested and developed using a fan (convection) oven.
- Find out more about how nutrition is calculated.
- Check out our must-have Italian Pantry Staples.
- You can also find all our Essential Kitchen Tools for Italian Cooking.
We sincerely hope you thoroughly enjoy baking and savoring this delightful **Rosemary Focaccia Bread**! Your feedback and experiences mean the world to us. If you’ve tried this recipe or any other on our blog, please take a moment to share your thoughts and let us know how you got on in the comments section below; we always love hearing from you! For more delicious, authentic recipes, helpful culinary tips, and to see what we’re cooking next, make sure to **FOLLOW US** on FACEBOOK, INSTAGRAM, and PINTEREST.