
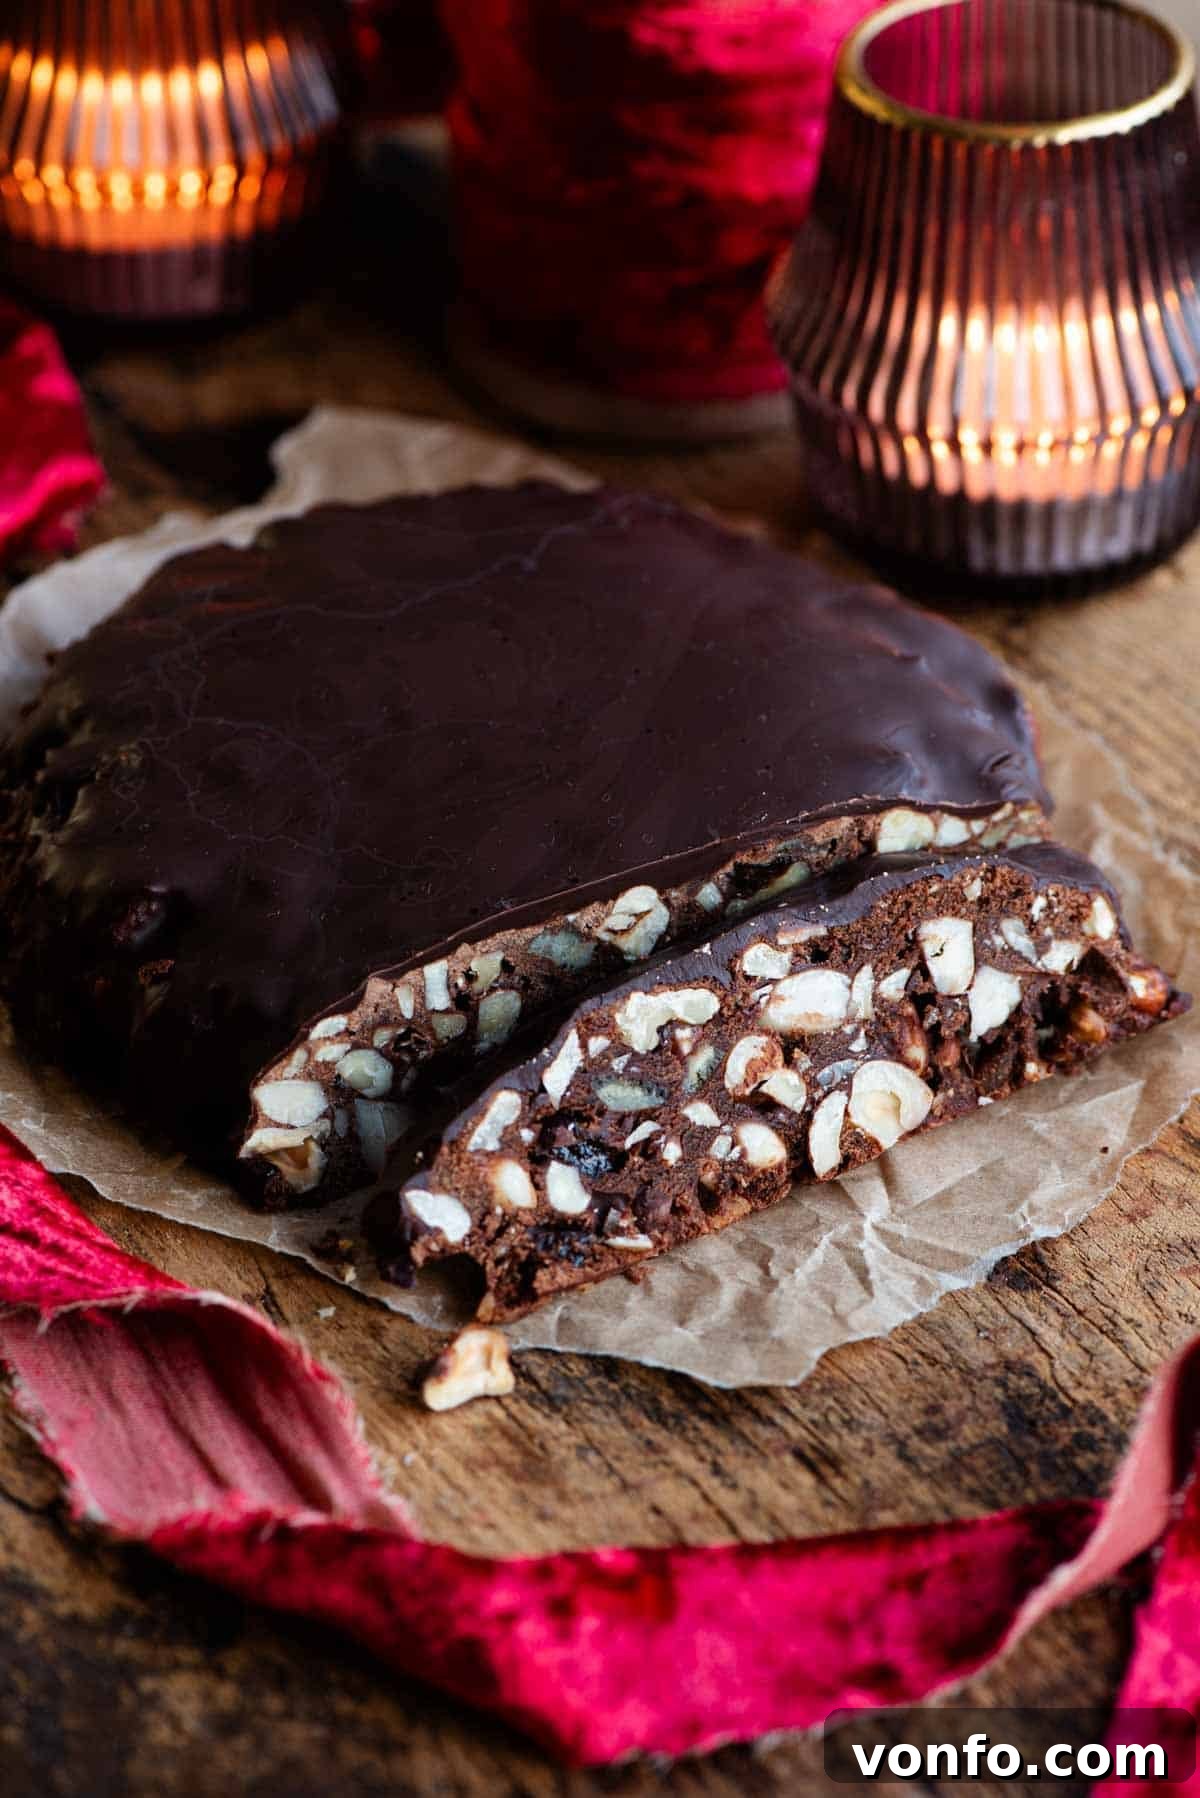
Panpepato: The Exquisite Italian Christmas Spiced Chocolate Cake from Ferrara
Embark on a culinary journey to Ferrara, a historical city nestled in Italy’s Emilia Romagna region, and discover the enchanting delight of Panpepato. This traditional Christmas spiced chocolate cake is more than just a dessert; it’s a centuries-old festive masterpiece, rich with history and bursting with flavors that evoke the true spirit of the Italian holiday season. Imagine a dense, aromatic cake packed with an abundance of finely chopped nuts, succulent dried fruits, a touch of golden honey, and an unexpected, yet delightful, hint of black pepper, all elegantly crowned with a generous layer of melted dark chocolate. Panpepato is not only profoundly delicious and wonderfully festive, but surprisingly straightforward to prepare, making it a perfect addition to your holiday baking repertoire.
The Rich History and Cultural Significance of Panpepato
The story of Panpepato is as rich and intricate as its flavor, tracing its roots back to the glorious era of the Italian Renaissance. This culinary gem, whose name elegantly translates to ‘peppered bread,’ stands as a testament to the historical value of spices and the creativity of Italian cuisine. The inclusion of freshly ground black pepper, a seemingly unconventional ingredient for a sweet cake, is in fact a hallmark of its ancient lineage. During the Renaissance, pepper was a highly prized and costly spice, signifying wealth and status, and its presence in such a festive confection spoke volumes about the host’s generosity. Far from being overpowering, the pepper introduces a delicious, subtle warmth and an intriguing depth that beautifully balances the sweetness of the honey and chocolate, leaving a delightful lingering sensation on the palate.
While Ferrara in Emilia Romagna is often celebrated as Panpepato’s spiritual home, its origins are also linked to Terni in Umbria, showcasing regional variations of this beloved dessert. What truly fascinates food historians and enthusiasts alike is Panpepato’s pivotal role in the evolution of other iconic Italian Christmas sweets. This very cake is considered the progenitor of Panforte di Siena. When the recipe traveled to Tuscany, it underwent a transformation: the signature black pepper was largely omitted, and a more generous quantity of dried fruit was incorporated, resulting in the distinctively fruitier Panforte we know today. Understanding this historical connection only deepens appreciation for Panpepato as a foundational Italian holiday delicacy.
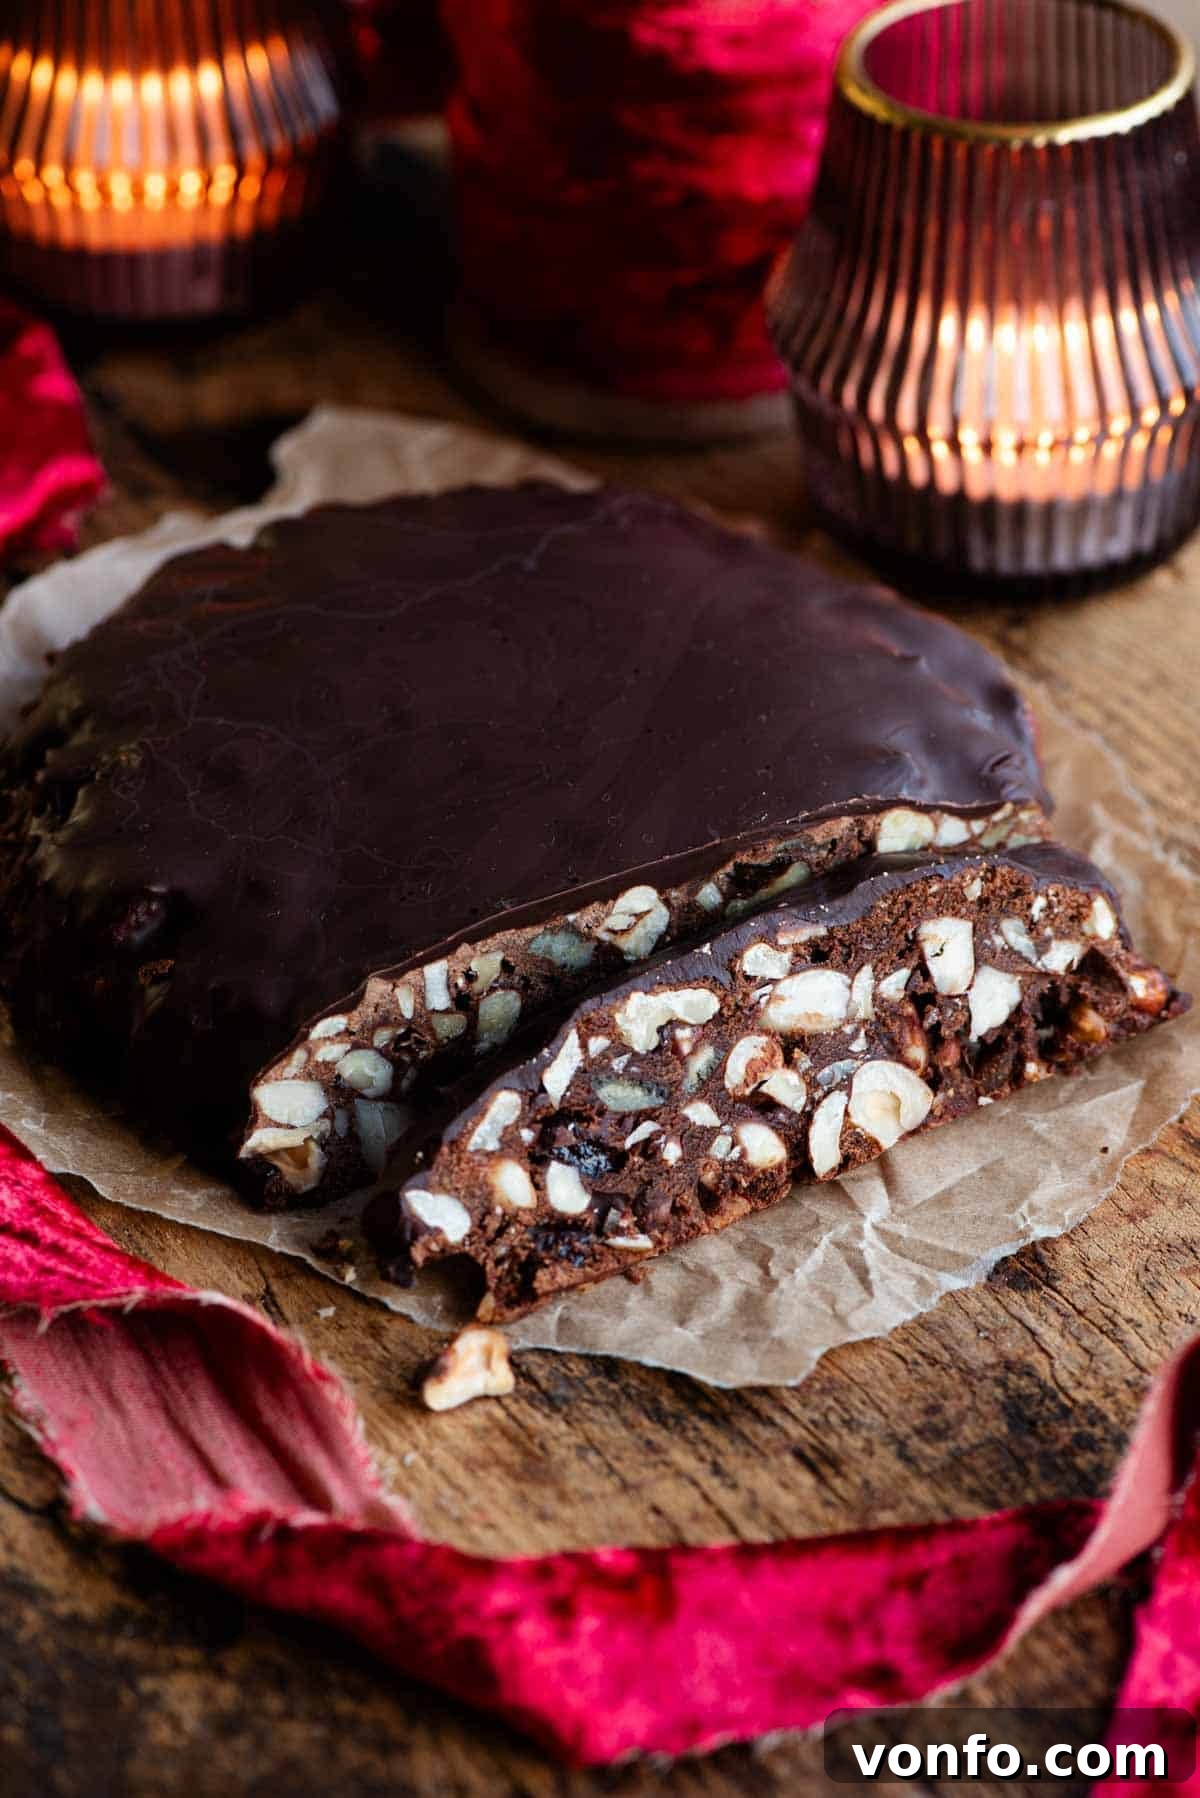
This Christmassy treat is renowned for its wonderfully dense and slightly chewy texture, a satisfying characteristic that makes each bite a delightful experience. It’s generously packed with sumptuous dark chocolate, an assortment of crunchy nuts, and subtle bursts of dried fruit and aromatic spices. Panpepato is not just a cake; it’s an edible piece of Italian heritage, offering a truly unique flavor profile that sets it apart from other holiday desserts. It’s the kind of cake that invites you to slow down, savor each mouthful, and truly connect with the festive season.
Beyond its exquisite taste, Panpepato offers practical advantages that make it an ideal choice for holiday baking. It is remarkably easy to prepare, requiring no complicated techniques or extensive baking skills. Furthermore, its robust composition allows it to last for an extended period, meaning you can bake it well in advance of Christmas and enjoy it throughout the festive season. This longevity makes it perfect for gifting or for having on hand to serve alongside a steaming cup of coffee, a rich espresso, or a comforting hot drink on a chilly winter day. Once you master this classic recipe, you’ll find yourself inspired to experiment with different dried fruits, nuts, and spices, crafting your own unique family version of this timeless Italian delight.
Why You’ll Adore This Authentic Panpepato Recipe
- A Taste of Italian Tradition: Experience an authentic Renaissance-era Christmas dessert, bringing a unique historical and cultural flavor to your holiday table.
- Effortlessly Elegant: Despite its sophisticated flavor and appearance, this Panpepato recipe is incredibly simple to follow, perfect for bakers of all skill levels.
- Rich & Complex Flavor Profile: Enjoy the harmonious blend of robust dark chocolate, earthy nuts, sweet dried fruits, aromatic spices, and that distinctive, subtle warmth from black pepper.
- Perfect for Gifting: Its long shelf life and exquisite presentation make Panpepato an ideal homemade Christmas gift for friends and family.
- Versatile Indulgence: Whether paired with coffee, a digestif, or simply enjoyed on its own, Panpepato is a versatile treat for any festive occasion.
Perfect Pairings and Serving Suggestions for Panpepato
Panpepato, with its rich and complex flavors, is a versatile dessert that can be enjoyed in many delightful ways. Traditionally, it’s served in thin slices, allowing its dense texture and concentrated taste to be fully appreciated. Here are some serving suggestions to elevate your Panpepato experience:
- With Coffee or Espresso: A classic Italian pairing. The intensity of a freshly brewed espresso or a strong coffee beautifully complements the chocolate and spice notes of Panpepato.
- Alongside a Digestif: For an authentic Italian finish to a holiday meal, serve Panpepato with a digestif such as Vin Santo, Grappa, or a sweet Marsala wine. The sweet wine enhances the fruit and honey, while the stronger spirits cut through the richness.
- As Part of a Festive Platter: Arrange thin slices of Panpepato on a platter with other Italian Christmas cookies like Ricciarelli or Cuccidati, and perhaps some candied fruit or roasted nuts for an impressive holiday spread.
- Simple & Elegant: Sometimes, the best way to enjoy Panpepato is simply on its own, allowing its unique combination of textures and flavors to shine. Its rich character means a small slice is incredibly satisfying.
- Gift-Worthy Presentation: Wrap a whole Panpepato or several slices in festive cellophane or a decorative box. It makes a thoughtful, homemade gift that truly conveys the spirit of Italian Christmas.
Essential Ingredients for Authentic Panpepato
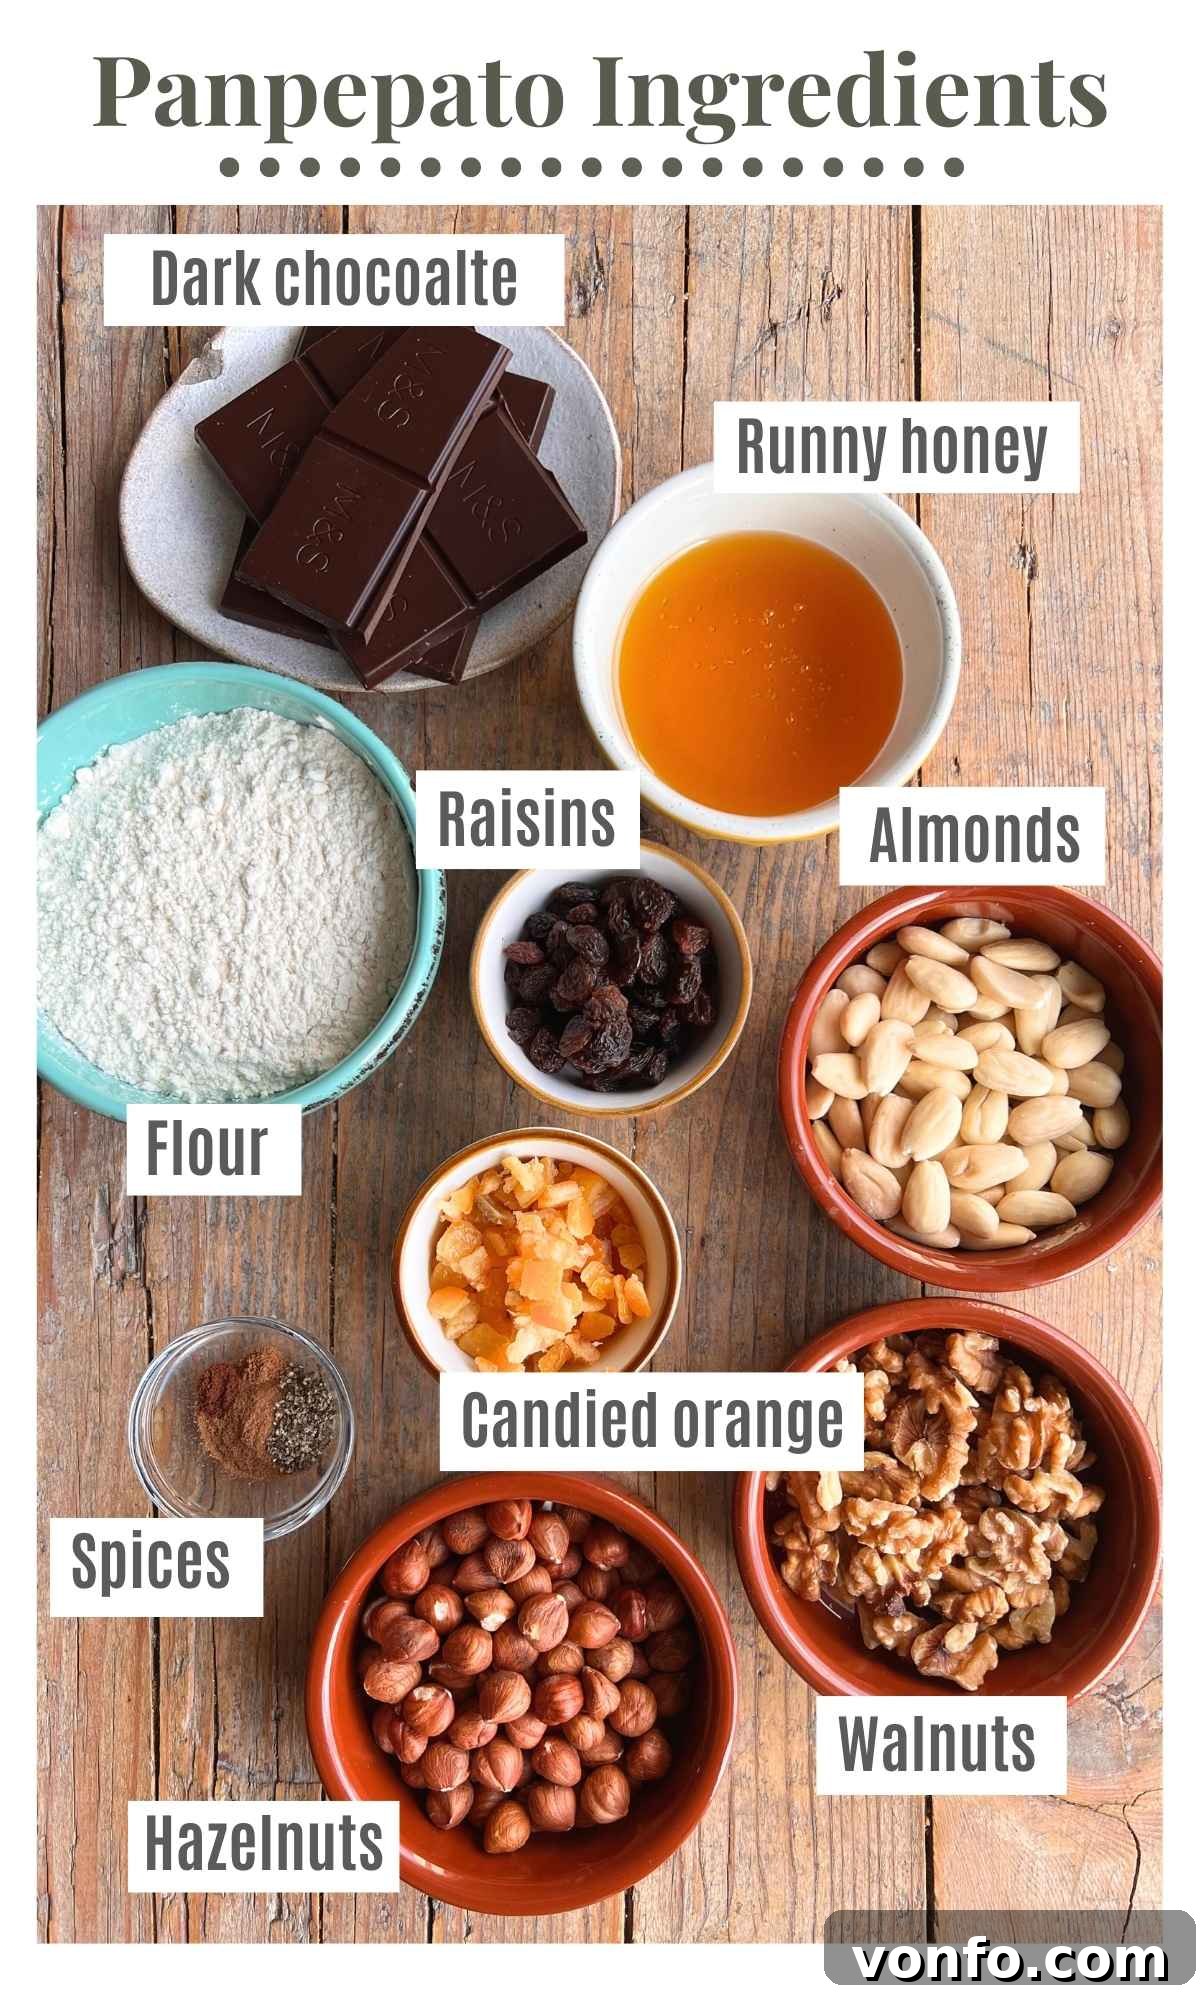
Crafting the perfect Panpepato starts with selecting the right ingredients. Here’s a detailed look at what you’ll need, along with expert tips and potential substitutions to help you achieve the best results.
Key Ingredients and Expert Tips:
- Dark Chocolate: For the most authentic and robust flavor, opt for a high-quality dark chocolate with at least 70% cocoa content. Its slight bitterness beautifully complements the sweetness of the honey and dried fruits. While the recipe calls for dark chocolate throughout, if you prefer a milder topping, you can certainly switch to milk or even white chocolate for the final glaze. However, for the cake mixture itself, dark chocolate is highly recommended for its depth.
- Honey: Use a runny honey for ease of melting and incorporating into the mixture. The type of honey can subtly influence the flavor profile; a delicate acacia honey will yield a lighter taste, while a robust wildflower honey will add more character.
- Raisins & Candied Fruit: Raisins are essential, but the type of candied fruit is flexible. Candied orange peel is traditional, offering a bright citrusy note. Feel free to experiment with other candied fruits like citron, cherries, or even mixed peel to customize your Panpepato to your liking. Soaking the raisins in hot water beforehand is crucial to plump them up, ensuring they remain juicy and tender within the dense cake.
- Assorted Nuts: A medley of nuts is characteristic of Panpepato. Whole hazelnuts, blanched almonds, and walnuts provide a delightful variety of textures and nutty flavors. For best results, use fresh, unroasted nuts and chop them yourself. You can achieve a rough chop with a sharp knife or use a food processor for a few quick pulses to get the desired consistency – not too fine, as you want some textural bite.
- Flour: While traditional Italian 00 flour is ideal for its fine texture, high-quality all-purpose (plain) flour works perfectly well as a substitute, ensuring a smooth and cohesive cake mixture.
- Ground Spices: The aromatic blend of ground cloves, nutmeg, and cinnamon is central to Panpepato’s festive character. These spices infuse the cake with warmth and depth. Spices can be adjusted to personal preference; remember that cloves and nutmeg are particularly potent, so start with the recommended amounts and taste the mixture before adding more. It’s better to add a little more than to over-spice.
- Freshly Ground Black Pepper: This is the defining ingredient of “peppered bread.” Do not skip it! For the most authentic and vibrant flavor, always use freshly ground black pepper. Pre-ground, extra-fine pepper often lacks the aromatic punch and can sometimes have a duller taste. The pepper adds a subtle, intriguing warmth that is a signature of this ancient recipe.
Step-by-Step Guide: Crafting Your Homemade Panpepato
Follow these detailed instructions to create a truly irresistible Panpepato. Precision and attention to detail will ensure a perfect festive cake.
Preparation:
- Pre-heat Oven & Prepare Baking Tray: Begin by pre-heating your oven to 180°C (350°F). Line a baking tray with parchment paper, ensuring it covers the entire surface to prevent sticking and aid in easy removal.
- Hydrate Raisins: Place your raisins in a small bowl or ramekin and cover them completely with hot water. Allow them to soak for 10-15 minutes. This step is crucial as it plumps up the raisins, making them soft and juicy, and also provides the essential raisin liquid needed for melting the honey.
- Chop Nuts: While the raisins are soaking, finely chop all your chosen nuts – hazelnuts, almonds, and walnuts. You can do this by hand with a sharp knife for a more rustic texture or use a food processor with a few quick pulses for a more consistent, yet still chunky, chop. Set aside the chopped nuts.
Making the Panpepato Mixture:
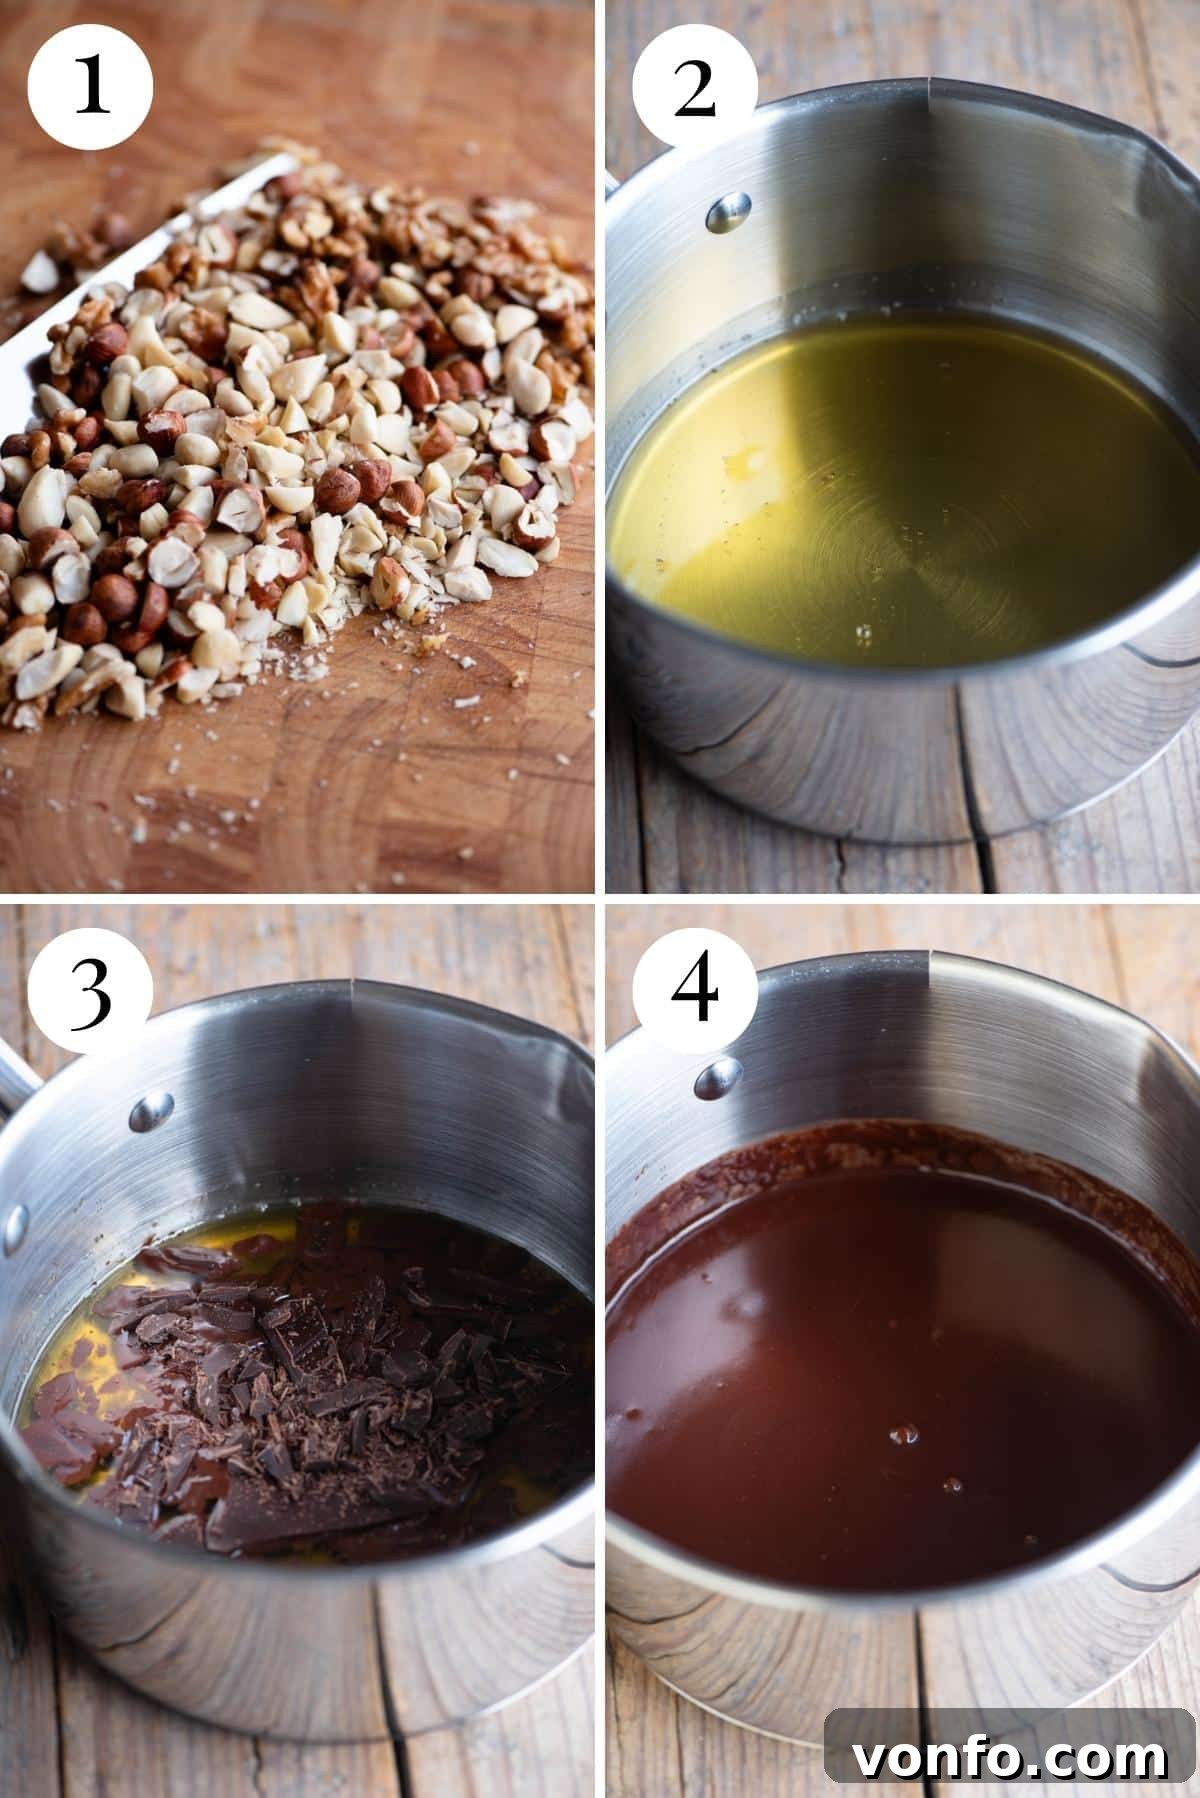
- Melt Honey: In a medium saucepan, combine the runny honey with 1 tablespoon of the warm water from the soaked raisins (ensure you have this liquid before draining!). Gently heat the mixture over low heat, stirring continuously, until the honey transforms from a thick, sticky consistency to a thin, liquid state. This usually takes just 1-2 minutes. Be careful not to let it boil, as overheating the honey can affect its flavor and texture.
- Incorporate Dark Chocolate: As soon as the honey is runny, remove the saucepan from the heat. Add 100g of your chopped dark chocolate into the hot honey. Let it sit undisturbed for 1-2 minutes, allowing the residual heat to melt the chocolate. Then, stir vigorously until the chocolate is completely melted and smoothly combined with the honey, creating a glossy, rich base.
- Add Nuts and Fruits: Now, add the finely chopped nuts and candied orange peel (or your preferred candied fruit) to the chocolate-honey mixture. Drain the plumped raisins, squeezing out any excess liquid, and add them to the saucepan as well. Stir everything thoroughly until all the nuts and fruits are evenly coated in the luxurious chocolate mixture.
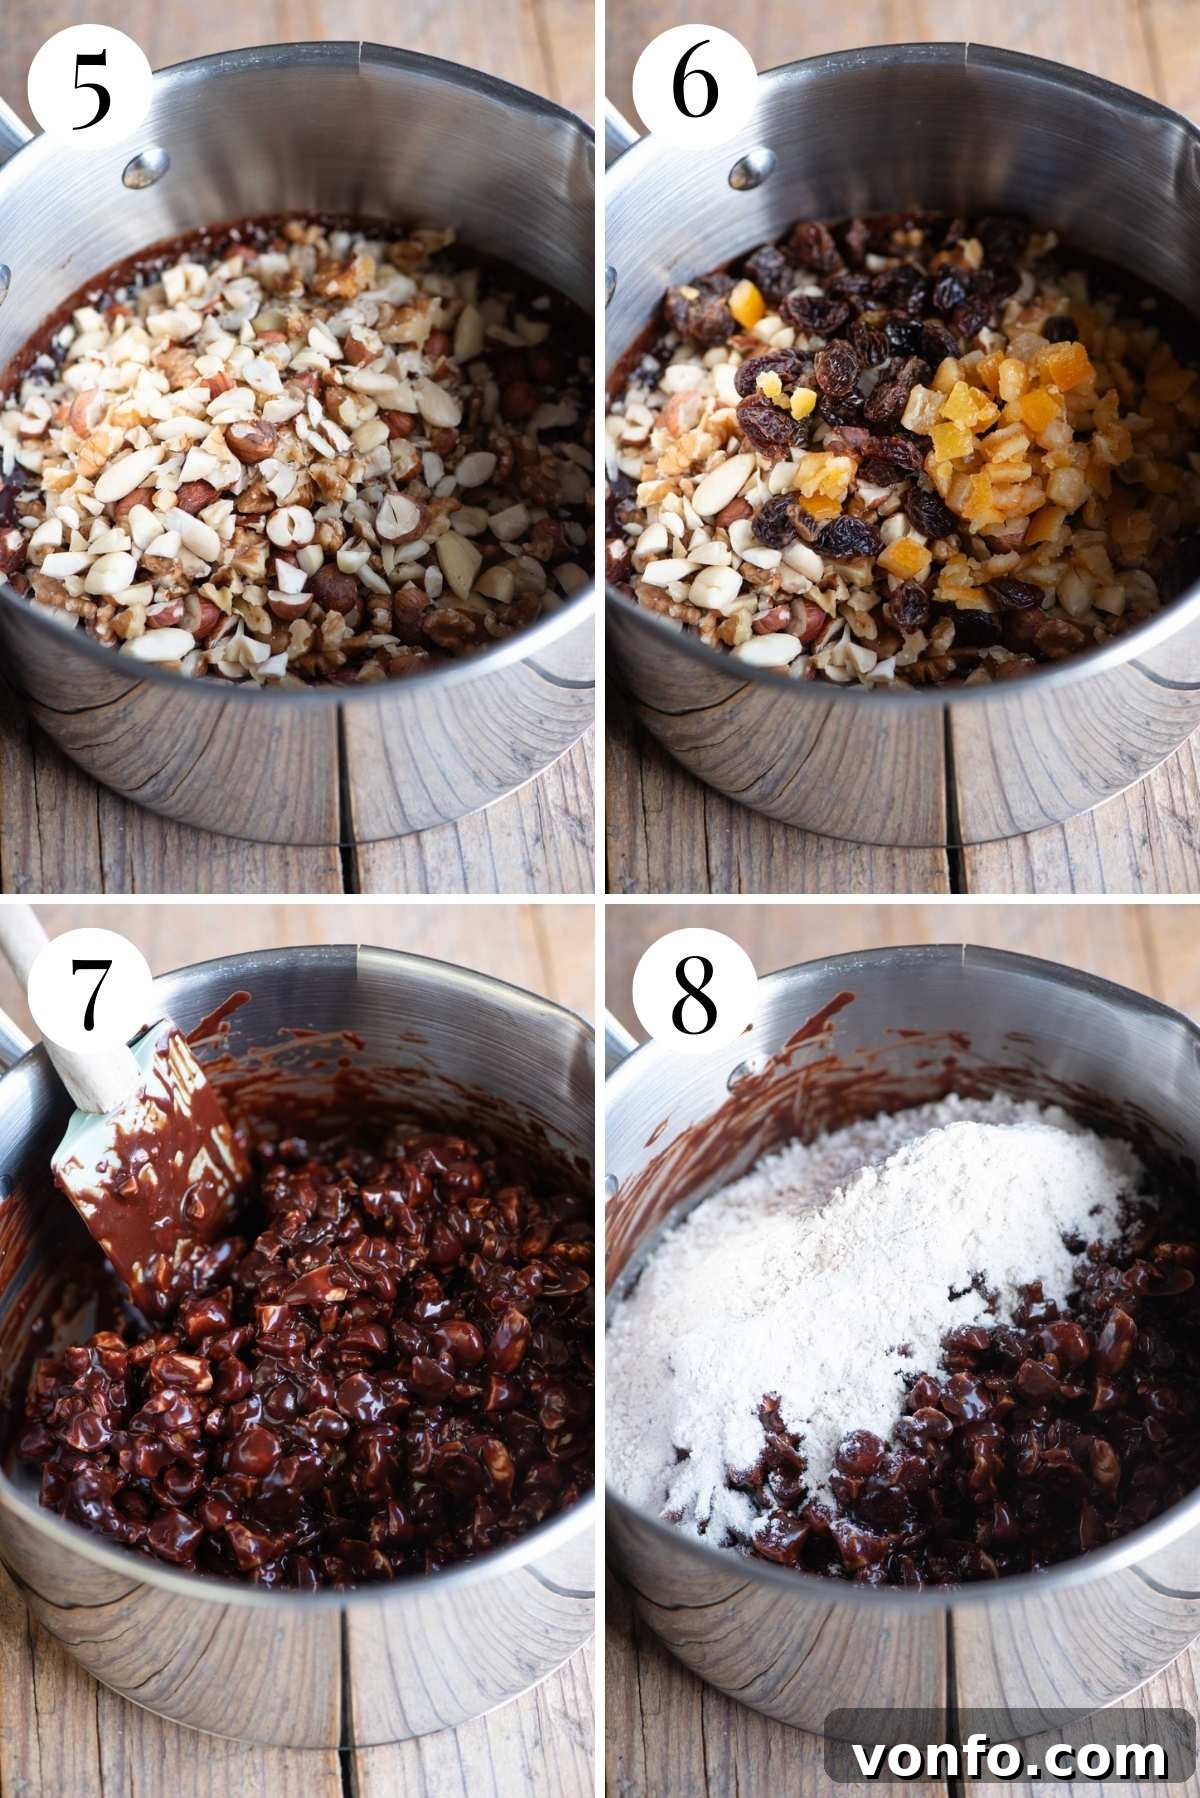
- Combine with Flour and Spices: In a separate small bowl, whisk together the 00 flour (or all-purpose flour), ground cloves, nutmeg, cinnamon, and freshly ground black pepper. This ensures an even distribution of spices throughout the cake. Gradually add this dry mixture to the chocolate, nut, and fruit mixture in the saucepan. Stir diligently until all the dry ingredients are fully incorporated and absorbed, forming a dense, cohesive dough.
Shaping, Baking, and Finishing Panpepato:
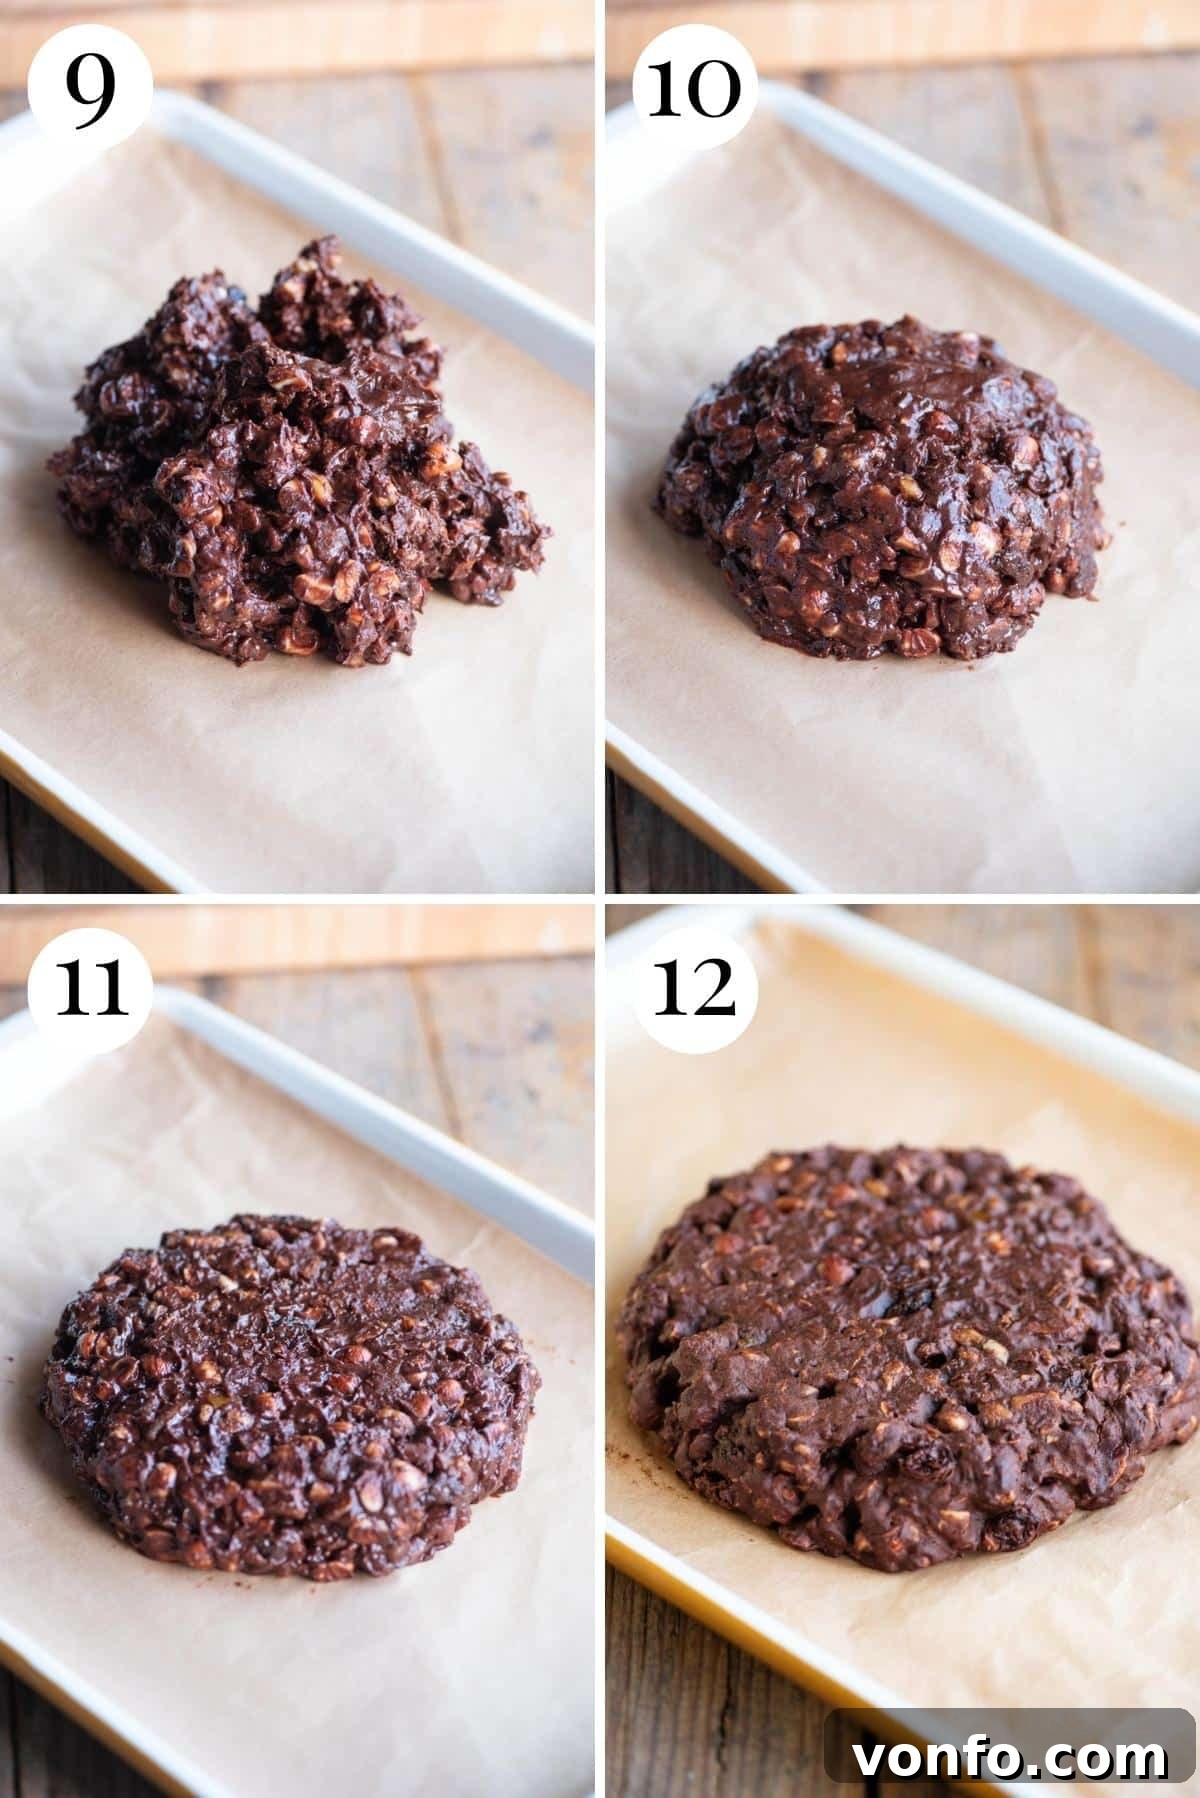
- Shape and Bake: Transfer the dense Panpepato mixture onto the center of your prepared baking tray, forming a mound. To prevent the sticky dough from adhering to your hands, lightly dampen them with water (just a quick rinse and half-dry with a towel works best). Using your damp hands, gently shape the mixture into a distinct dome. Then, press down lightly on the top to flatten it slightly. Bake in the pre-heated oven for approximately 20 minutes. The Panpepato will firm up as it cools, so don’t expect it to be rock hard straight out of the oven.
- Cool Completely: Once baked, remove the Panpepato from the oven and transfer it, still on its parchment paper, to a wire rack. It is absolutely crucial to let the cake cool down completely to room temperature before attempting to add the topping or cut it. This can take a few hours.
- Apply Chocolate Topping: When the Panpepato is entirely cool, it’s time for the final flourish. Melt the remaining 100g of dark chocolate. You can do this gently in a small saucepan over very low heat, stirring constantly, or using a bain-marie (double boiler) method for a smoother melt. Once melted and glossy, pour the warm chocolate evenly over the cooled Panpepato, allowing it to drip slightly down the sides.
- Set and Serve: Allow the melted chocolate topping to set completely. This can be done at room temperature or in the refrigerator for a quicker set. Once the chocolate is firm, use a sharp knife to cut the Panpepato into elegant slices. Serve and enjoy this festive Italian delicacy!
Helpful Tips for Panpepato Success:
- Kitchen Scale for Accuracy: For the most consistent and best results, it is highly recommended to use a kitchen scale to weigh all your ingredients, especially flour and chocolate.
- Adjusting Spices: Ground cloves and nutmeg are potent. While the recipe provides a good starting point (1/8 teaspoon for cloves), you can always taste the mixture after incorporating all ingredients and add another 1/8 teaspoon of cloves if you desire a stronger spice profile. Always err on the side of less, as you can add but not remove.
- Shaping with Damp Hands: The mixture is sticky. Rinsing your hands and then patting them half-dry before shaping is key to preventing the dough from sticking. Avoid overly wet hands, which can introduce too much moisture.
- Fresh Black Pepper: As mentioned in ingredients, use freshly ground black pepper for a superior aroma and taste that truly honors the “peppered bread” tradition.
- Decorating Your Panpepato: For an extra festive touch, after pouring the melted chocolate topping, you can adorn the cake with additional candied fruit pieces, whole nuts, or even a dusting of cocoa powder or powdered sugar before the chocolate sets.
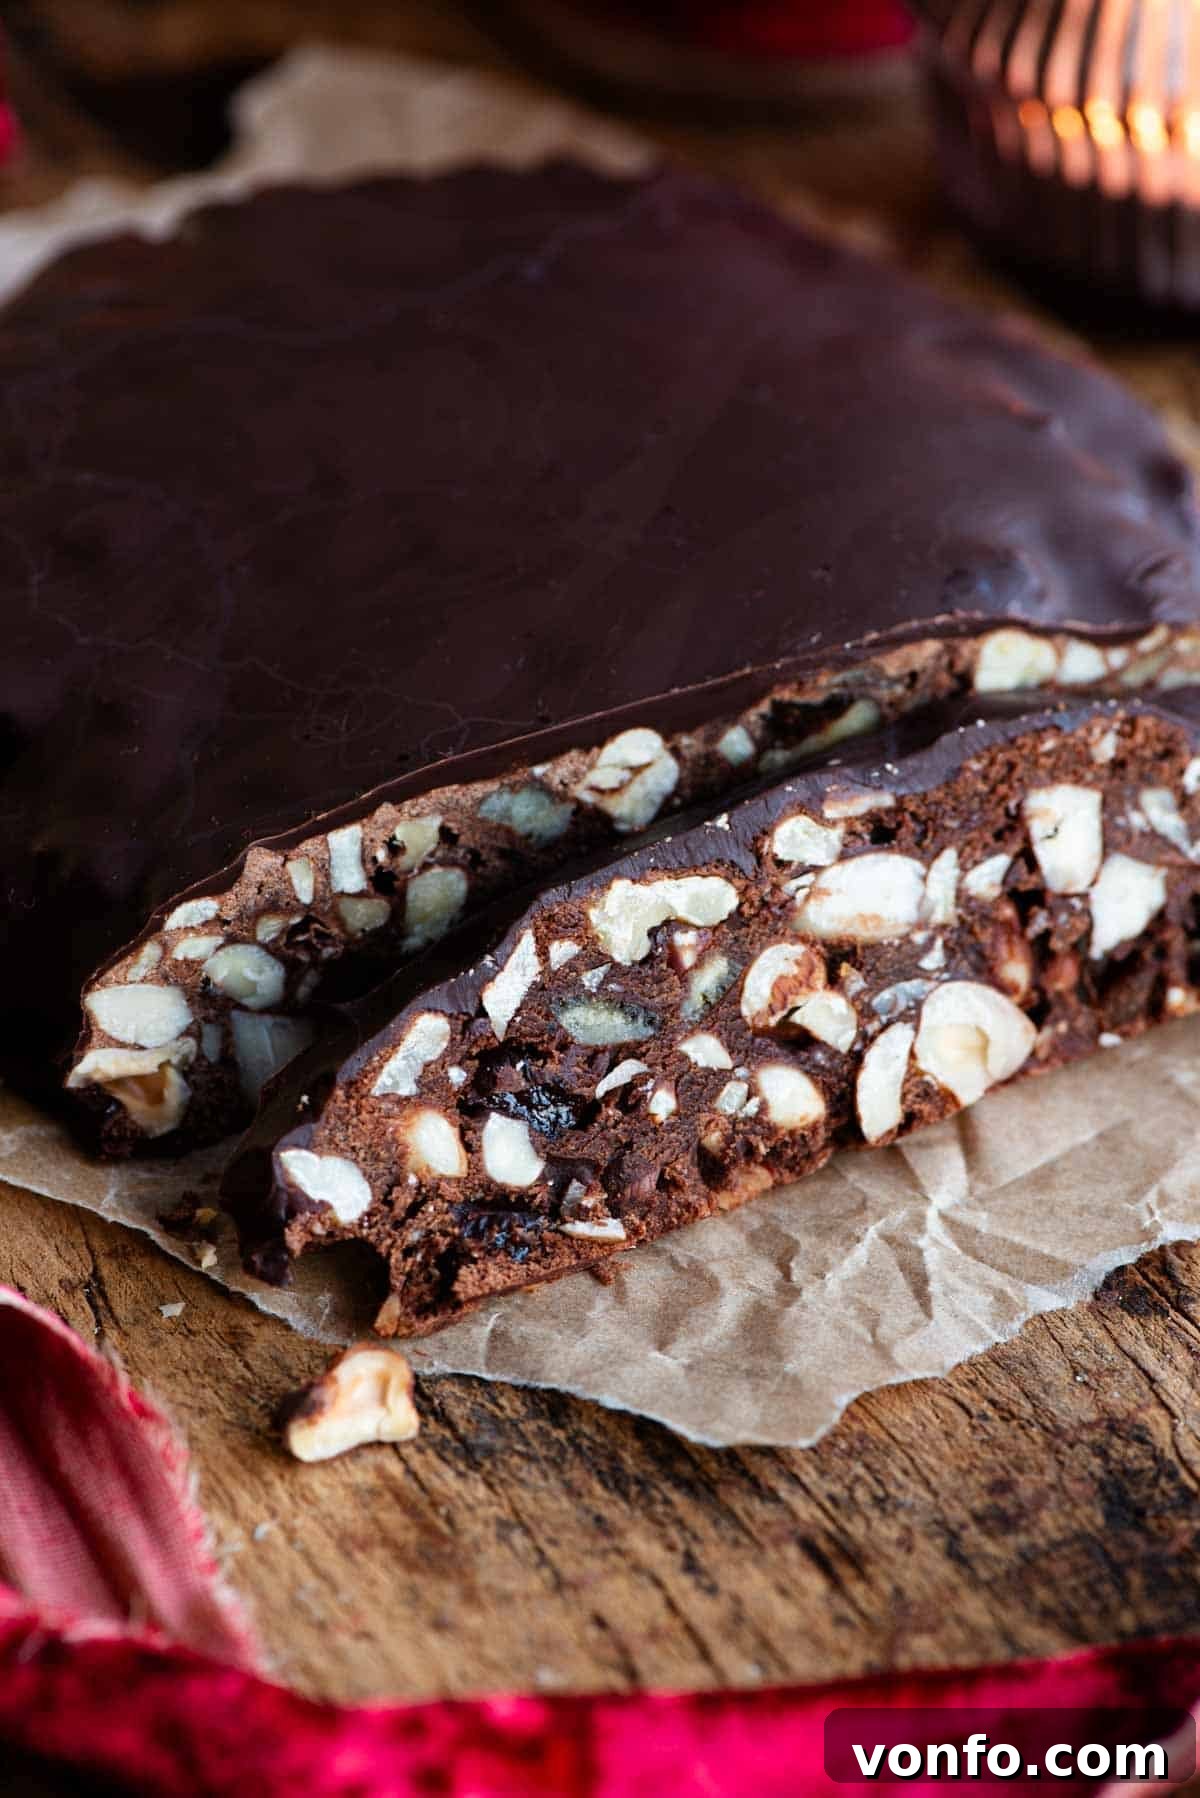
Storage and Make-Ahead Tips for Panpepato
One of the many virtues of Panpepato is its excellent keeping quality, making it an ideal dessert to prepare in advance during the busy holiday season. With proper storage, you can enjoy this delightful cake for weeks, or even months!
- Room Temperature Storage: Once cooled and the chocolate topping has set, wrap the Panpepato tightly in aluminum foil, then place it in an airtight container. Stored at room temperature, it will remain fresh and delicious for up to 3 weeks. Its flavors tend to deepen and meld beautifully over time.
- Freezer Storage: For longer preservation, Panpepato freezes exceptionally well. Wrap the entire cake or individual slices securely in several layers of plastic wrap, then an additional layer of aluminum foil. Place it in a freezer-safe bag or container. It can be frozen for up to 3 months.
- Thawing: To enjoy frozen Panpepato, simply remove it from the freezer and let it defrost completely at room temperature. This usually takes a few hours for a whole cake or about an hour for individual slices.
- Make-Ahead Convenience: Because it stores so well, Panpepato is perfect for preparing days or even weeks before Christmas. This frees up valuable time closer to the holidays, allowing you to focus on other festive preparations.
More Italian Christmas Dessert Inspirations
If you enjoyed crafting this delicious Panpepato, you might be interested in exploring other traditional Italian Christmas recipes that capture the magic of the holiday season. From rich fruitcakes to delicate cookies, Italian festive baking offers a treasury of delightful treats.
Italian Desserts
Panforte – Tuscan Fruit and Nut Cake
Christmas
Italian Almond Cookies (Ricciarelli)
Italian Cookies
Cuccidati (Italian Fig Cookies)
Italian Desserts
Struffoli – Italian Honey Balls
Share Your Panpepato Experience!
We hope you thoroughly enjoyed preparing and tasting this authentic Panpepato recipe. Your culinary feedback is invaluable to us and helps other home bakers discover delicious new treats. If you’ve tried this recipe, we’d love to hear about your experience in the comments below! Don’t forget to connect with us on social media to see more of our delicious Italian food. Follow us on Facebook, Instagram, and Pinterest, or subscribe to our Newsletter for weekly recipe updates directly to your inbox!
Panpepato (Traditional Italian Christmas Spiced Chocolate Cake)
By Emily
Prep Time: 15 minutes
Cook Time: 25 minutes
Total Time: 40 minutes
Yields: 15 servings
Panpepato is a delicious Christmas spiced chocolate cake originating from Ferrara, Emilia Romagna. This festive Italian treat is generously filled with chopped nuts, dried fruit, honey, and a unique touch of black pepper, all elegantly coated with melted dark chocolate. It’s surprisingly easy to make and promises a delightful, authentic Italian holiday flavor.
Ingredients
- 110 g (1/3 cup) runny honey
- 40 g (1/4 cup) raisins, soaked
- 75 g (1/2 cup) whole hazelnuts
- 75 g (1/2 cup) whole blanched almonds
- 55 g (1/2 cup) walnuts
- 1 tablespoon raisin liquid (from soaking raisins)
- 40 g (1/4 cup) chopped candied orange peel (or candied fruit of choice)
- 1/8 – 1/4 teaspoon ground cloves (adjust to taste)
- 1/8 teaspoon ground nutmeg
- 1/2 teaspoon cinnamon
- 1/2 teaspoon ground black pepper (freshly ground recommended)
- 95 g (3/4 cup) 00 flour (or all-purpose flour)
- 100 g (3.5oz) dark chocolate, 70% cocoa, chopped
For the Topping:
- 100 g (3.5 oz) dark chocolate, 70% cocoa
Instructions
- Pre-heat your oven to 180°C (350°F) and line a baking tray with parchment paper.
- Place the raisins in a small bowl and cover them with hot water. Allow them to soak for 10-15 minutes to plump up.
- Meanwhile, roughly chop all the nuts (hazelnuts, almonds, walnuts) with a knife or by pulsing them a few times in a food processor. Set aside.
- In a saucepan, gently heat the runny honey with 1 tablespoon of the raisin water. Stir until the honey becomes thin and runny, which takes about 1-2 minutes. Do not let it boil.
- Remove the saucepan from the heat. Add 100g of the chopped dark chocolate. Let it sit for 1-2 minutes, then stir until the chocolate is completely melted and smoothly combined with the honey.
- Add the chopped nuts and candied orange peel to the chocolate mixture. Drain the soaked raisins, squeezing out any excess liquid, and add them as well. Stir everything until well coated.
- In a separate bowl, mix the flour with all the ground spices (cloves, nutmeg, cinnamon) and freshly ground black pepper. Add this dry mixture to the chocolate, nut, and fruit mixture. Stir thoroughly until all the flour is absorbed and a dense dough forms.
- Transfer the dough to the center of your lined baking tray. Dampen your hands slightly (rinse and half-dry) to prevent sticking. Shape the mixture into a dome, then gently flatten the top.
- Bake in the pre-heated oven for 20 minutes. Remove and allow the Panpepato to cool completely on a wire rack.
- Once the Panpepato is completely cool, melt the remaining 100g of dark chocolate. You can use a small saucepan over very low heat or a bain-marie.
- Pour the melted chocolate evenly over the cooled Panpepato. Let the chocolate topping set at room temperature or in the refrigerator.
- Once the topping is firm, cut the Panpepato into desired slices and serve.
Nutrition Information (Approximate per serving)
- Calories: 225 kcal
- Carbohydrates: 23 g
- Protein: 4 g
- Fat: 14 g
- Saturated Fat: 4 g
- Polyunsaturated Fat: 3 g
- Monounsaturated Fat: 6 g
- Trans Fat: 0.005 g
- Cholesterol: 0.4 mg
- Sodium: 8 mg
- Potassium: 234 mg
- Fiber: 3 g
- Sugar: 12 g
- Vitamin A: 8 IU
- Vitamin C: 1 mg
- Calcium: 36 mg
- Iron: 2 mg
Nutrition information is automatically calculated and should be used as an approximation.
General Culinary Notes and Recommendations
To ensure the highest quality and best results in all your culinary endeavors, please keep the following general recommendations in mind, which are consistent across many of our recipes:
- Unless otherwise specified, extra virgin olive oil is our preferred choice for its superior flavor and health benefits.
- For any recipe requiring canned or jarred tomatoes, we highly recommend using premium brands like Cirio or Mutti to achieve the finest flavor and texture.
- Unless specific sizes are mentioned, assume all vegetables used in our recipes are of medium size.
- All our recipes are meticulously tested and developed using a fan-assisted (convection) oven, which may affect baking times and temperatures if using a conventional oven.
- For details on how our nutrition information is calculated, please refer to our Privacy Policy page.
- Discover essential ingredients that form the backbone of Italian cooking by checking out our Italian Pantry Staples guide.
- Equip your kitchen for authentic Italian cooking with our comprehensive list of Essential Kitchen Tools for Italian Cooking.